Post pictures, sounds, and VIDEOS of your 3800 or Northstar powered Bonnie/Grand Prix(H & W Body ),Buick( H & C Body ) or Oldsmobile( H,C,G & W Body ) here. We want to see 'em! (Any picture or video files must be posted on a server somewhere to be linked here). Also post pics of Regional or National meets. THERE IS A 25-PIC LIMIT PER PAGE IN THIS FORUM. ADDITIONAL PICS MUST BE LINKS TO AN ALBUM OR TO INDIVIDUAL PICS. Meets are exempt from this restriction.
BonneMe wrote:I'd clean off those pans and see if you've got a leak somewhere, of if that's just our typical MN winter grime buildup.
I'd also attack that rust in the trunk with a grinding wheel and POR-15. Looks like a fairly solid car with a few things you can fix, be sure to meet up with the MN folks when we have a meet!
I plan on cleaning up the underside of the drivetrain, but not until spring.
I also plan on fixing the rust in the trunk pan. I just hope that I don't put a hole in it wire-brushing it....
What do you think about POR-15 on the entire underside???
I'd love to make it to a MN or a WI meet! Hopefully there's one close by soon!!!!
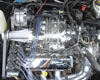
crash93ssei wrote:Car is coming along very nice! Those plugs were NASTY!!!!
That could have been caused from knock / detonation from a previous owner not using premium fuel, or just old beat up plugs in general.
I can't believe the car made it 1.5hrs home and for an hour test-drive all in the same day! I guess I won't worry about them too much then.
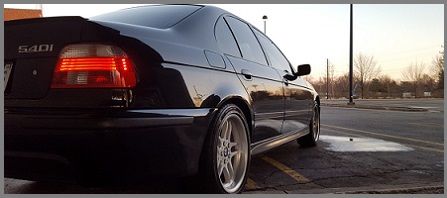
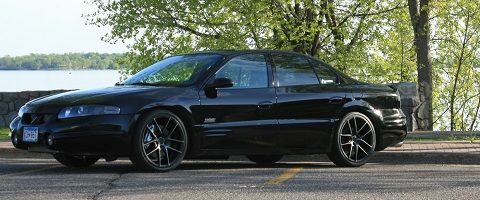
Hotwheels wrote:Love the car - one of my favorite color/wheel combos. I was actually arranging having my father in law getting an identical blue '02 SSEi with bent 5's out in UT for me, but it sold today.
Looks like it's coming along nicely - looks really clean underneath for a MN car. Looking forward to seeing the progress!
Rats! The only other color that I really liked more was the green with tan interior, but I only saw 1 of those and it was in Indiana.
I'm really excited with the outcome of my 2 projects (as small as they may be). It's giving me confidence and hopes that I can find my leaks and fix them too. In the spring, I want to polish the entire car and wheels. The front bumper is looking a little wind whipped/sand blasted and the hood has herpes. I'll probably talk to my buddy's dad and see if he will teach me how to fix and paint them properly.
Matthew
1998 Chevy K1500 Silverado Z71 ECSB L31 -- project/toy
1998 Chevy S10 ZR2 ECSB L35 5spd -- winter truck
2002 Pontiac Bonneville SSEi -- stock (trying to keep it that way...we'll see...)
Some people here have used POR-15 I think. I used truck bedliner as a base, and put some rubberized undercoating on top of that in the wheel wells on the SSEi. I want to use POR-15 on my next project.
Boost addict
The Fleet: '93 SSEi - Twincharged + manual Build thread '97 Camaro - Top swap '05 STS - V8, AWD, her DD '92 Trofeo - Fair weather DD '99 Montana - top swap 3800 '04 Sierra 2500HD - LLY Duramax
POR-15 on the entire underside is going to pretty cost prohibitive and require quite a lot of prep. Best off to use it on problem areas, and stop leaks that turn to puddles and cause rust problems in the future as well.
Jason Z - Exposed Autos
2001 BMW 330i- Titanium Silver - Sport Package - 3 Pedals - Koni Yellow/H&R Sport 2006 Volkswagen GTI - (gone) Tornado Red - DSG, Stage II~280hp/325tq 1993 Pontiac Bonneville - (gone) Purple Pearl H4U/SLE. Loud
Those plugs were nasty! Glad you got them changed out.
I'd just get a pint of POR and spot-treat at this point.
Your changer magazine hit the mail yesterday, hopefully it gets there today or tomorrow. Now you'll have tunes!
Bye Bye: RIP sandrock
Sirius wrote:Think about it. You’re tooling down the road in your Prius, knowing full-well that this thing being green is as big a sham as federally mandated ethanol-enriched gas, Russia pulling out of Ukraine, and Obamacare.
Had extra time after work and it was relatively decent out so I decided to pull out the seats, console, and carpet. Seats were a breeze, especially with another person to remove them. The center console was an entirely different beast.... This is my first time doing this so it was hard, but then became super easy as I found some good info on here as to how to go about removing it. 00Beast, I know I saw a post somewhere from you that really helped.
I'm not gonna bore you with carpet pics. The carpet is in pretty good shape. I'll shampoo it another time. For now, I'm going to focus on the floor itself.
Passenger Side
Driver Side
The padding under the carpet, especially on the passenger side, is soaked. The front driver's is wet, but not as bad, and the rear driver side is just about totally dry. I haven't had a chance to cut into the rubber lining under the dash to inspect the sunroof drains yet.
Any ideas as to how long it will take for the carpet padding to dry out? It's inside the house laying on the floor upside down.
Matthew
1998 Chevy K1500 Silverado Z71 ECSB L31 -- project/toy
1998 Chevy S10 ZR2 ECSB L35 5spd -- winter truck
2002 Pontiac Bonneville SSEi -- stock (trying to keep it that way...we'll see...)
While I was at all this, I decided to investigate my rear passenger side window switch that isn't working and my window lockout button that isn't working. I ohm'd the window switch, trying all combination of pins, and got nothing. Then I tried a known-good switch just to make sure and it tested fine. So I need a new switch.
Then I figured I'd pull apart the driver's main controls and test it....wrong! I tried testing the one button for the window lockout and didn't get any ohm readings. Gonna need a whole new switch panel I guess. This isn't individual switches. Since I dissected it, I figured I'd share.
In this one, you can see the clear plastic pieces that help disperse the light to the switches.
This is what is under the rubber membrane.
This is the bottom side of the circuit board.
Matthew
1998 Chevy K1500 Silverado Z71 ECSB L31 -- project/toy
1998 Chevy S10 ZR2 ECSB L35 5spd -- winter truck
2002 Pontiac Bonneville SSEi -- stock (trying to keep it that way...we'll see...)
I was able to get my utility knife in (and all the wires/connectors out of the way) and cut a flap for the passenger side. I ended up cutting down to where the wire harness comes through the rubber and up along the ridge/bend on the right side. My cuts worked out great, but probably could have gone more to the right of the ridge/bend. The rubber cuts really easy. I went over a few spots 3 or 4 times just to make sure I didn't go too far through it.
Pretty sure I found the main contributor to my water problem.
The lower rubber hose actually ended up being plugged. I stuck a wire (solid copper with insulation on it) down the hose, but couldn't get past about 8" into it. Then I did another search on here and found More Information on Sunroof Drains so I started pulling the wheel well liner out of the car.
Didn't quite get it all the way out, but it still worked fine.
So once I found this little guy, I took a bare copper wire (solid) and started pushing it up into it. What I found was a slimy, pasty sand and water mixture. It took a few times of putting the wire in and taking it out to get the majority of the gunk out. Once it was out, I could push the wire about 8" into it before hitting a bend or something.
Next I flushed out the lower hose using a large syringe (it was actually an old battery acid tester that was missing all the floating balls; seemed to work great for my purpose: getting the water in with not much pressure).
All fixed up with a hose clamp (1/4" to 3/8" that was $0.79 at my local store).
Now I just need to test the whole thing (this drain that is) and make sure its all good.
side note: The underside of my carpet is drying out nicely. I think it should be dry by this time tomorrow. I tried removing the back seat seat back, but one of the bolts holding the seat belt clicker is stuck pretty good. I don't think it has ever been out. I want to get it out so I can vacuum and clean/investigate more.
up next: investigating driver side front sunroof drain
Matthew
1998 Chevy K1500 Silverado Z71 ECSB L31 -- project/toy
1998 Chevy S10 ZR2 ECSB L35 5spd -- winter truck
2002 Pontiac Bonneville SSEi -- stock (trying to keep it that way...we'll see...)
Yesterday, I got the driver side drain taken care of. I was able to flop the park brake pedal assembly out of the way without disconnecting anything. I honestly wasn't expecting this side to be disconnected since the carpet wasn't nearly as wet underneath. Guess I was wrong....
Here's the outlet for this one.
Some other stuff
This looks like it's the temp sensor for the automatic climate. There's one on each side by your feet.
What is this? There's one on each side by your feet also.
Is there supposed to be a trim piece running across here? There's still a gap at the ends of the back of the back seat and it is clipped in properly.
Behind the back seat
Am I missing something here? (broken plastic hanging there by the white pegs)
To me, this looks like it may or may not be factory. There's a red and an orange wire that seem to be spliced into the wire harness and taped up. The connector is also supposed to be clipped to the metal, but it really didn't want to reach the clip.
Matthew
1998 Chevy K1500 Silverado Z71 ECSB L31 -- project/toy
1998 Chevy S10 ZR2 ECSB L35 5spd -- winter truck
2002 Pontiac Bonneville SSEi -- stock (trying to keep it that way...we'll see...)
While I had the seats out, I cleaned them with Mr. Clean Magic Erasers, then in an attempt to recondition/rehydrate them, I got an ice cream bucket of water and dissolved half a bar of Dove soap in it. My logic was if it's supposed to be good for your skin, it could work for leather too. IMO, it did help the seats feel softer and not dried out.
All back together like nothing ever happened (other than cleaner seats, console, plastic along the sides of the doors, and vacuumed carpet).
Everything really went back together really easily and really quick. I could've probably had everything back in in an hour, but I was taking my time and double checking everything.
Here's the covers that hide the bolts for the front seats.
As you can see, the black ones have 2 tabs (or ears) on each of them. You need to pry these up to be able to remove the covers. I used a screwdriver for one hook and a small pick to get the other. Doing this, they slid right off. The interior-colored piece just snaps down.
I also pulled the trunk apart again. I disconnected the rear drains for the sunroof and made sure they were clean. I put my copper wire up both tubes as far as I could (about a foot) and didn't really get anything out. I was able to blow air up them and hear it come out by the sunroof with no problems. In the spring, I might take down the headliner and check everything out just to be safe, but I think most of the issues are the front drains that are now fixed.
Pretty sure I found my trunk leak....
Looking at the bottom of the trunk lid where the seal meets the lid, there is a line of dirt, then it dips where this crease is and it's clean, then the dirt continues on. It seems like the seal is glued on instead of sitting on a piece of steel (a ridge) like the door seals on my trucks do.
Any ideas how to fix this?
Matthew
1998 Chevy K1500 Silverado Z71 ECSB L31 -- project/toy
1998 Chevy S10 ZR2 ECSB L35 5spd -- winter truck
2002 Pontiac Bonneville SSEi -- stock (trying to keep it that way...we'll see...)
Is there supposed to be a trim piece running across here?
Nope
Am I missing something here?
The RIM (rear integration module) has been broken off. Probably by someone that wanted to access it without removing the seat. Its probably hanging down there somewhere.
To me, this looks like it may or may not be factory.
That doesn't look factory to me.
Andrew - owner/operator of Bonnevilles Unlimited 2004 Bonneville GXP | 60k | White Gold Tricoat | custom built supercharged 3800 hot rod | garage queen 1997 Corvette | 57k | Silver Metallic | Z06 wheels | Date-night Hauler/Parts runner 2014 Town & Country Limited | Cashmere Pearl | 115k | Family Hauler 2002 Ram 1500 Quad Cab Sport | Black| 280k | Official Bonneville Hauler
Finally wrapped up a project that took 5 month/5,000mi. This basically started with the car needing tires when I bought it, it was bouncy in the front, and the P/S rack was leaking from every end. I decided to just do everything at once and be done with it.
Front
MONROE 171685 Strut / Coil Spring / Mount Assembly x2
MOOG ES3452 Tie Rod End - outer x2
MOOG K8989 Stabilizer Bar Link - heavy duty design x2
MOOG RK620291 Control Arm - left
MOOG RK620292 Control Arm - front
Cardone 22-1002 Power Steering Rack - incl. inner tie-rods
Rear
MOOG K660168 Rear Suspension Toe Link x2
MOOG 80659 Coil Spring (pair)
MOOG K6690 Stabilizer Bar Link - standard design x2
MOOG K5341 Shock Mount x2
MONROE MA822 Shock Absorber (pair)
Tires
Cooper CS4 235/55R17 V-rated
Other Parts/Materials
Engine cradle - local junkyard
OTC Engine Support - OTC1725
POR15 - 1 pint silver, 1 pint black
POR15 Metal Ready - 1gal
latex gloves
wire wheels
scotchbrite pads
several paint brushes
This all started on April 6, 2013 at 158,696mi with replacing the front struts, front control arms, rear shocks, rear shock mounts, and rear toe links. In the process, I found I had a bent rear toe link on the passenger side and just how wimpy the factory toe links are compared to the Moog ones. No real surprises here other than the front end being higher than a kite.
On August 11, 2013 at 162,827mi I removed and painted the rear cradle. The hardest part of this was the stupid park brake cables and trying to pry apart some clips that hold the halves of the cables together. Needless to say, putting it back together was much easier. With the cradle removed, I also replaced the rear springs to try to level the car out more. Along with painting the cradle, I painted the sway bar, rear toe links, all brackets/hardware for the cradle, and a few spots on the underside of the car that were only accessible with it removed. The cradle was removed on a Friday night, cleaned/prepped/painted on Saturday, and re-installed on Sunday. To put it back in, we put the cradle up on stands and lowered the car back down onto it.
On September 7, 2013 at 163,670mi the front cradle was removed. The OTC support worked great. The hooks reached the engine hooks perfectly and it was definitely up to the task. When I removed it, the engine settled 1/8” to 1/4” even though it wasn’t holding the entire weight. Prior to this, I cleaned/prepped/painted the second one I got from the junkyard. This wasn't really necessary except for an unwelcome surprise I got when I removed my cradle. When we removed the cradle, to my surprise we found the front rear driver's side bushing was completely shot. The metal sleeve that was supposed to be part of the rubber bushing fused itself to the metal cup and ripped out of the bushing. Also, the bolt was severely corroded. Luckily, the cradle I bought had all good bushings in it. Along with the cradle, the P/S rack and outer tie-rod ends were replaced. The biggest problem we ran into was the torx headed bolts at the rear of the cradle that hold the rear mount for the engine/trans to the cradle. We were able to get one of them out, but the other one stripped out the torx head. We ended up welding a nut to it to get it out, then went to Ace and bought 2 new metric (I think 10mmx1.5 and 100mm long) bolts and a couple washers. They were a bit long, but that wasn't an issue at all. I didn't paint the front sway bar due to time and it also cleaned up nicely. We could have had the entire cradle out and back in in about 6hrs, but having to get bolts and a torx socket bit set us back 2hrs along with lunch.
Finally, on September 9, 2013 I took the car in to have the tires mounted, balanced, and the car aligned. Surprisingly, the alignment wasn't off as bad as I thought it would be. I couldn't be happier with the results!!!! The car rides smooth, quiet, and straight. No more highway death-shake either! A great big thanks goes out to my buddy Keith. Without his help and the use of the shop he works at, none of this would have been possible. I can never repay him for all of his help on all my projects.
Any questions, comments, and/or concerns are welcome.
Matthew
1998 Chevy K1500 Silverado Z71 ECSB L31 -- project/toy
1998 Chevy S10 ZR2 ECSB L35 5spd -- winter truck
2002 Pontiac Bonneville SSEi -- stock (trying to keep it that way...we'll see...)
That quick strut, Monroe part # 171685 is the one that everyone has problems with making the car look like a monster truck up front due to an extra coil in the spring over stock. We recently had a member go through this issue and she called Monroe and found out that this strut is not recommended for a Bonneville at all, checking the Monroe website says the same thing, no recommendation for a Bonneville. http://catalog.monroe.com/catalogPart/d ... artDetails
Other then that, it looks fantastic and I would have to imagine rides like a brand new car!
Ryan 2003 Bonneville SSEi - The Black Mirror SOLD! 2002 Bonneville SE - The MuttComplete 2004 SLE interior, drivetrain, and body harness swap, ECC swap, HUD swap, black GXP wheels, GXP headlights and tinted tails - SOLD 2003 BMW 540i M Sport, 2001 BMW X5 4.4i, 2010 GMC Acadia, 2017 Grand Design Imagine 3150BH 1982 Cutlass Supreme - The fun one
MattStrike wrote:It was the worst week of my life! *pause, drinks beer... smiles* But I'm better now!
crash93ssei wrote:That quick strut, Monroe part # 171685 is the one that everyone has problems with making the car look like a monster truck up front due to an extra coil in the spring over stock. We recently had a member go through this issue and she called Monroe and found out that this strut is not recommended for a Bonneville at all, checking the Monroe website says the same thing, no recommendation for a Bonneville. http://catalog.monroe.com/catalogPart/d ... artDetails
Other then that, it looks fantastic and I would have to imagine rides like a brand new car!
I didn't find out about the increased ride height until well after I bought them back in March. Had I known about it, I wouldn't have gone with them. Now I have 5k miles on them and the car is done/aligned so they're not going anywhere. I doubt Monroe or RockAuto would take them back now anyways. I'm just going to roll with them now until they go bad or the ride gets terrible. At that time, which is hopefully long down the road, I'll explore other options.
The car rides amazing! I have absolutely no complaints and am excited as to how everything turned out. All in all, everything was pretty straight forward. A lift definitely helped though.
ga93sle wrote:Suppose it still sits lower than Randy's car? lolol
Hahaha. You know it!!!!!
Dean wrote:Wow, a lot of the same problems I'm having - good to know they can be readily fixed! Keep us updated on those struts.
What problems are you experiencing?
I don't know of anyone else that has found a bad bushing. I'm not sure if the death shake was caused by that or the other things I replaced. Basically, I replaced a lot of stuff so it's hard to pin-point what caused and/or solved what.
Just filled the car up today so we'll see how my MPG's do. Running the fronts at ~35psi and the rears at 30psi.
Matthew
1998 Chevy K1500 Silverado Z71 ECSB L31 -- project/toy
1998 Chevy S10 ZR2 ECSB L35 5spd -- winter truck
2002 Pontiac Bonneville SSEi -- stock (trying to keep it that way...we'll see...)