

grounding bus bars
-
farmermike
- SE Member

- Posts: 16
- Joined: Fri May 01, 2015 9:17 pm
- Year and Trim: 2001 Bonneville
grounding bus bars
Where are all the grounding bus bars on a 2001 Bonneville ?
-
ddalder
- Resident Gearhead

- Posts: 2599
- Joined: Wed Apr 01, 2009 7:11 pm
- Year and Trim: 2004 GXP, 2008 STS, 2020 XT6
- Location: Alberta, Canada
Re: grounding bus bars
There are numerous grounding "Splice Packs".
At the base of the 'A' pillar, behind the door sill trim on each side.
Under both front seats.
Under the rear seat cushion.
In the trunk on each side toward the back near the tail lamp wiring.
This totals eight right off the top of my head, and doesn't include the ones in the engine compartment. Can you be more specific about what you're looking for?
This is an example of what they look like.

Bose Luxury Sound System w/Touch Screen Navigation, Addition of Factory XM, 2005 MY Antenna, OnStar Upgrade (3G),
RainSense Wipers, Backup Camera, '00 Style Door Panel Courtesy Lights, Heated Washer Solvent, 2X Remote Trunk Release,
Turn Signal Mirrors, Center Console Courtesy Lamp, Rear Outboard Heated Seats, PVD Chrome 18" Factory Rims, Upgraded
Carbon Fibre Appearance Interior Trim, Highly Modified Main Body Harness, Instrument Panel, Door, Door Panel & Headliner
Wiring Harnesses, Custom Fuse Box & Tire and Loading Information Decals, Additional Acoustic Insulation[/size][/color]
-
farmermike
- SE Member
- Posts: 16
- Joined: Fri May 01, 2015 9:17 pm
- Year and Trim: 2001 Bonneville
Re: grounding bus bars
Gauges, heater, and radio quit and the car died and didn't restart. Had it towed home and it started and everything worked. this is on top off a ticking noise that went to a major clatter, 1 collapsed lifter and a bad rod bearing. the oil must never have been changed until I got it at 60000 miles then changed every 3000 miles.
Anyway a different motor going in and I want to try to elliminate the electrical problems.
Anyway a different motor going in and I want to try to elliminate the electrical problems.
-
ddalder
- Resident Gearhead
- Posts: 2599
- Joined: Wed Apr 01, 2009 7:11 pm
- Year and Trim: 2004 GXP, 2008 STS, 2020 XT6
- Location: Alberta, Canada
Re: grounding bus bars
I pretty much always suggest starting at the battery and battery connections when there are so many different components involved. Also check connections under the hood at the fuse block and starter. Connections have proven to be the cause for many others in the past with similar complaints. Make sure they are clean and snug with no corrosion hiding underneath the rubber boots. How old is the battery and have you had it properly load tested?
Once the battery and cables have been checked and confirmed solid...
Ground problems in these cars are considered fairly rare because GM used a better splice pack and located them in more strategic locations. Each of the components you describe have grounds at two separate splice packs.
Instrument Panel Cluster - Grounds at splice packs G200 and G201
HVAC Control Module - Grounds at splice packs G200 and G201
Radio - Grounds at splice packs G201 and G300
G200 is located at the base of the 'A' pillar on the driver's side. Remove the LF door sill trim for access.
G201 is located at the base of the 'A' pillar on the passenger side. Remove the RF door sill trim for access.
G300 is located under the carpet, beneath the driver's seat.
It's easy enough to check G200 and G201, but G300 is more difficult. I'll be surprised if you find any problems however. A problem at G300 may cause the radio not to work, but won't affect the others so I don't think it's worth the time and effort at this point to remove the seat.
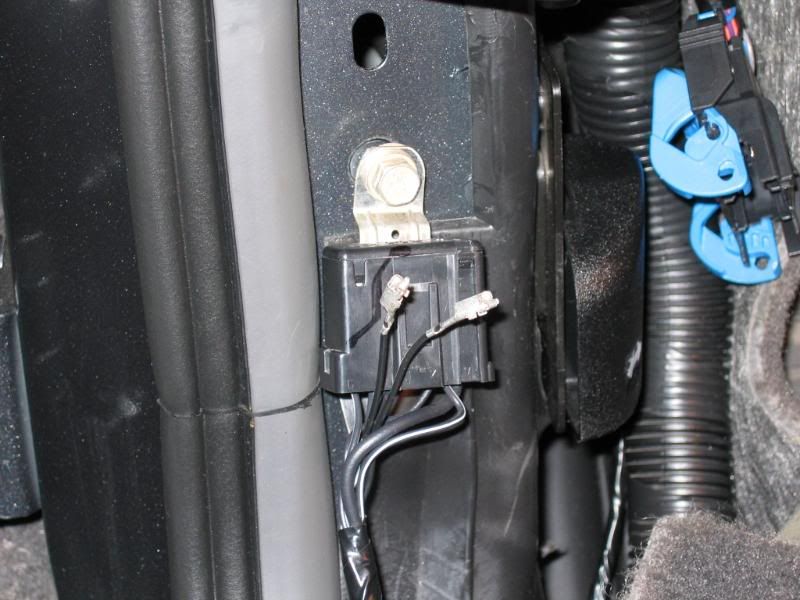
There are a couple of large 40 cavity connectors behind the knee bolster under the steering column. I would check there first to make sure they are secured properly. You may want to disconnect the battery and then remove and reattach the connectors to reseat them. Look for corrosion, terminals that have backed out or other problems while they are apart. These are called LeverLock connectors. You need to pinch two tabs on the back of the connector and while holding them, pull the large blue lever down and toward the rear of the connector to separate the two halves. You can see one half of an 18 cavity LeverLock in the picture I posted above. One of the tabs you need to squeeze to release the lever is at the top of the connector in the photograph. These two connectors are two of three that connect the instrument panel wiring harness to the main body wiring harness.
Once the battery and cables have been checked and confirmed solid...
Ground problems in these cars are considered fairly rare because GM used a better splice pack and located them in more strategic locations. Each of the components you describe have grounds at two separate splice packs.
Instrument Panel Cluster - Grounds at splice packs G200 and G201
HVAC Control Module - Grounds at splice packs G200 and G201
Radio - Grounds at splice packs G201 and G300
G200 is located at the base of the 'A' pillar on the driver's side. Remove the LF door sill trim for access.
G201 is located at the base of the 'A' pillar on the passenger side. Remove the RF door sill trim for access.
G300 is located under the carpet, beneath the driver's seat.
It's easy enough to check G200 and G201, but G300 is more difficult. I'll be surprised if you find any problems however. A problem at G300 may cause the radio not to work, but won't affect the others so I don't think it's worth the time and effort at this point to remove the seat.
There are a couple of large 40 cavity connectors behind the knee bolster under the steering column. I would check there first to make sure they are secured properly. You may want to disconnect the battery and then remove and reattach the connectors to reseat them. Look for corrosion, terminals that have backed out or other problems while they are apart. These are called LeverLock connectors. You need to pinch two tabs on the back of the connector and while holding them, pull the large blue lever down and toward the rear of the connector to separate the two halves. You can see one half of an 18 cavity LeverLock in the picture I posted above. One of the tabs you need to squeeze to release the lever is at the top of the connector in the photograph. These two connectors are two of three that connect the instrument panel wiring harness to the main body wiring harness.
Last edited by ddalder on Wed Jun 14, 2017 12:18 am, edited 3 times in total.
Bose Luxury Sound System w/Touch Screen Navigation, Addition of Factory XM, 2005 MY Antenna, OnStar Upgrade (3G),
RainSense Wipers, Backup Camera, '00 Style Door Panel Courtesy Lights, Heated Washer Solvent, 2X Remote Trunk Release,
Turn Signal Mirrors, Center Console Courtesy Lamp, Rear Outboard Heated Seats, PVD Chrome 18" Factory Rims, Upgraded
Carbon Fibre Appearance Interior Trim, Highly Modified Main Body Harness, Instrument Panel, Door, Door Panel & Headliner
Wiring Harnesses, Custom Fuse Box & Tire and Loading Information Decals, Additional Acoustic Insulation[/size][/color]
-
96 SSEi
- Posts like a Northstar

- Posts: 1813
- Joined: Sun Aug 22, 2010 11:11 pm
- Year and Trim: 2000 Bonniville SSEi L67
- Location: Ontario, Canada
Re: grounding bus bars
YEAH look at the power 'in' at the fuse box to - a multimeter is your best friend!
poverty forces one to do unorthodox things
2000 SSEi
past rides:
1996 SSEi
1992 GTP
1987 Grand Am
2000 SSEi
past rides:
1996 SSEi
1992 GTP
1987 Grand Am
-
farmermike
- SE Member
- Posts: 16
- Joined: Fri May 01, 2015 9:17 pm
- Year and Trim: 2001 Bonneville
Re: grounding bus bars
Thanks for the help. With the motor swap those connections are redone. I'll check the others.
-
Captain Ali
- SLE Member

- Posts: 52
- Joined: Mon Apr 17, 2023 3:51 pm
- Year and Trim: '96 SE
'02 SE
Re: grounding bus bars
These are the first American cars I've had in a good 35 years, so I have a stupid question.
Are the Left and Right "A" pillars the ones that are the most forward and the ground points mounted on them ? I say yes, but want one of you guys to tell me if I am correct or not.
Are the "B" Pillars the center pillars ?
Thanks in advance.
Rich
Are the Left and Right "A" pillars the ones that are the most forward and the ground points mounted on them ? I say yes, but want one of you guys to tell me if I am correct or not.
Are the "B" Pillars the center pillars ?
Thanks in advance.
Rich
-
nos4blood70

- Certified Bonneville Nut

- Posts: 9522
- Joined: Mon May 10, 2010 6:11 pm
- Year and Trim: 2003 SLE
- Location: Chicago, IL
Re: grounding bus bars
Yes, the A pillars are the forward most ones. The sides of the windshield pillars basically.
The B pillar is the center one between the doors.
C pillar is rear most, with the sides of the back windshield.
The B pillar is the center one between the doors.
C pillar is rear most, with the sides of the back windshield.
-Car Guy Carl
"Penelope" - 2003 SLE - 250k Miles
"Sydney" - 2000 Honda S2000 - 101k miles

"Penelope" - 2003 SLE - 250k Miles
"Sydney" - 2000 Honda S2000 - 101k miles
-
Captain Ali
- SLE Member
- Posts: 52
- Joined: Mon Apr 17, 2023 3:51 pm
- Year and Trim: '96 SE
'02 SE
Re: grounding bus bars
Thanks for this, much appreciated.