PontiacBonnevilleClub.com
http://www.pontiacbonnevilleclub.com/forum/

Some pics of my 95 SLE (5/18 Update)
http://www.pontiacbonnevilleclub.com/forum/your-ride-pics-and-videos/topic12270-400.html
Page 21 of 23

Author:  Sirius [ Fri Jul 31, 2020 9:43 am ]
Post subject:  Re: Some pics of my 95 SLE (7/30 Update)

That's pretty impressive, especially when compared to the "before" pic. When do you think you'll paint? Can't wait to see that - the paint should blend everything together nicely.

Author:  95naSTA [ Fri Jul 31, 2020 10:38 am ]
Post subject:  Re: Some pics of my 95 SLE (7/30 Update)

Thanks. I just verbalized my Cali move date as Oct 1 to my work so the goal is to get it to paint before then. I would fly back sometime after it's complete to more or less reassemble and store till I get back permanently. There is no way I could get this thing CARB'd in Cali, so it's not heading out there unfortunately.

Author:  95naSTA [ Sun Aug 02, 2020 11:46 pm ]
Post subject:  Re: Some pics of my 95 SLE (7/30 Update)

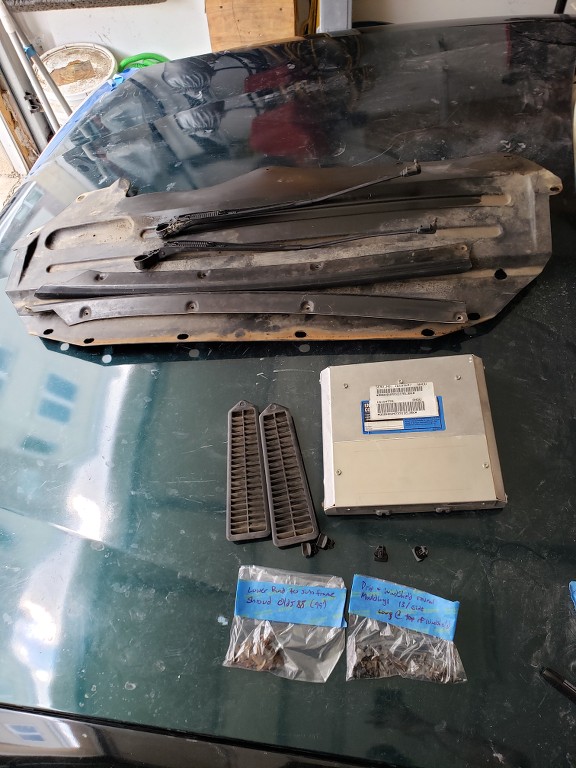
It's probably been 4 years or so since I've been to a junkyard and I have a short list of things I need or want. One of the things I'll need to get the car back together after paint are the drip and windshield reveal molding fasteners. I took them off the car years ago and I have NFC where I put them.. Or which type of screw they even are. With no Bonnevilles at the local u-pull it yards I decided to try Harry's in Pennsburg PA but still no Bonnevilles. Luckily there were a few H-Body cars.

I ended up with all the drip molding fasteners I needed plus a few spares, spare windshield moldings, spare main fuse box fasteners, a 4th spare 94-95 PCM (I've only ever fried one of these in 18 years and it was my fault), spare rear wheel well vents, spare wiper arms, a passenger side fan bracket because the one on my car acquired a crack at some point and a lower rad support to subframe shroud from a 99 Olds since it was in good shape. All that for $60. Not bad considering the PCMs go for $100 on ebay.

Image
Image

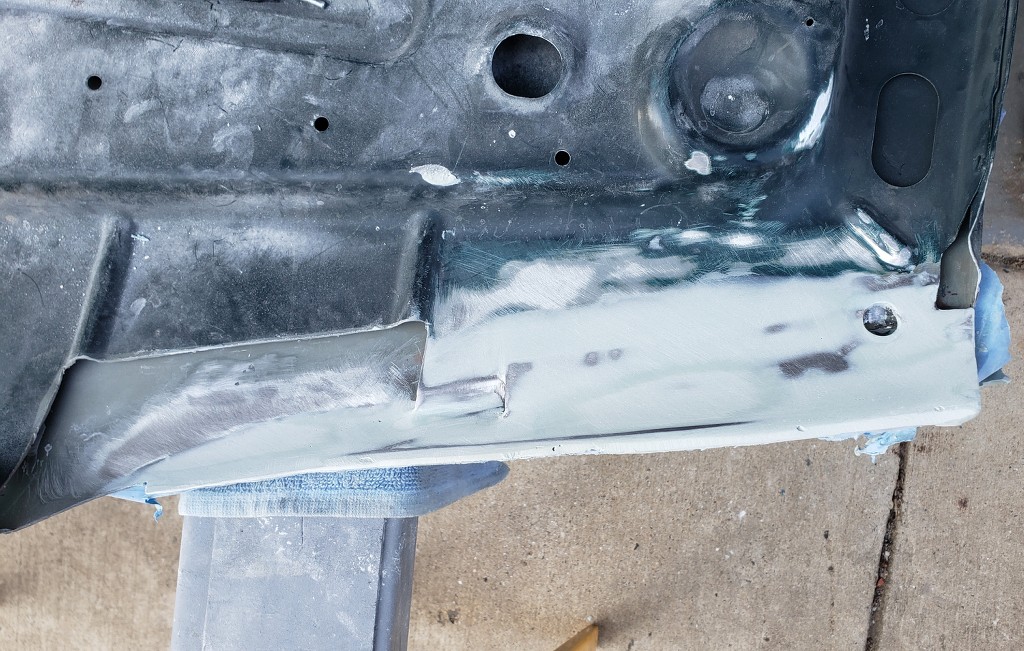
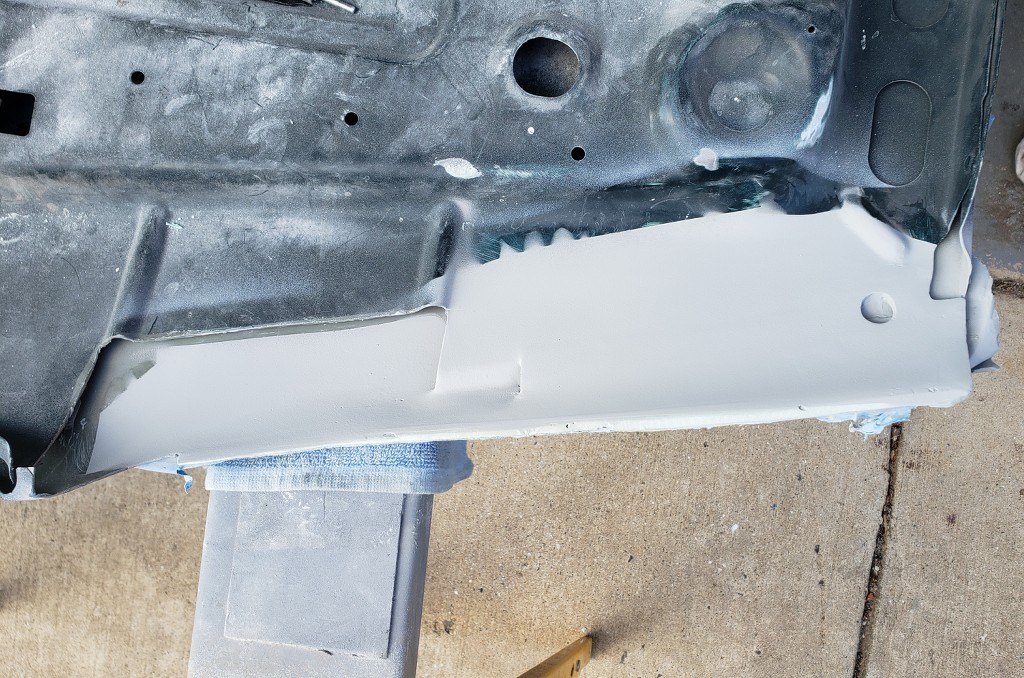
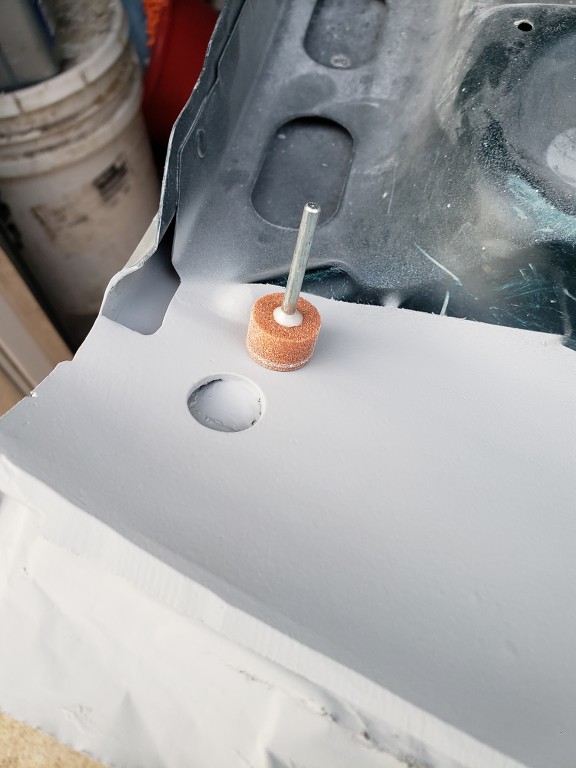
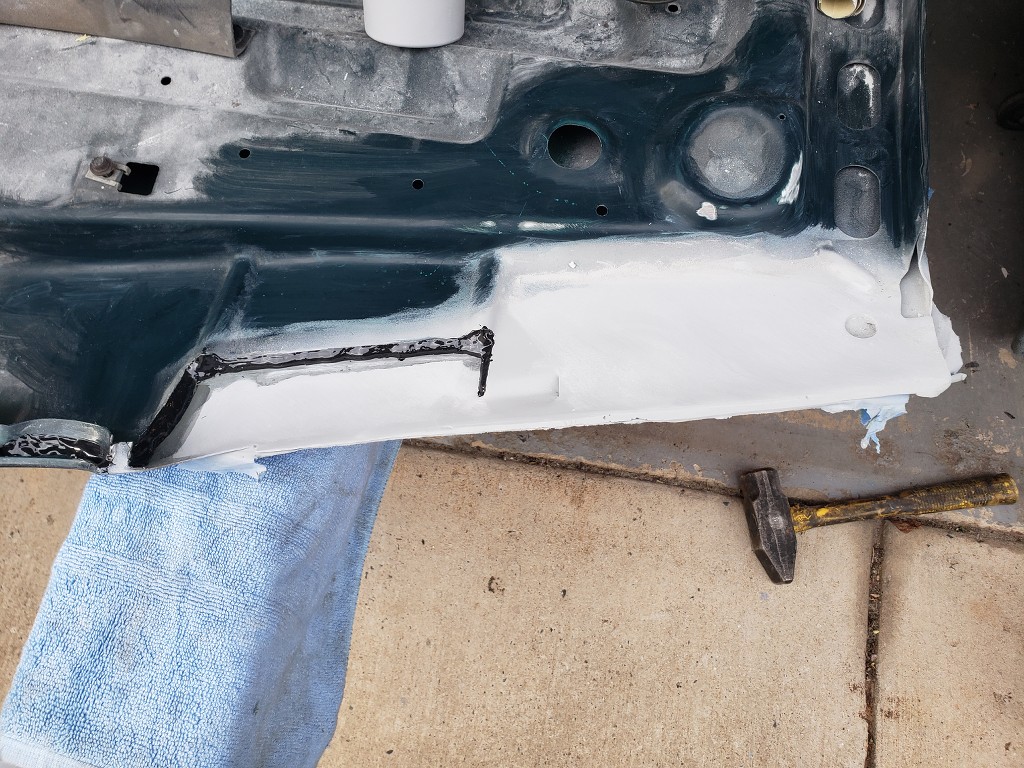
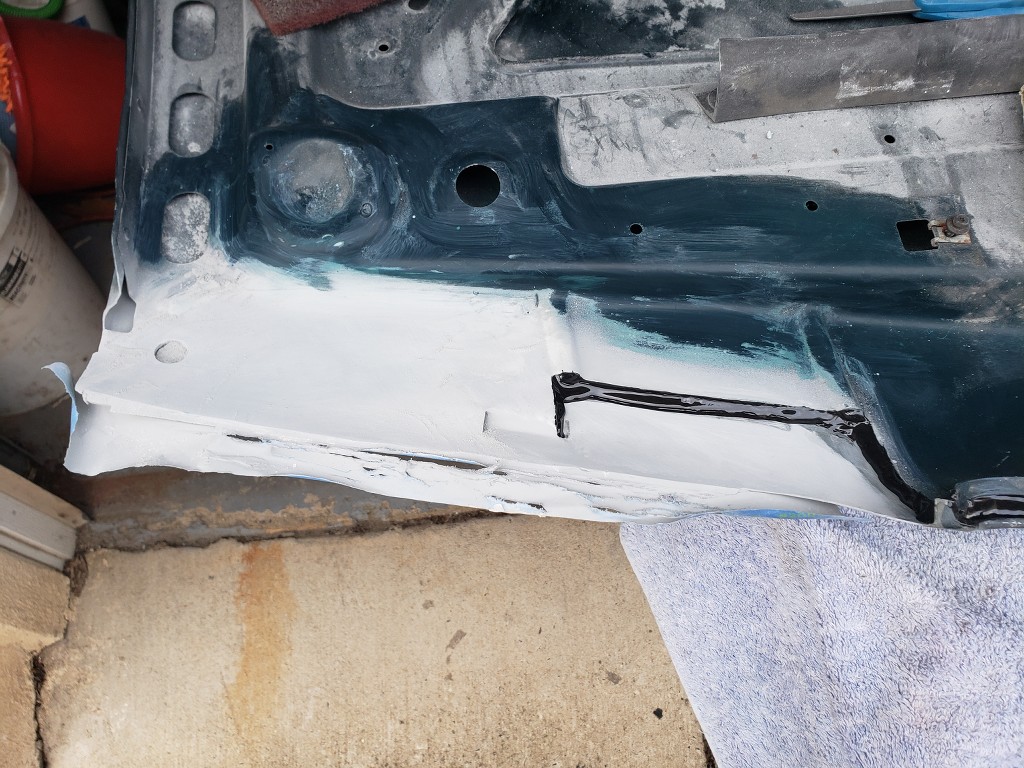
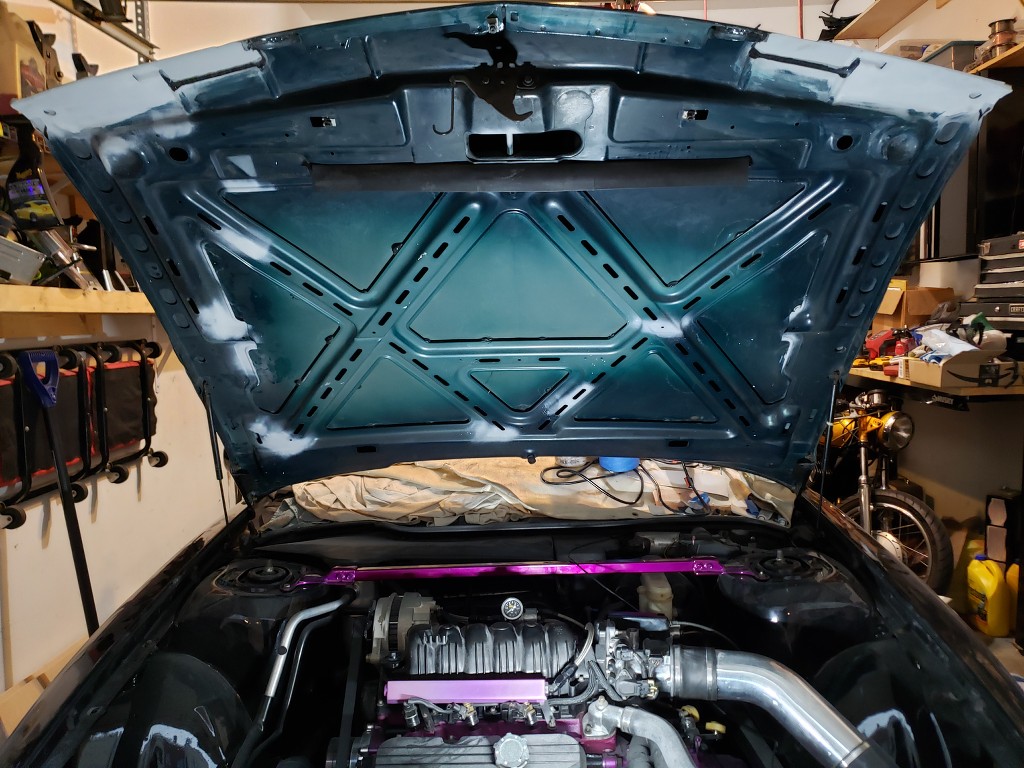
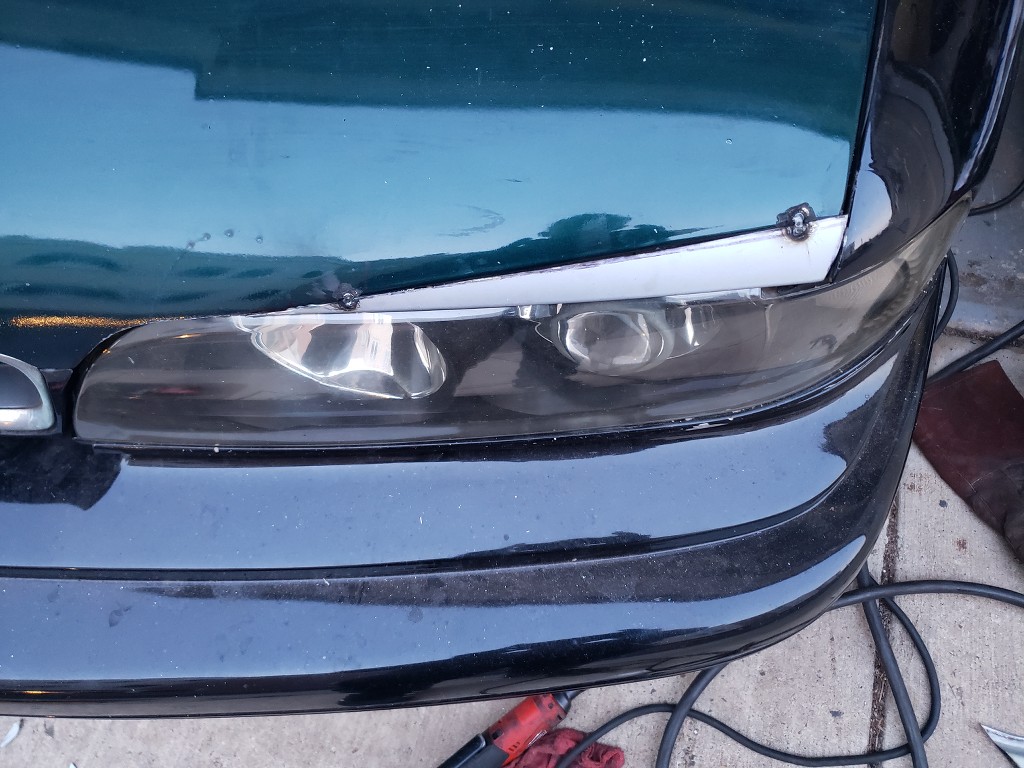
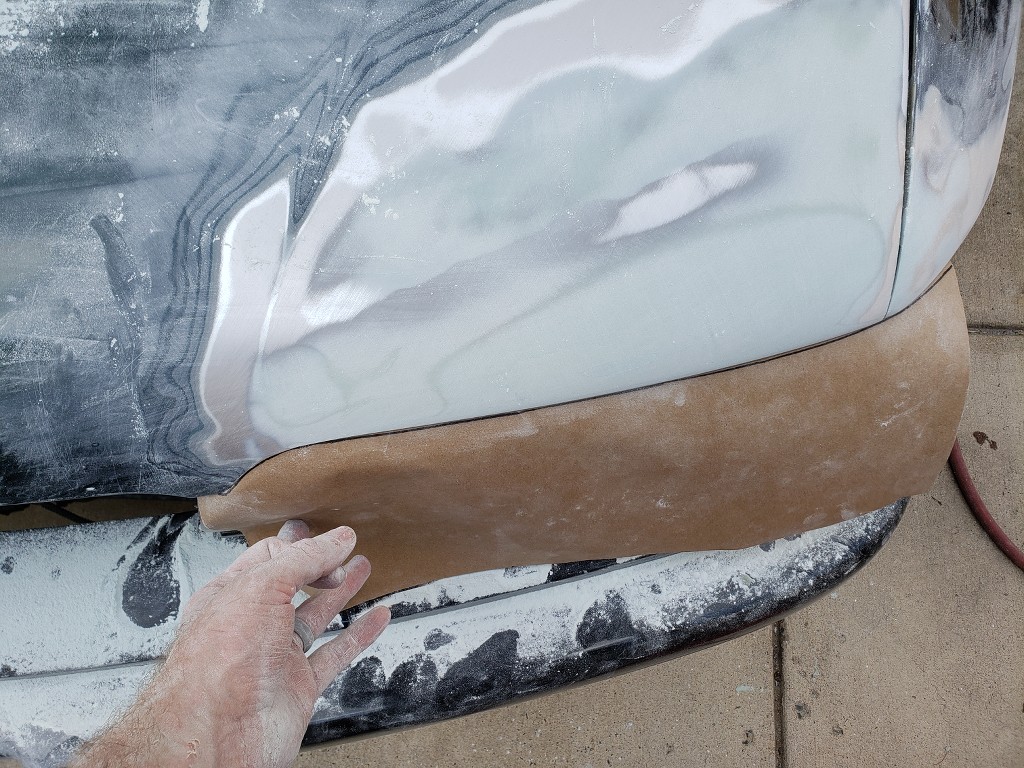
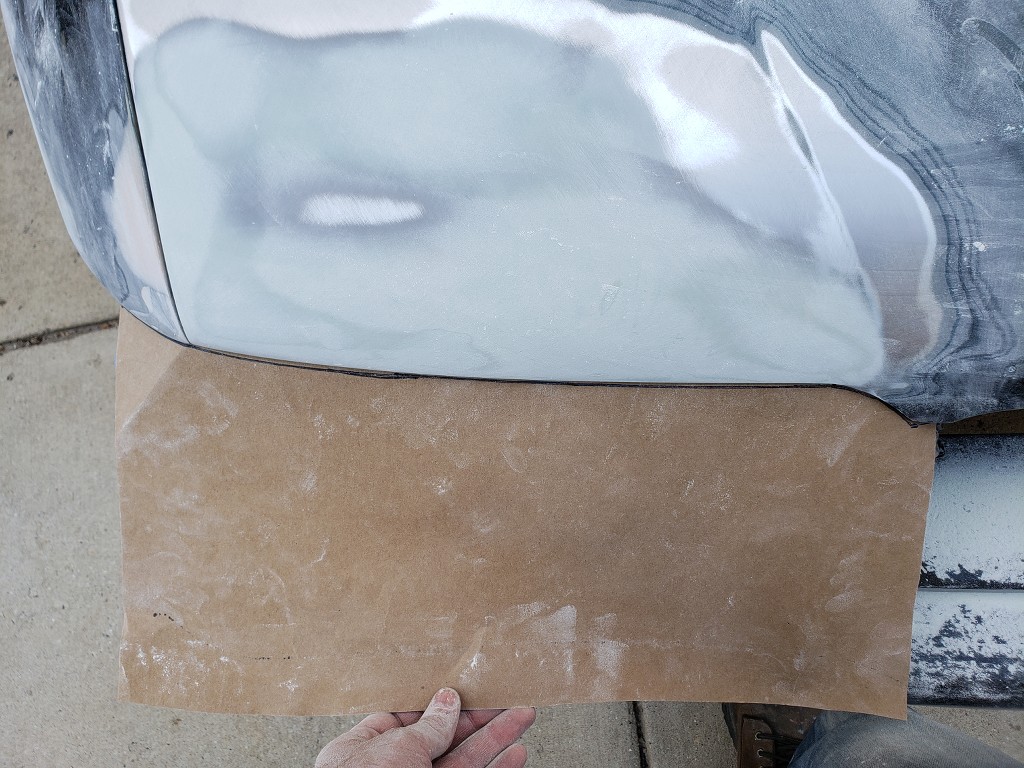
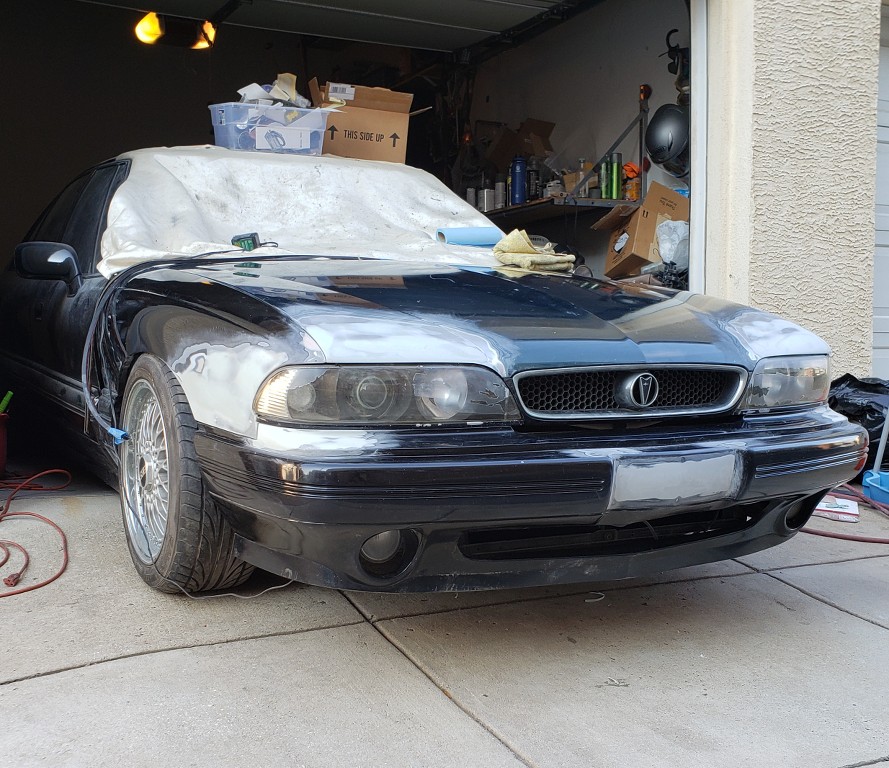
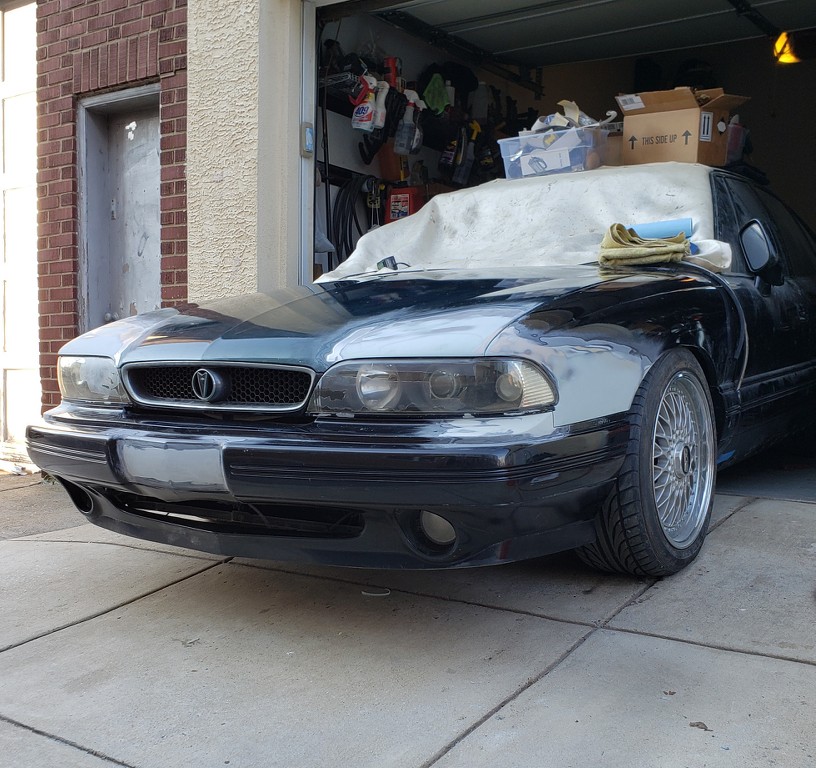
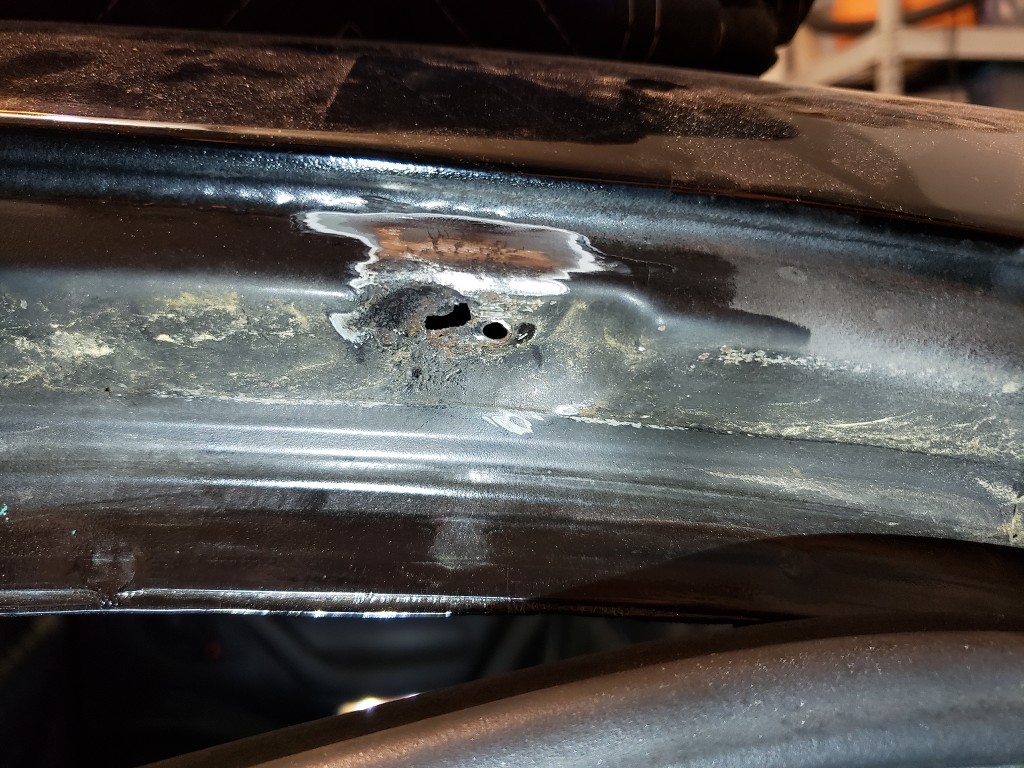
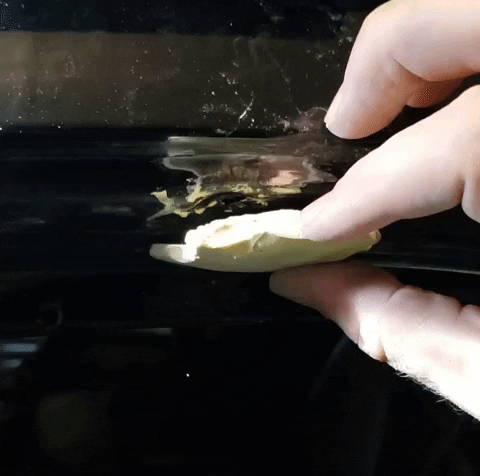
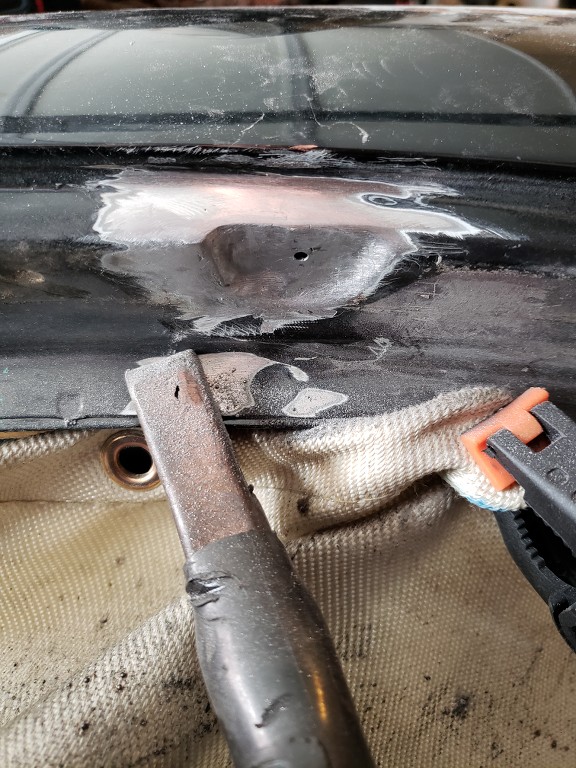
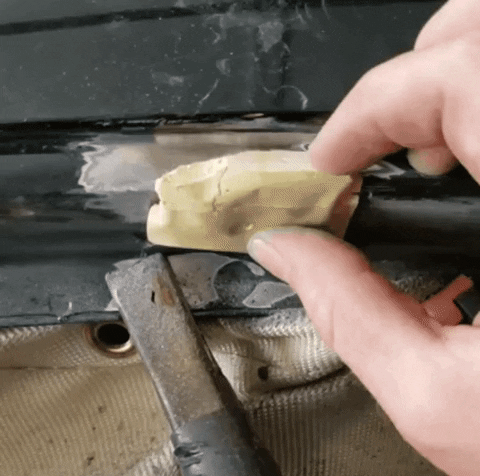
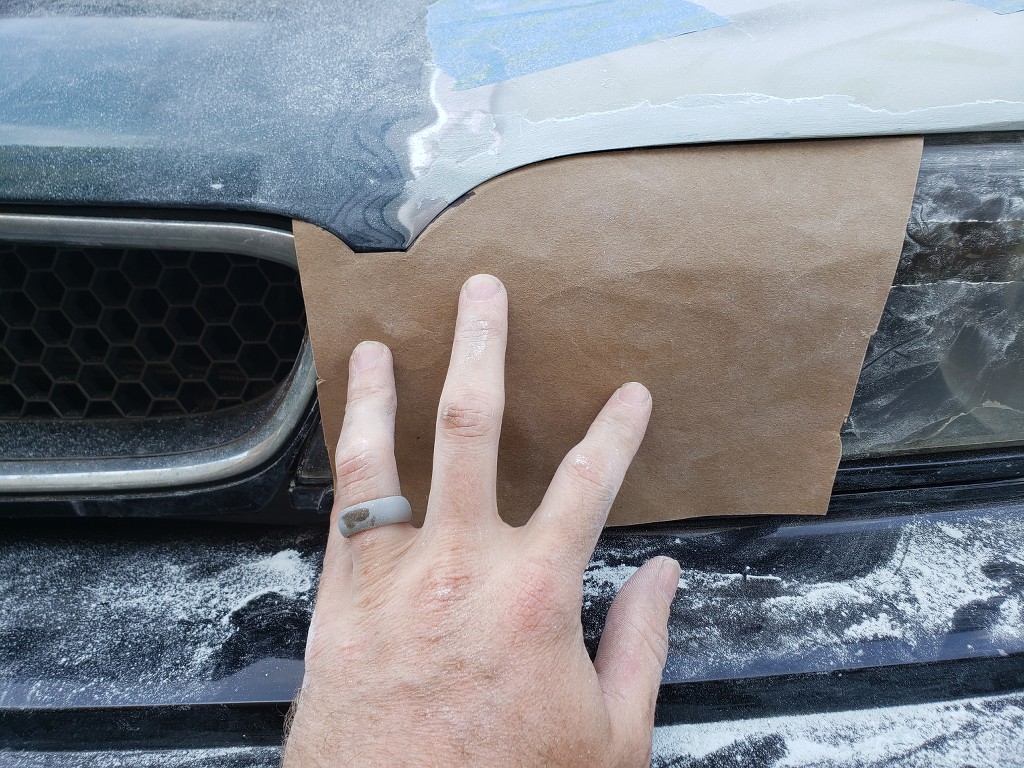
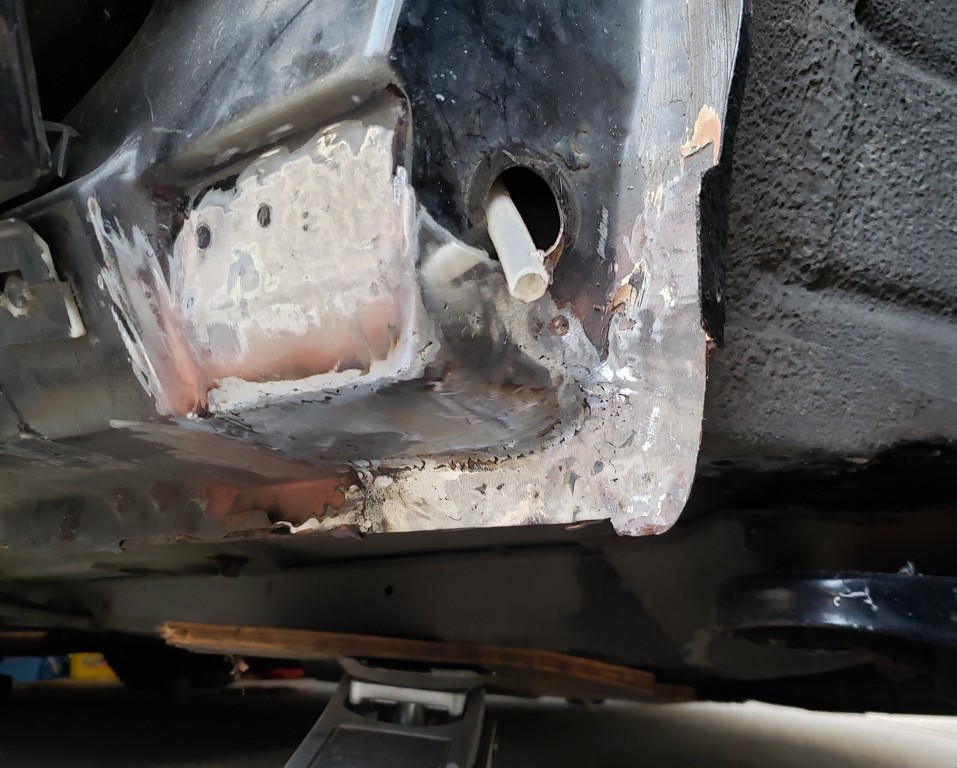
The last major ticket item for the headlight conversion is smoothing out the underside of the hood and I think I'm going to skim/redo the top with better filler. I'm leaving the forward most lip intentionally rough for that purpose. I got the passenger side pretty close today. A couple minor imperfections jumped out at me after I threw some primer on it. I also need to seam seal the perimeter of the clearance cut I made (left side of pics) for a more factory finish but I'll do both sides at the same time to make sure the fancy 3M stuff doesn't dry out in between. Whenever it's painted, the inside of the added section will get cavity waxed through the access areas I left open.

Image
Image
Image

Author:  Sirius [ Mon Aug 03, 2020 10:12 am ]
Post subject:  Re: Some pics of my 95 SLE (8/2 Update)

How long do you anticipate being in CA?

Author:  95naSTA [ Mon Aug 03, 2020 10:24 am ]
Post subject:  Re: Some pics of my 95 SLE (8/2 Update)

It'll be at least a year but I'm not really sure beyond that. Could be up to 4-5 years.

Author:  95naSTA [ Mon Aug 03, 2020 10:42 pm ]
Post subject:  Re: Some pics of my 95 SLE (8/2 Update)

Not much of an update but I wanted to get my old OBD1.5 compatible Actron 9110 working again. I mentioned a few posts back that the cable for it had corroded pins I couldn't manage to clean up enough to work. I had power put no data. I know there's the simplified Bill Buttermore version but since I already had an Actron cable as a template, I decided to match it exactly. Same idea though, I just hacked up a cheap OBD2 cable.

Image
Image

Eventually I'll have to find the cable and license for the laptop based EFI Live I had working like a decade ago but I'll let later me worry about that.

Author:  Sirius [ Tue Aug 04, 2020 9:40 am ]
Post subject:  Re: Some pics of my 95 SLE (8/2 Update)

"Later you" is going to hate you. :lol:
:poke:

Author:  95naSTA [ Tue Aug 04, 2020 10:23 am ]
Post subject:  Re: Some pics of my 95 SLE (8/2 Update)

Haha. It's a fight on sight every time.

Author:  95naSTA [ Wed Aug 05, 2020 9:52 pm ]
Post subject:  Re: Some pics of my 95 SLE (8/2 Update)

Squeezed some more in today. The driver's side is smoothed out and primed. I got some U-pol Liquid Gold glazing putty for pin holes and light swipes. I decided to test it out here (yellow) and it seems pretty good. When I took the primed pic I noticed I could have done a little better smoothing out the transition to the stock hood. But, since this is high build primer, I was able to feather it out and throw another coat on.

Image
Image
Image

I also found a dremel bit that was a perfect fit to open up the holes I brought over from the BMW doner hood.

Image

I tidyed up the passenger side hole and the small issues I mentioned but that was pretty hard to tell in pictures.

I just have to scuff and seam seal the cut areas then it's back to finishing up the top.

Author:  95naSTA [ Thu Aug 06, 2020 9:35 pm ]
Post subject:  Re: Some pics of my 95 SLE (8/5 Update)

Scuffed and sealed. I started blocking the primer but decided I should just wait till the panel bond dries completely. I couldn't really do any other body work and I didn't feel like packing so.. I literally blew the dust off the DS7 to go break necks and ear drums around the city.

Image
Image

The next the hood will get bolted back up to do some rework on the top.

Author:  95naSTA [ Fri Aug 07, 2020 11:17 pm ]
Post subject:  Re: Some pics of my 95 SLE (8/6 Update)

Not much of an update but might as well. Blocked the primer, ground down any minor corrosion, blew out all the dust, primed the bare metal and mounted it back up.

Image

The top has been repainted at least once and I want the hood stripped prior to paint. One of the reasons is to make sure the front hood bodywork is flush with bare metal. So, I started to strip the area behind the front bodywork but after 3 rounds with scuffing and rattle can aircraft stripper, I called it.

Author:  95naSTA [ Sun Aug 09, 2020 9:17 pm ]
Post subject:  Re: Some pics of my 95 SLE (8/6 Update)

I finished stripping the hood behind the headlight, re-swipped and long blocked. The biggest difference is how the hood now flows with the headlight. Previously it was more straight across as you can see when I first tacked the metal in. My initial bodywork got the headlight gap set and hood blended into the new metal but missed the headlight contour. I started noticing the top of the headlight was exposed more than it should be, which is why went over it again. In order to make sure the two sides matched I made another template. It was actually pretty close when I initially checked which I guess is a good thing.

Image
Image
Image
Image
Image
Image

I also went through my OEM bumper moldings to see what I have. These ride that 90* groove at the top of the front and rear bumpers. The front is 1 piece and the rear is split into 3 with some slack to cut back. I remembered I bought all that were available about 10 years ago but apparently I was missing the driver's rear section. Ebay actually had a couple so I now will have a complete NOS set. One thing I also remembered was the 1 piece front was too short. I tested it and at first it was maybe 2" short. I left it out in the sun while I was working on the car and it expanded out about an inch. At that point it was also somewhat stretchable. I'm hoping a little heat and stretch will get it where it needs to be.

From here the front needs some minor tweaks, pin hole control, some more gap work and some primer. I have a couple more things I want to tackle before it gets sent to paint but we'll see if there's time.

Author:  Sirius [ Mon Aug 10, 2020 9:56 am ]
Post subject:  Re: Some pics of my 95 SLE (8/9 Update)

The fit between the headlight and hood is pretty remarkable. Nice work indeed! I've had mediocre success with paint stripper. I've used the stuff that comes in a gallon can and you brush on. It works, but takes a few coats and is a little pricey as I recall. I'm impatient though. I want to brush it on, wait 20 minutes then wash the paint off with a hose. :)

Author:  95naSTA [ Mon Aug 10, 2020 11:21 pm ]
Post subject:  Re: Some pics of my 95 SLE (8/9 Update)

Thank you!

Over 15 years ago when I worked at a less crappy corporate Maaco they had some brush on stuff that would lift the paint clean off.. along with your nose hair. The other thing you can see in the pics is this hood as been repainted more than once. So that'll slow it down a little.

Author:  ProblematicBonneville [ Thu Aug 13, 2020 11:21 pm ]
Post subject:  Re: Some pics of my 95 SLE (8/9 Update)

Gosh what a beauty.. put her on bags, that's what i want to do to mine.

Author:  95naSTA [ Sun Aug 16, 2020 2:49 am ]
Post subject:  Re: Some pics of my 95 SLE (8/9 Update)

Thanks. I've thought about bags but I like how connected a coil setup is. At most I would do a cup kit for the front.

On one of the drip rail screw locations had some rust that was beyond what a grinder could take care of so I welded in some new metal. I wanted to make sure the shape was the same so I made a mold with glazing putty. This also allowed me to have a template for a screw hole. I Por15'd the metal on the outside and I'll cavity wax once the rattle can comes in the mail.

Image
Image
Image
Image
Image
Image

I also cleaned up the gaps and pin holes that high build primer wouldn't fix.

Image

Author:  Sirius [ Tue Aug 18, 2020 3:39 pm ]
Post subject:  Re: Some pics of my 95 SLE (8/16 Update)

That drip rail repair turned out pretty nice. I like the idea of using the glazing putty as a mold. Did you use some kind of parting agent to keep it from sticking to the metal?

Author:  95naSTA [ Tue Aug 18, 2020 11:43 pm ]
Post subject:  Re: Some pics of my 95 SLE (8/16 Update)

Thanks. I didn't use any parting agent but I lightly pried it off while it was still curing. It was mostly smooth except for the problem area and gravity was working for me.

Author:  95naSTA [ Fri Aug 21, 2020 12:10 am ]
Post subject:  Re: Some pics of my 95 SLE (8/16 Update)

More or less I let OCD get the better of me and I tweaked the driver's side headlight gap again. It was hard to tell but when I made another template it was apparent it didn't match exactly. I used the new template to set the vertical gap and the old template to set the aerial view. I forgot to get a finished pic but honestly, it's hard to tell what I did without the template.

Image
Image

There's two other areas of rust I was going to pay to have repaired if I couldn't get to it myself. The front passenger side rocker and the passenger rear wheel well. I actually have the OEM sheet metal for the rear wheel well. Today I started peeling back the onion on the rocker. It's not as bad as the driver's side was but it'll definitely require some new metal.

Image
Image
Image

Author:  95naSTA [ Fri Aug 28, 2020 7:14 pm ]
Post subject:  Re: Some pics of my 95 SLE (8/21 Update)

I'm shipping my welder out to Cali next week so it was crunch time to get this hole buttoned up. With afternoon thunderstorms, rain all day tomorrow and a potential commitment Sunday, today was the day.

When I started digging into it again I realized the inevitable H-body subframe rust issue was starting to rear it's ugly head on the rear passenger uni-body mount. It was rusted and cracked. Given the time crunch, I did some what of a mickey mouse repair, grinding out some rust and welding where I could. The good news is the front rear mount location still looks ok.

When I got back into the front rocker I grinded out all the rust in the last pic, cut out a small piece of the middle layer sheer metal to replace, then made the new a new outer skin. Not a few mins after I popped open the POR-15 to coat it, the sky opened up and I had to literally throw everything into my garage. If I had more time it would have looked like nothing had ever been replaced but at this point I'm just working with the time I have. I still have to strip the rocker and POR-15 it like I did to the other side. Nothing beyond what I replaced seems like it's more than surface rust, similar to the other side. I also have to cavity wax this through the sunroof drain hole and cavity wax the drip rail fix a couple posts back.

Image
Image
Image

I did realize after the fact that the aft recess for the fender mount wasn't as high as the forward one so I trimmed that up before I put the outer skin on.

Image
Image

With the rain, I decided to finish an interior LED light conversion I started. I did the doors a while back which were B8.5D/T5 but the contacts needed to be bent to mimic the stock bulbs. I did the grab handle and map lights tonight which were DE3175 and 561 respectively. The 561s aren't the exact same bulb but they fit without issue.

Image

Image

Page 21 of 23 All times are UTC - 5 hours [ DST ]
Powered by phpBB® Forum Software © phpBB Group
http://www.phpbb.com/