It is currently Thu Oct 02, 2025 3:58 pm

All times are UTC - 5 hours [ DST ]


Post new topic Reply to topic  [ 35 posts ]  Go to page Previous  1, 2
Author Message
PostPosted: Sat May 24, 2008 1:35 pm 
Offline
Retired Gearhead
Retired Gearhead
User avatar

Joined: Tue May 20, 2008 9:11 pm
Posts: 2156
Location: Fayette City,PA
Year and Trim: 1990 Bonneville LE
Originally Posted: Jan 20, 2007

Took a little break from the narrative to assemble the second cylinder head. Also during the week, the rest of the L67 rods arrived along with all the bearings, gaskets, piston rings, etc. I spent today cleaning and inspecting the rods after removing the L67 pistons that came with them (They are STD bore pistons, so they are just going to get boxed up and set aside in case they are needed later on another motor.)

Now, here's a little photo to drive home the idea that you DO NOT use anything metal to pry on a machined surface.

Image

What you are looking at is the rod journal end of the connecting rod. Note the rough gouges in the machined surface, right by the rod bolt hole. That's what happens when you try to pry the rod cap off with a screwdriver. What the person who disassembled this motor should have done was back out the rod bolts a turn or two, then tap on them with a rubber mallet to pop the cap without damaging either the rod, or the crank.

Should you come across this, there are three ways to fix it: 1.) Pitch the rod in the trashcan and go get a new one. 2.) Break the sharp edge with a file, and live with the fact that the rod has a defect and may wear the bearing funny. 3.) Mill the rod to remove the damaged ends, refit the cap, and re-bore the main journal a larger size, using a thicker rod bearing to make up the extra clearance.

Of those solutions, #3 is the correct one to repair the rod. However, due to the cost of the rods, #1 is a viable option too.

Got a PM from Ed Morad (who sold me the rods) and he will be sending a replacement. Thanks Ed.

Now, gotta wait for the rod to get here before sending the crank off for balancing. Had a really good weight set going on the rods, with 689.5grams being the average, heaviest rod was 692 grams, lightest 688 grams. That's pretty consistent for a bunch of factory rods.

With that, I'll pick up tomorrow with installing the old cam, putting the crank in temporarily along with one connecting rod and piston, then going through checking the specs on the factory L36 camshaft with a dial gauge and degree wheel.

_________________
Bye Bye 1990 Bonneville LE... Now it belongs to my daughter
In the Garage: 2009 Subaru Outback, 1987 Camaro, 2006 SV650S, 1995 Regal 182 "ASANAGI", 1962 Ford Galaxie 500, 1995 Ford F150 XL 4WD, 1953 Farmall Cub


Top
 Profile  
 
PostPosted: Sat May 24, 2008 8:13 pm 
Offline
Retired Gearhead
Retired Gearhead
User avatar

Joined: Tue May 20, 2008 9:11 pm
Posts: 2156
Location: Fayette City,PA
Year and Trim: 1990 Bonneville LE
Originally Posted: Jan 22, 2007

Quote:
sandrock wrote:
A question on the head buildup post. The picture shows 2 different valve stem seals (which is like that on the S1 too....but they are black and orange). Are there any other differences between these seals, with exception of color?


Hmm, it's probably differences in the neoprene used to make them. Dimensionally, they are identical and use the same construction. These two PN's are the latest and greatest from GM.

There were some other things I noted during the teardown. On one L67 head, the intake valve seals were black and the exhaust valve seals were black with a tan stripe. On the other L67 head, all the valve seals were blue, like the new intake valve seals. (The heads are probably off different motors.)

My guess is that this is just a series of revisions to get valve seals that work for a long time and provide the right amount of lubricating oil to the stems. Kinda like the three decade long quest to find valve stem seals that will work in the SBC V8, without producing that familiar wisp of blue smoke on a cold startup.

_________________
Bye Bye 1990 Bonneville LE... Now it belongs to my daughter
In the Garage: 2009 Subaru Outback, 1987 Camaro, 2006 SV650S, 1995 Regal 182 "ASANAGI", 1962 Ford Galaxie 500, 1995 Ford F150 XL 4WD, 1953 Farmall Cub


Top
 Profile  
 
PostPosted: Sat May 24, 2008 8:22 pm 
Offline
Retired Gearhead
Retired Gearhead
User avatar

Joined: Tue May 20, 2008 9:11 pm
Posts: 2156
Location: Fayette City,PA
Year and Trim: 1990 Bonneville LE
Originally Posted: Jan 28, 2007

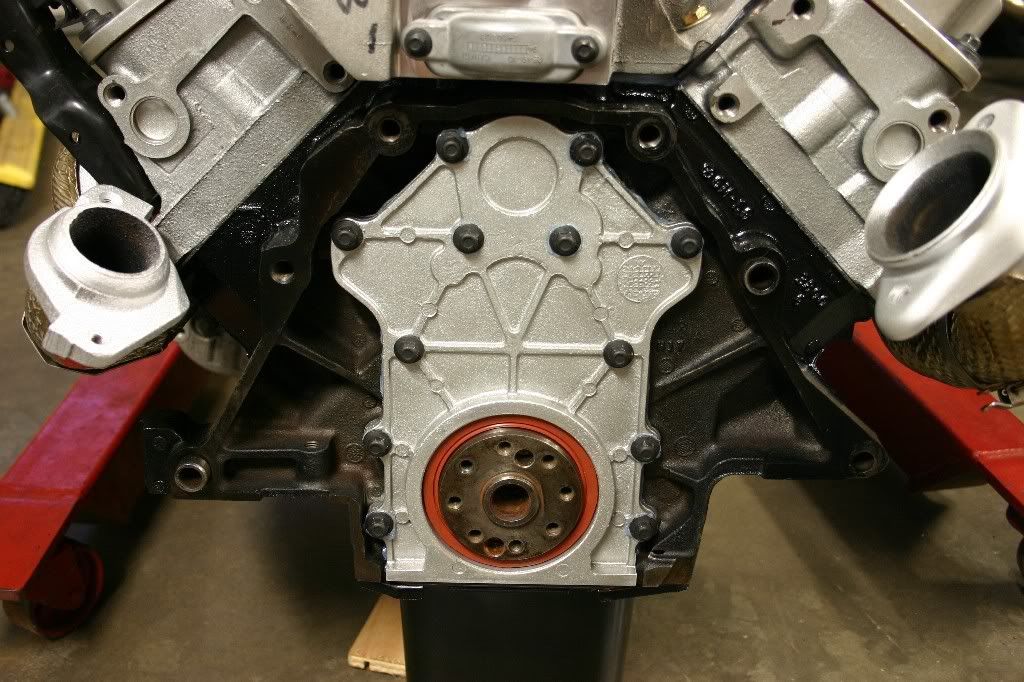
Ok, another week gone by, time for a status update.

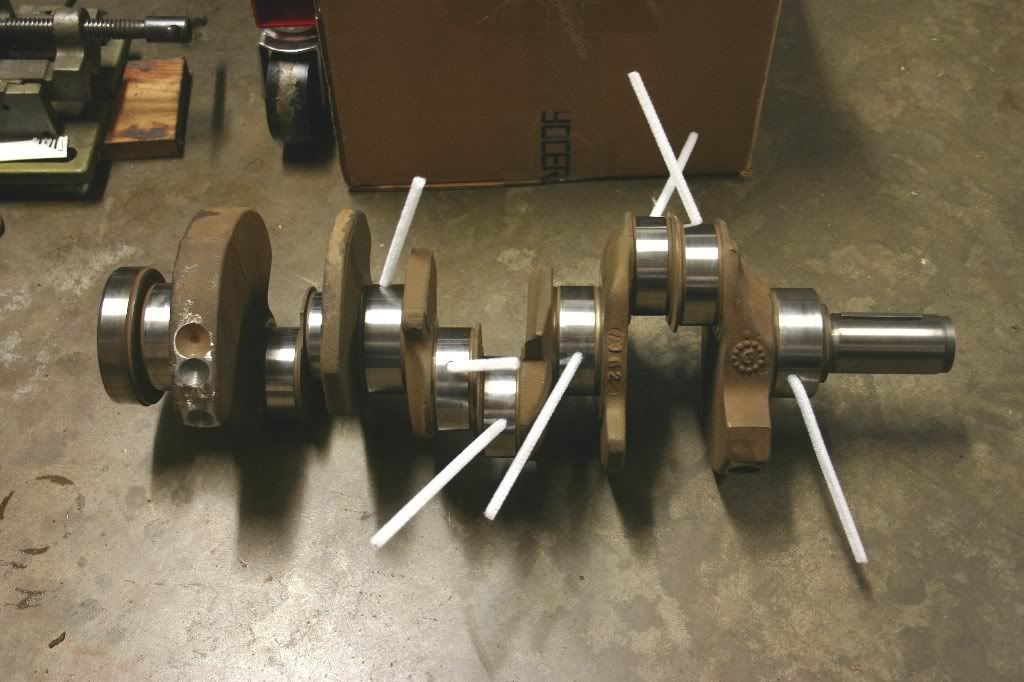
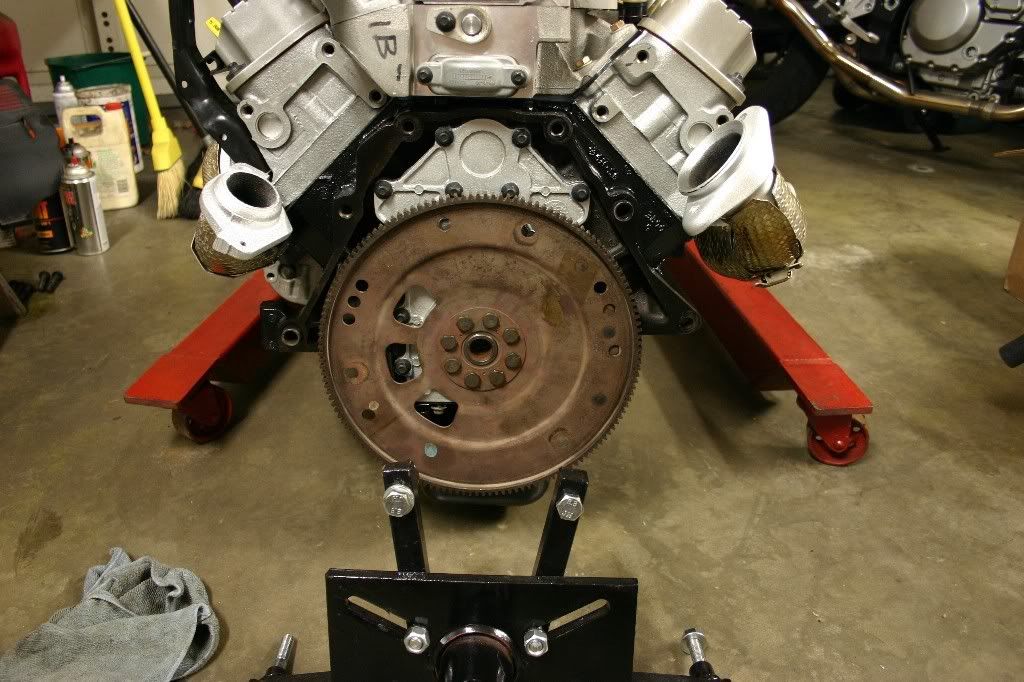
The crank, rods, pistons, harmonic balancer, and flex plate are now at Express Engines in DeLand, Florida to be balanced as an assembly. The local machine shop in Holly Hill didn't have bob weights that fit the V6 crank, so it had to go to a different shop.

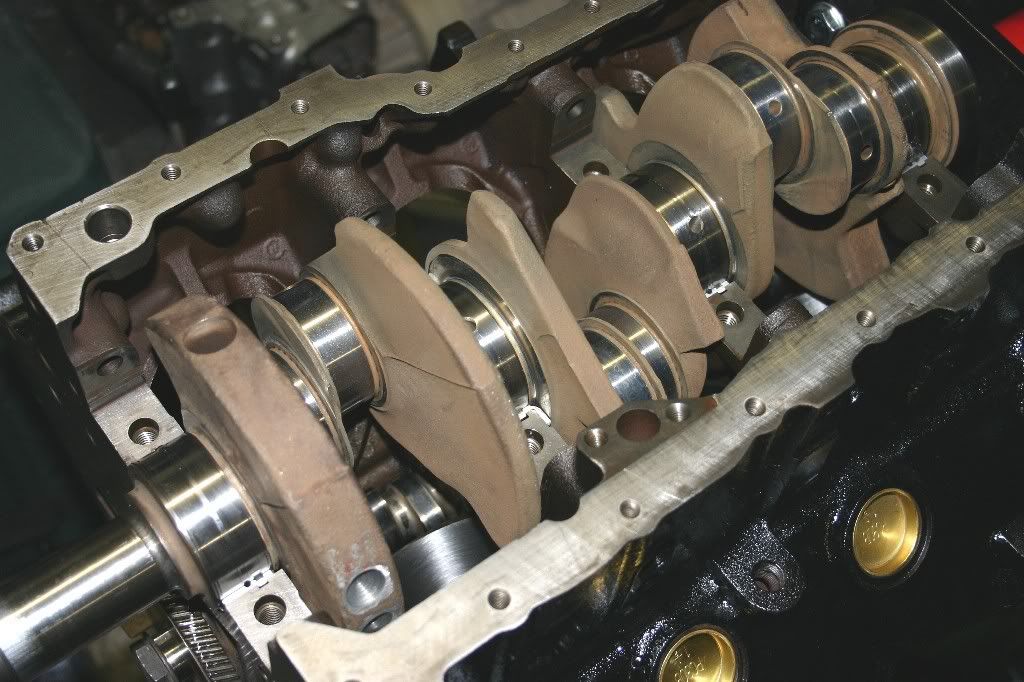
While waiting, I can still do some work on the camshaft and the block. Here's the camshaft along with the other timing components.

Image


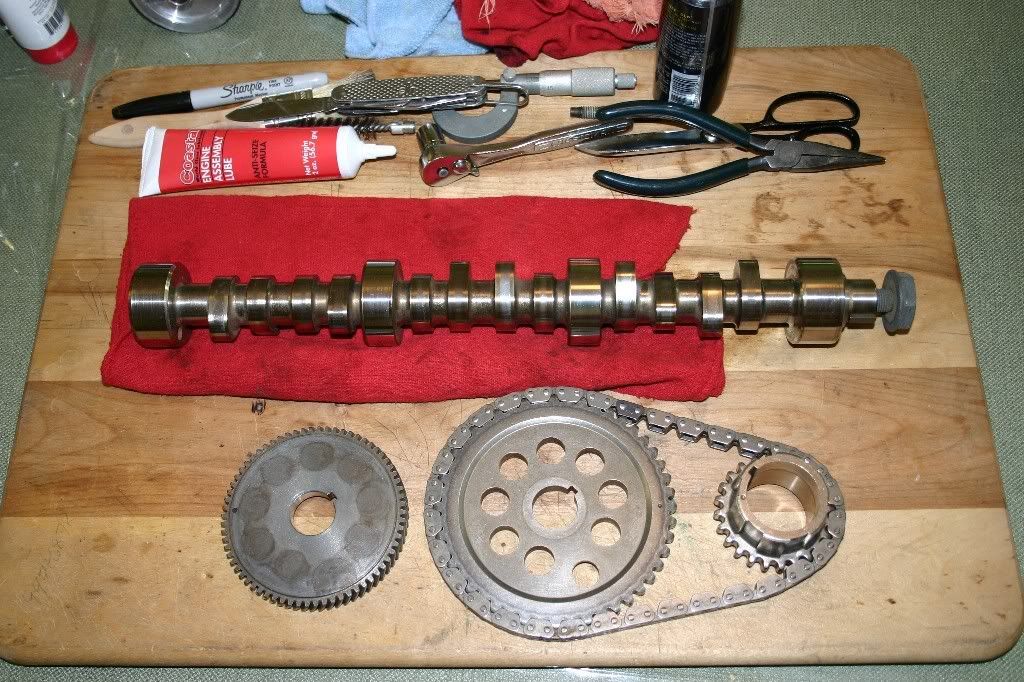
The cam appears to be a billet steel cam (meaning it was cut from a single chunk of steel rod stock as opposed to being machined from a cast iron core. In the photo, from left to right are #4 Cam Journal, #6 Exhaust Lobe, #5 Intake Lobe, #6 Intake Lobe, #5 Exhaust Lobe, #3 Cam Journal, #4 Exhaust Lobe, #3 Intake Lobe, #4 Intake Lobe, #3 Exhaust Lobe, #2 Cam Journal, #2 Exhaust Lobe, #1 Intake Lobe, #2 Intake Lobe, #1 Exhaust Lobe, and #1 Cam Journal. It's the geometry of the motor that dictates the placement of the lobes on the cam.

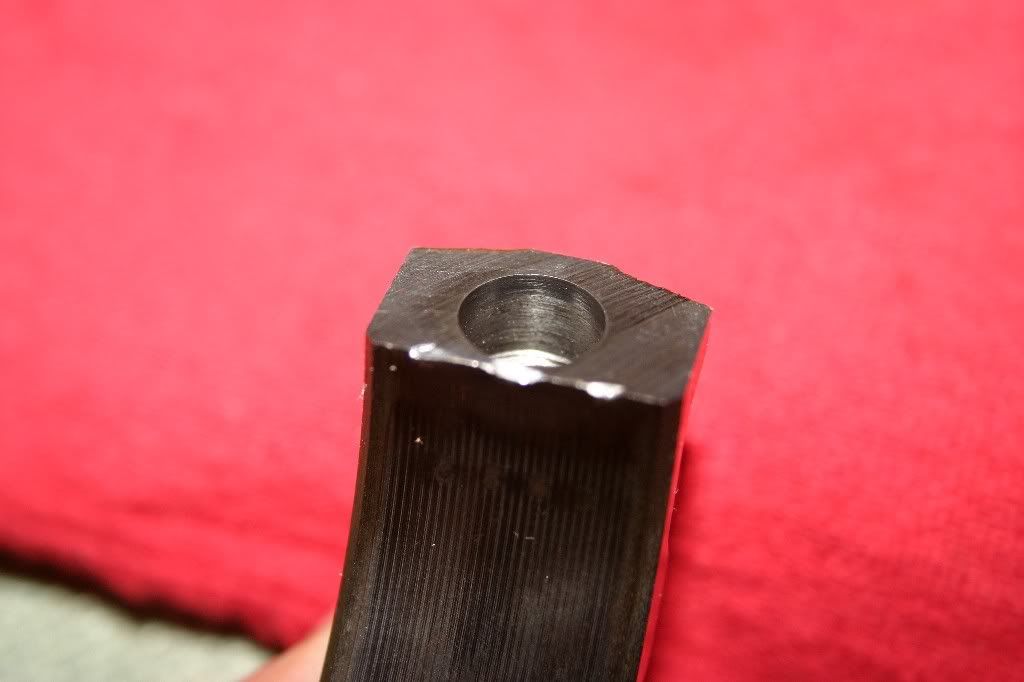
Looking a little closer at the cam, here's the back end. Note the three holes. Two of them are left over from the manufacturing process and only one serves a real purpose inside the motor.

Image


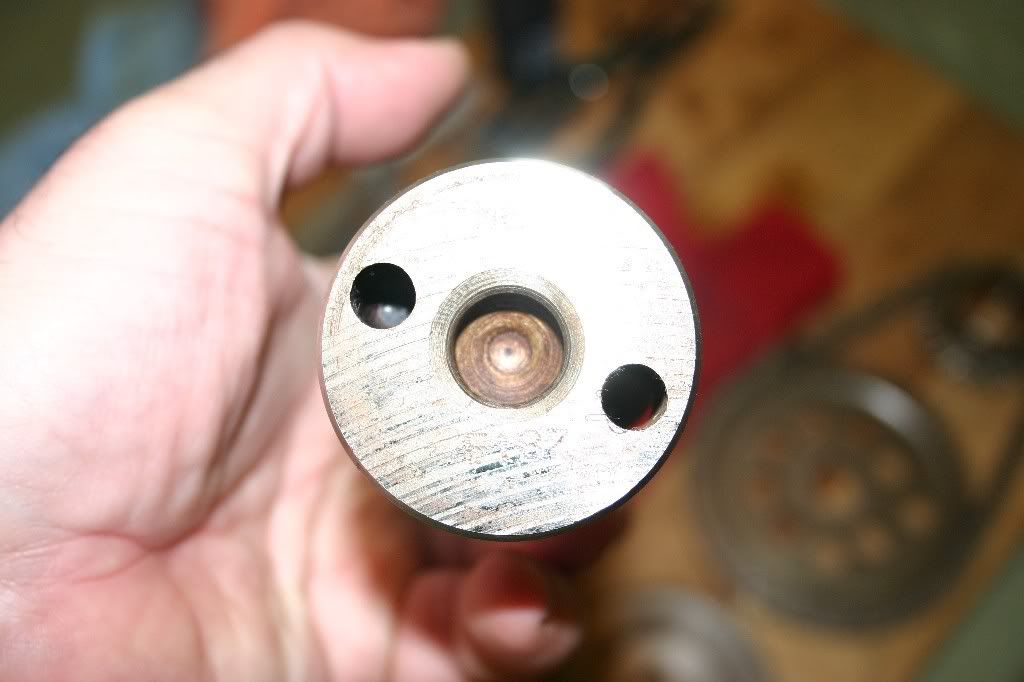
The center hole is a lathe "Center". It's a machined pocket that fits a dead center in the drive face of the lathe. To the left of it is a hole that fits a pin in the face of the lathe (called a drive dog) that will index the cam on the equipment. The hole on the right is also used during manufacture for a second drive dog, however it is drilled through the #4 journal. When the cam is in the motor, this hole serves as a relief to keep oil pressure from building up between the cam and the plug/cover that seals up the bell housing end of the block. Without that hole, oil pressure would build up and pop the cover.

Cams are made on duplicating (or Pantograph) lathes and grinding machines. In the process, the work piece (i.e. the yet to be made camshaft) is being spun by the lathe while a pattern is being spun at the same speed, parallel to the work piece. The cross-head (with the cutting bit) follows the pattern and transfers it to the work piece. It take 10 different patterns to cut and grind the cam to it's finished form, so the index holes in the end of the cam keeps everything in sync with the patterns as the cam moves from step to step. If you are ever in Daytona Beach during race weeks, drop in on Crane Cams and you can usually get a tour of the plant to see them making cams.

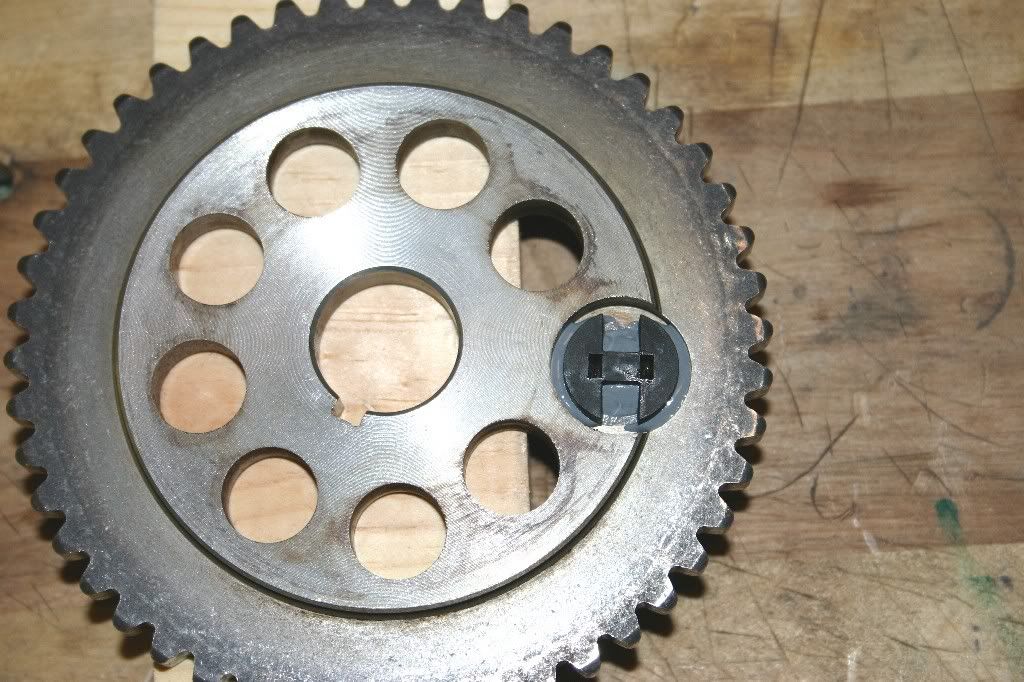
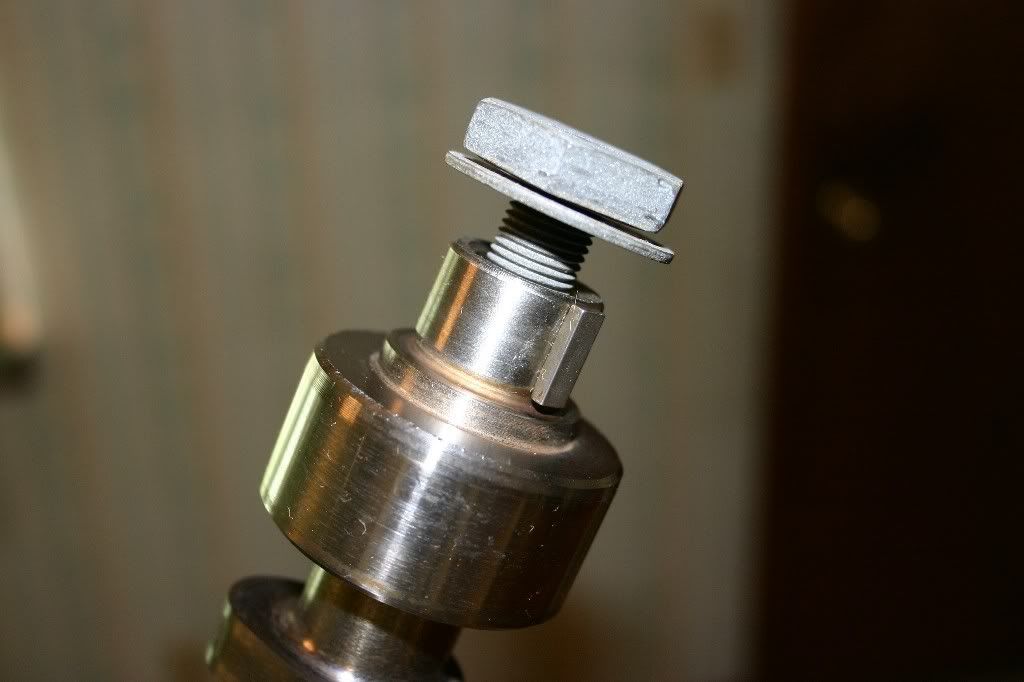
Back to this cam... Here's the timing chain end of the cam. Unlike most cams, the Buick V6 uses a key in the snout to drive the cam...same thing used on the crank nose to drive the oil pump and balancer. The reason for this is the Balancer shaft drive gear that also uses the cam. It's easier to slot the end of the cam for a key and broach the timing gears. The alternative is a whacky pin and bolt arrangement.

Image


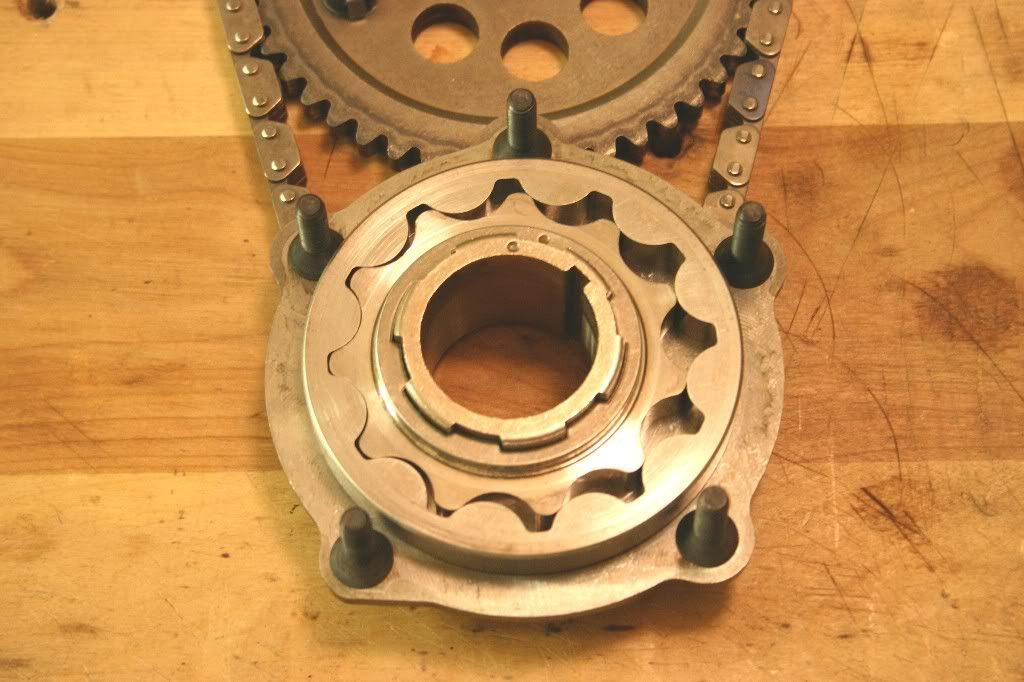
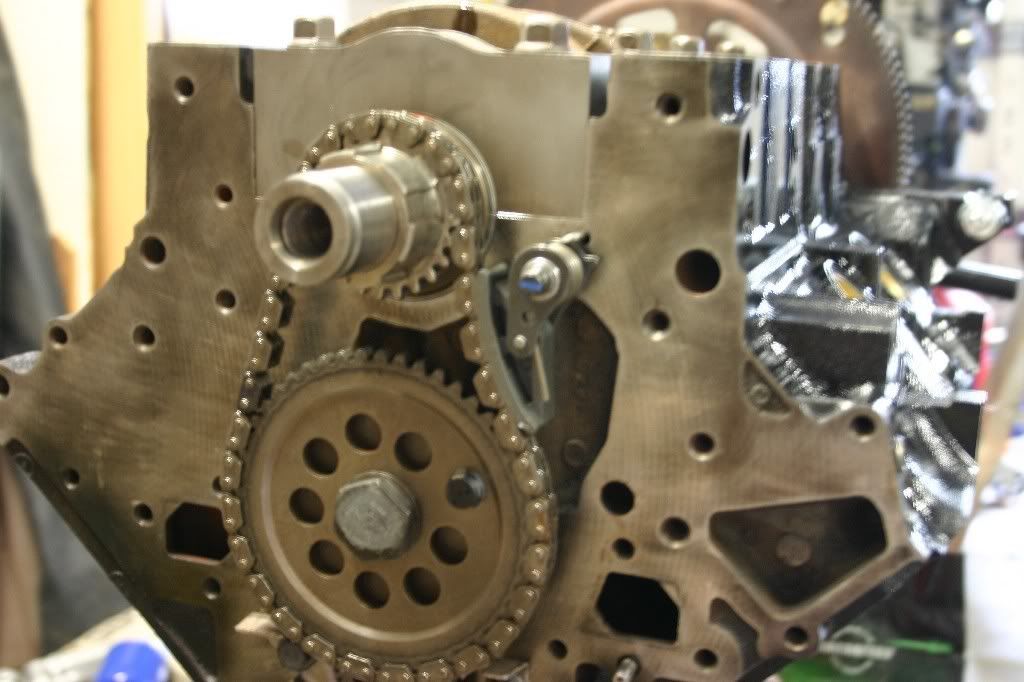
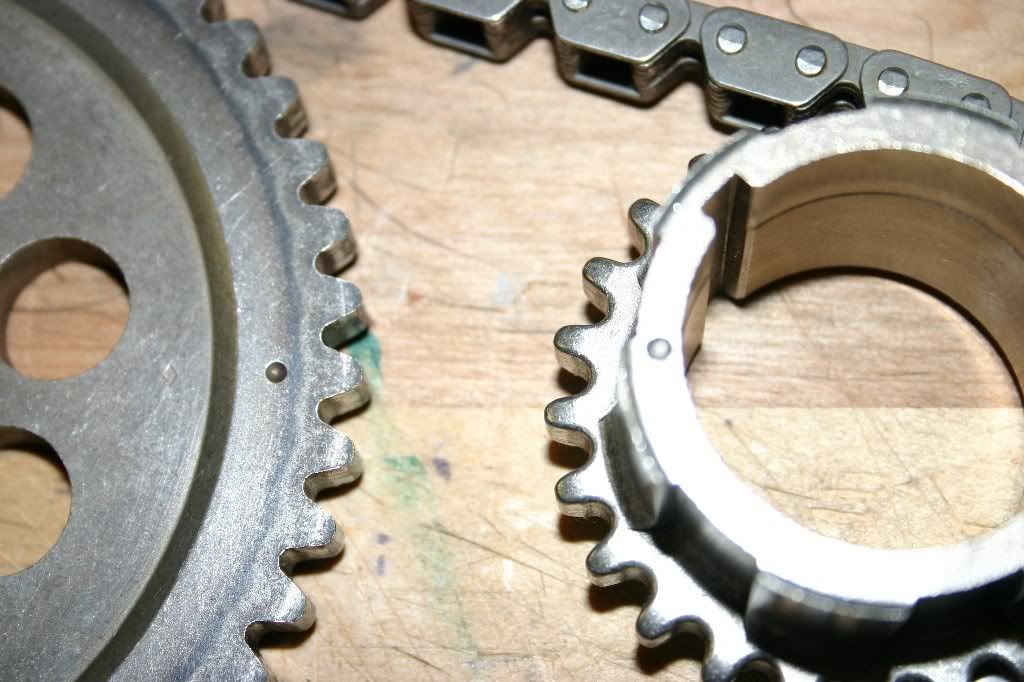
Here's the timing chain and its gears. Note the dimples in both the cam gear and the crank gear. When the set is installed, the dimples with be lined up with each other. That times the crank rotation with the cam rotation. The geometry of the motor comes into play again. The cam gear has twice the teeth of the crank gear, so the cam will always spin at 1/2 the crank RPM.

Image


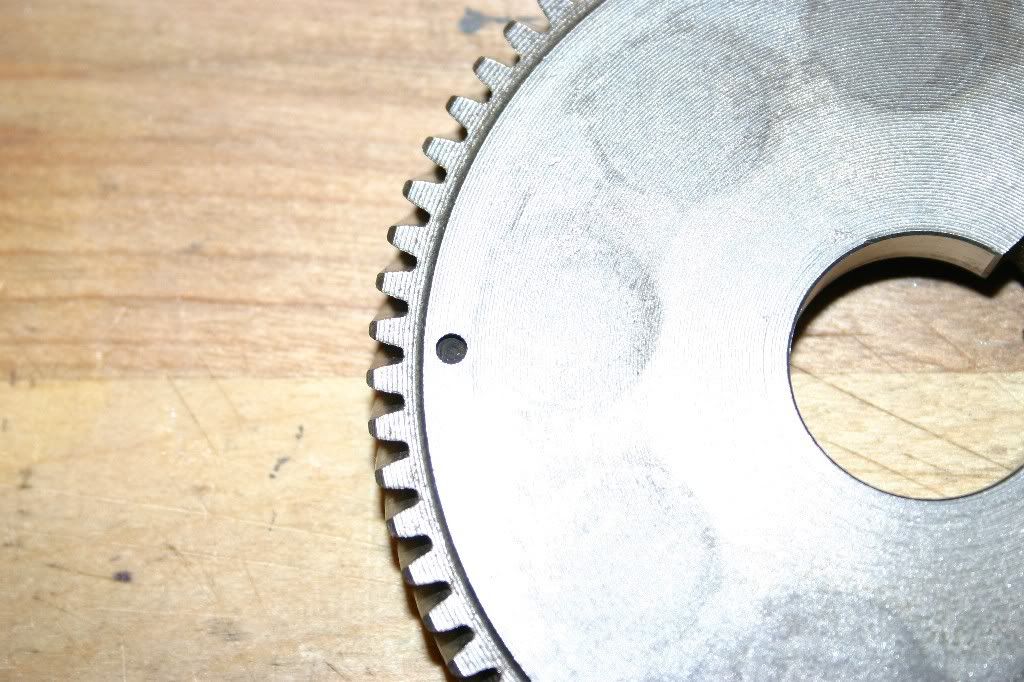
Here's the drive gear for the balancer shaft. It has a dimple on it as well to line up on the gear on the end of the balance shaft, so it spins in time with the crank.

Image


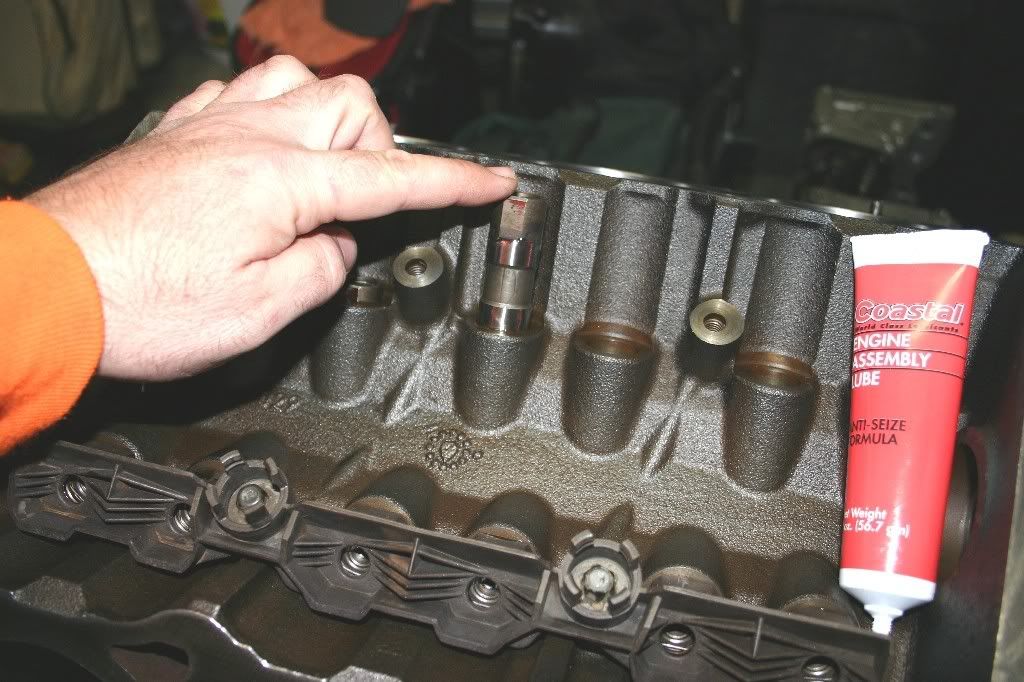
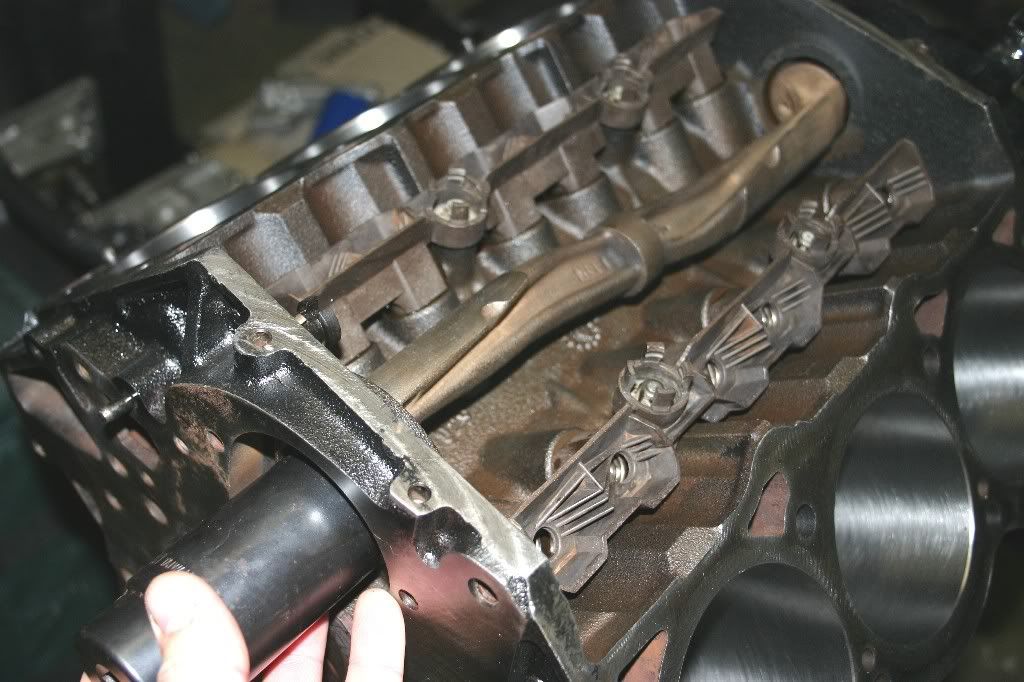
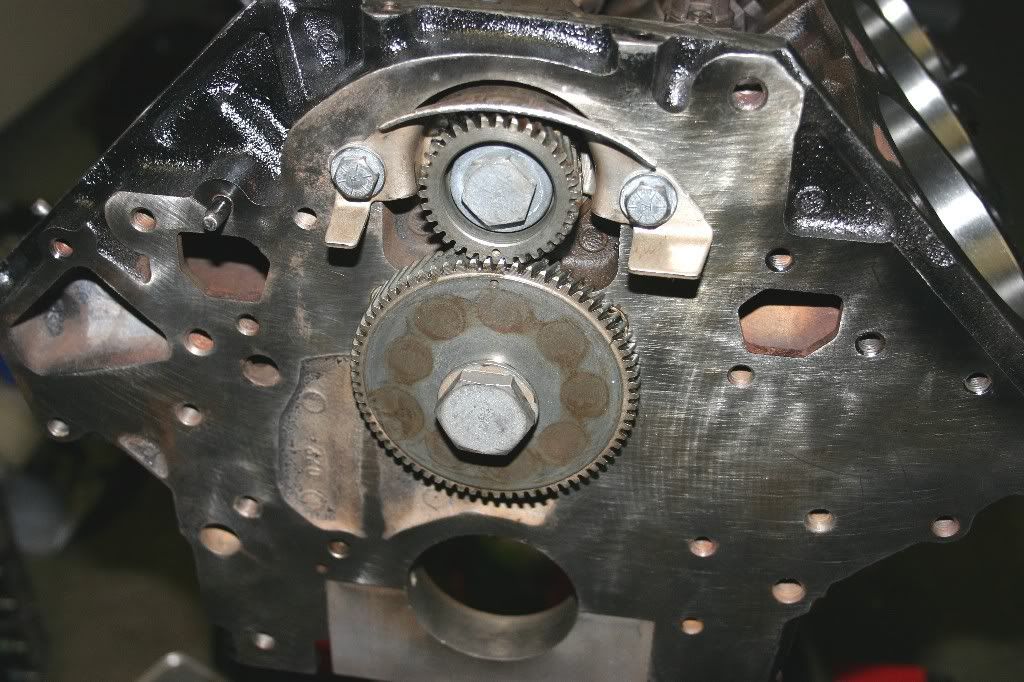
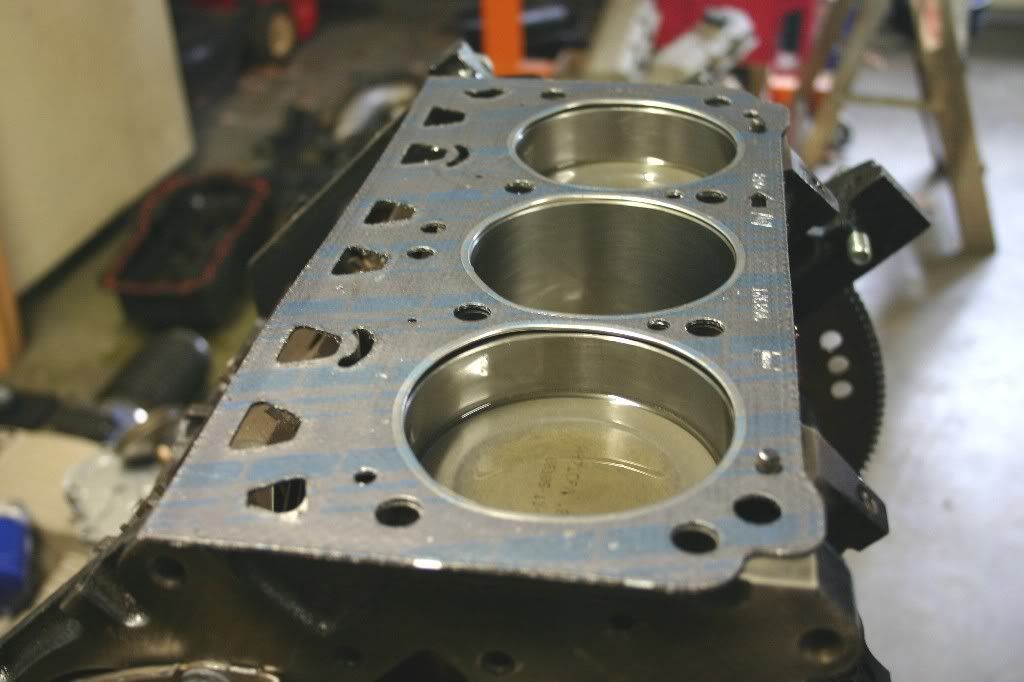
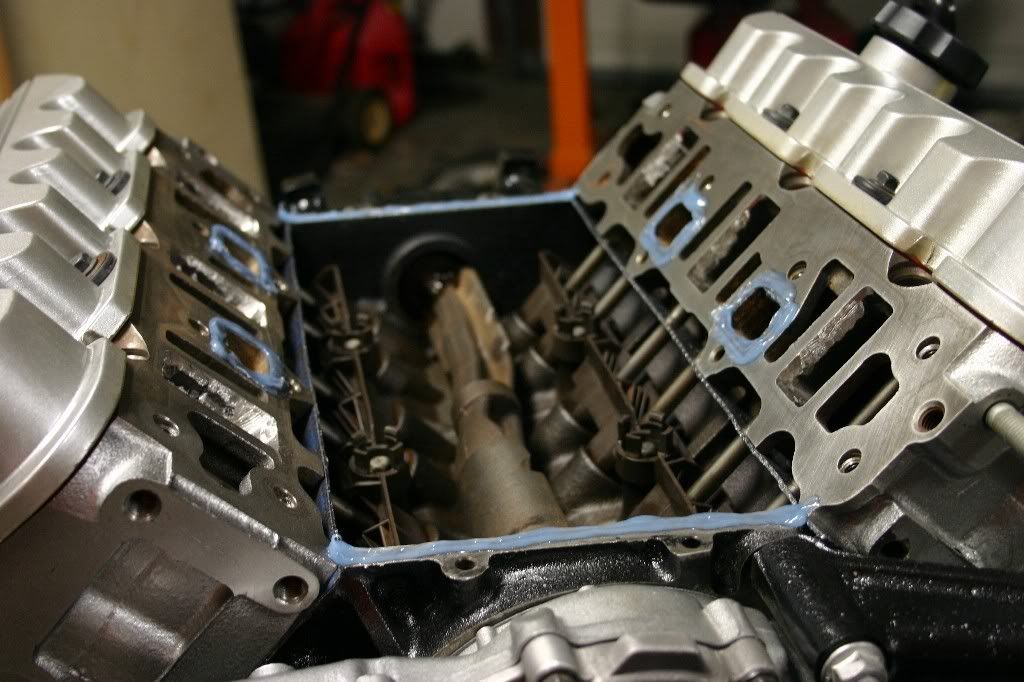
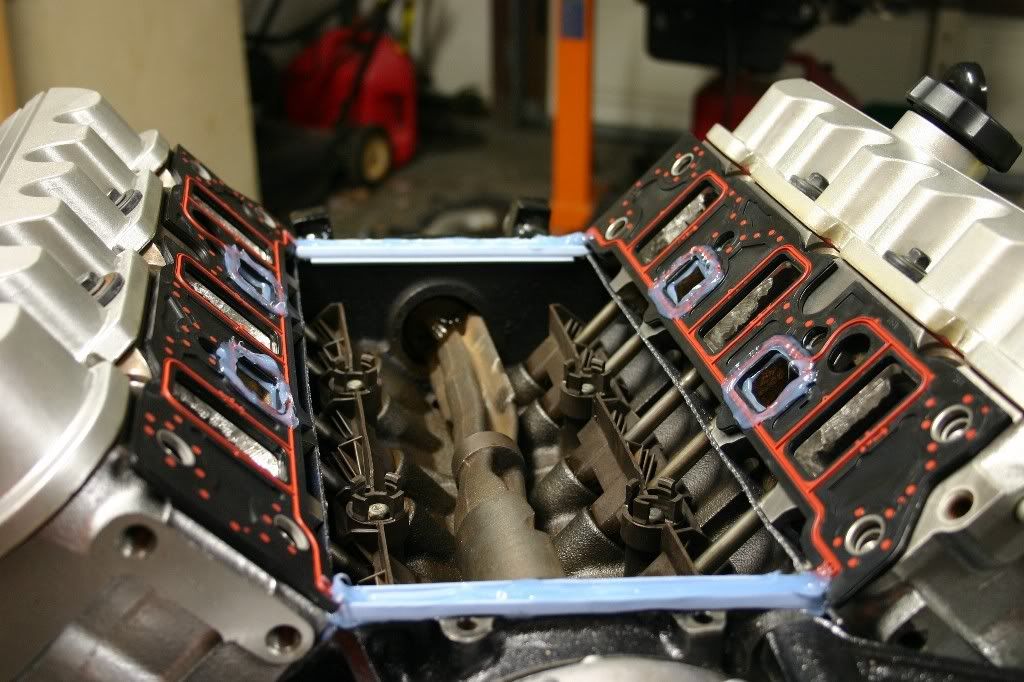
Time to put some stuff back inside the engine block. First item to go back in is the camshaft. It was the last item to come out because it is easiest to remove that way. It's the first to go back in for the same reason. Use some engine assembly lube on the journals and on the bearings, then carefully slide the cam in. Stick your finger up inside the block to support it as it slides in. (The cam bearings are new, no sense screwing them up by gouging them with cam lobes.)

Image


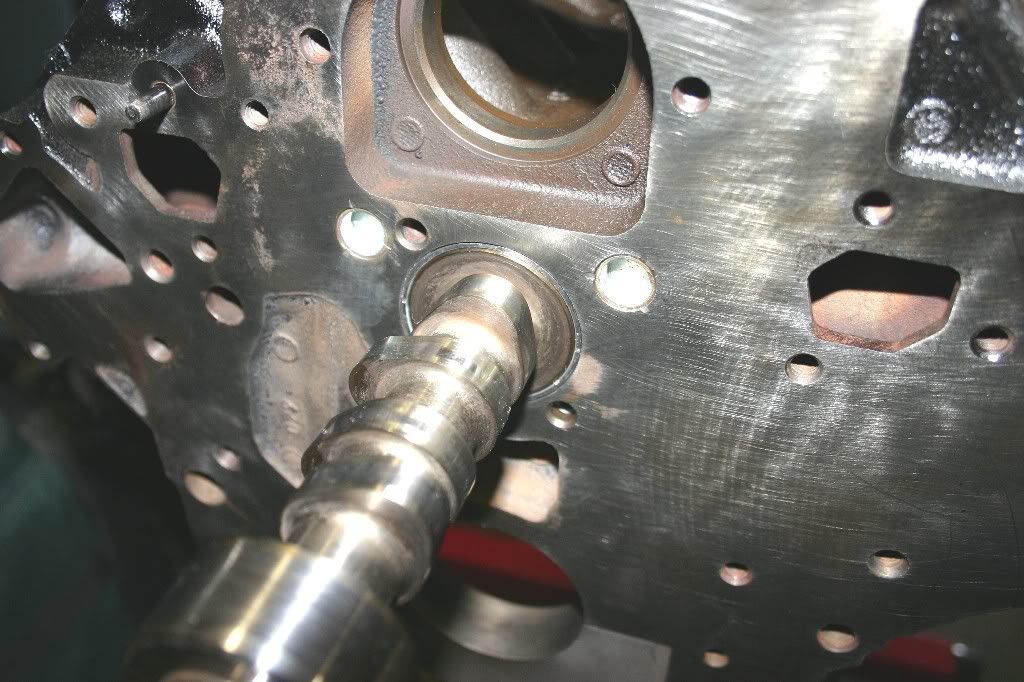
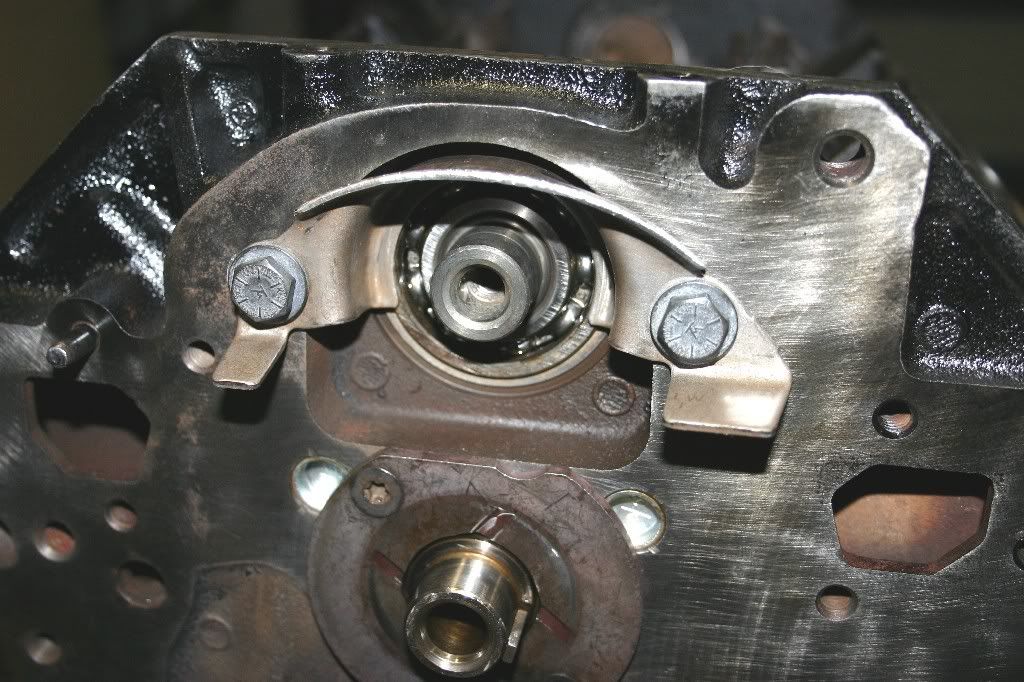
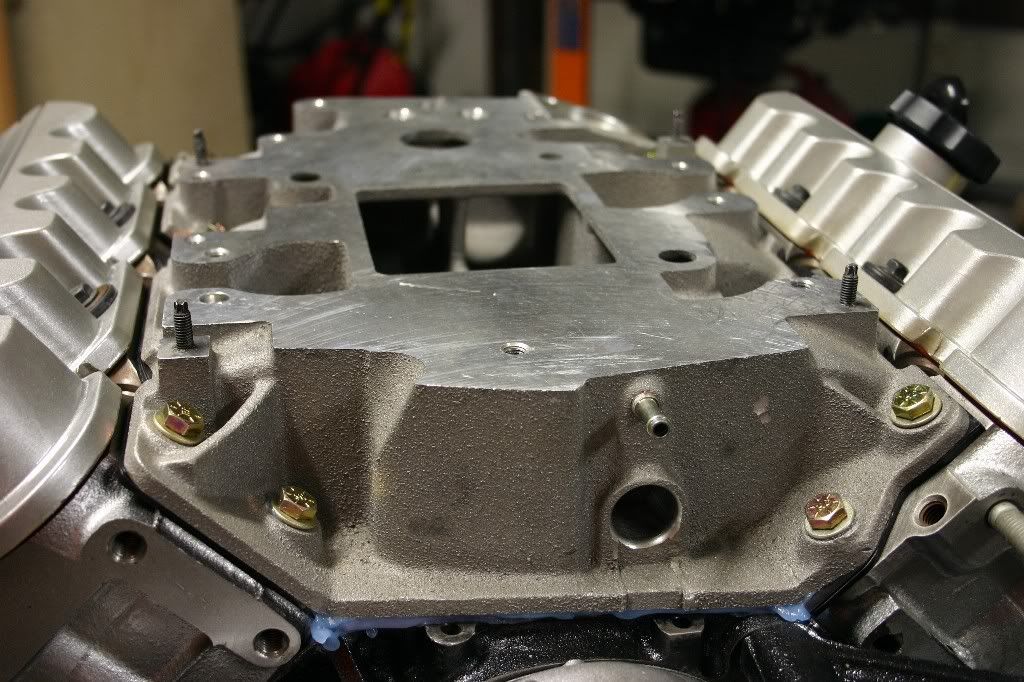
Next up is the cam retainer plate and its screws. Again, apply a little assembly lube to both faces and install. Torque the #30 Torx screws to 11ft-lbs. The purpose of this plate is to keep the camshaft from walking fore-aft in the block. The plate is trapped between the shoulder of #1 cam journal and the back of the balancer shaft drive gear.

Image

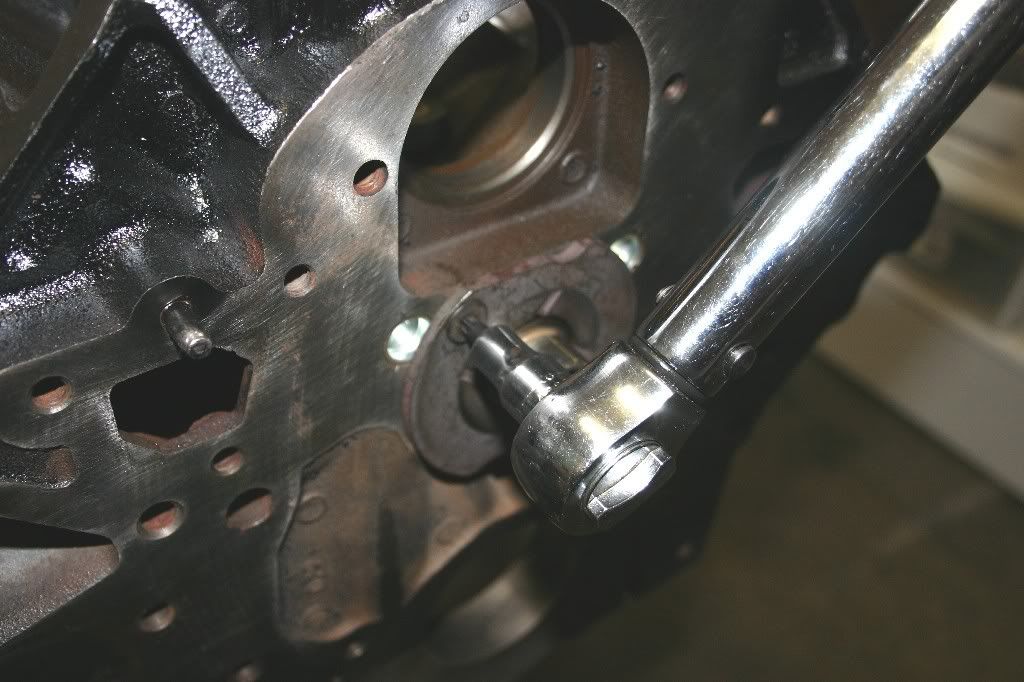
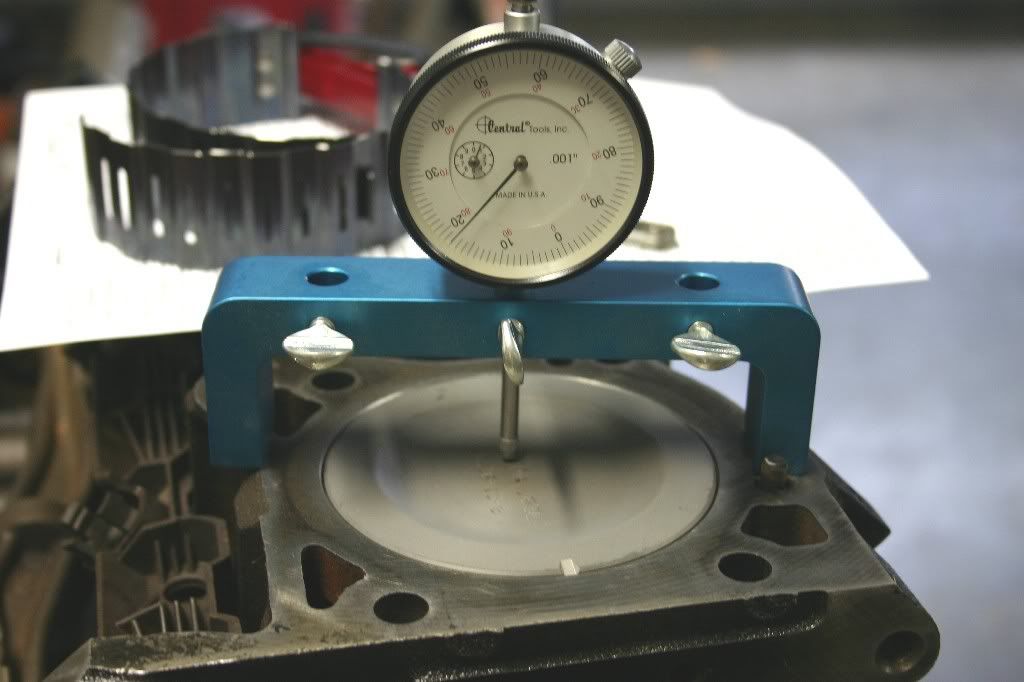
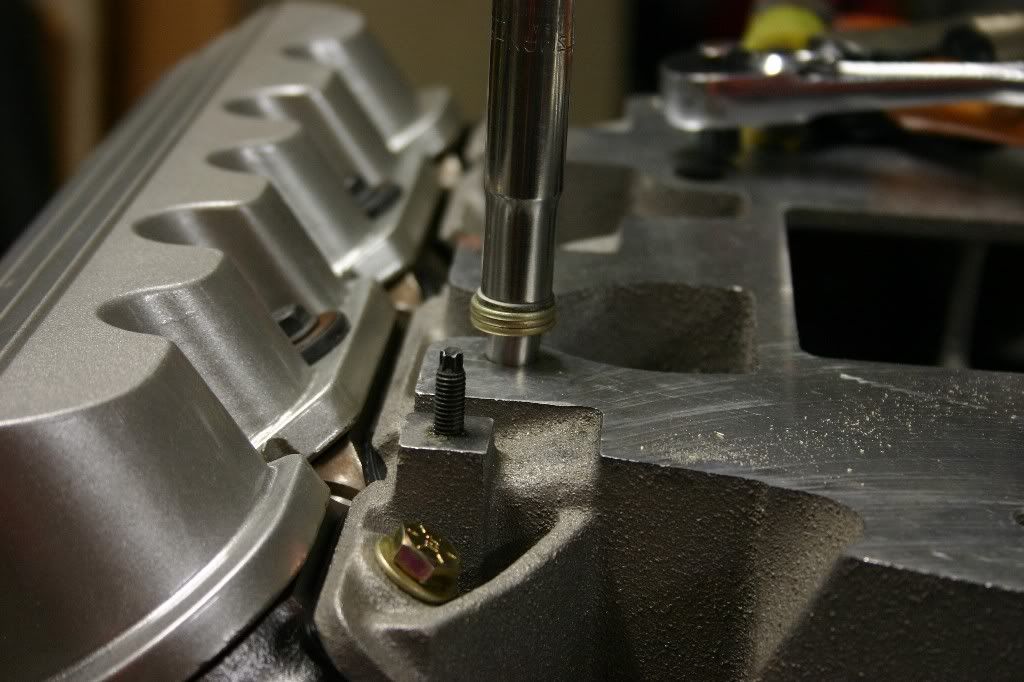
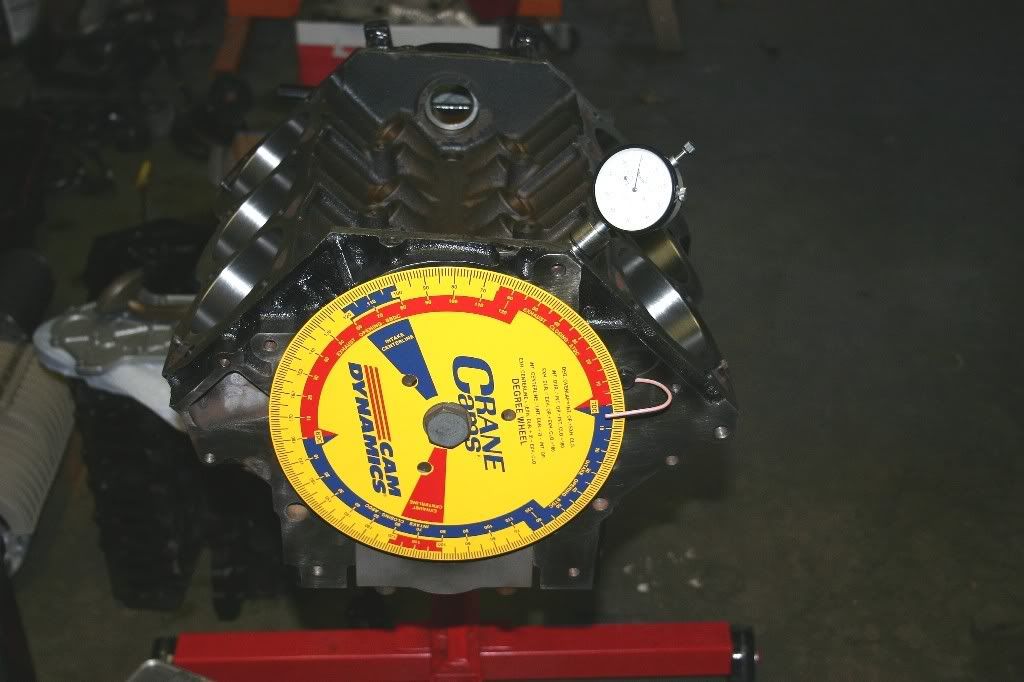
Ok, gears go on next and then a degree wheel is temporarily installed on the nose of the cam. (Note: A degree wheel is usually done on the crank nose, but since I know the block centerline and have the dimple on the cam gear to reference, I can get a profile of the cam lobes without the crank.)

Image


The pointer (pink wire in photo) is just a chunk of coat hanger wire bolted to the block.

Image


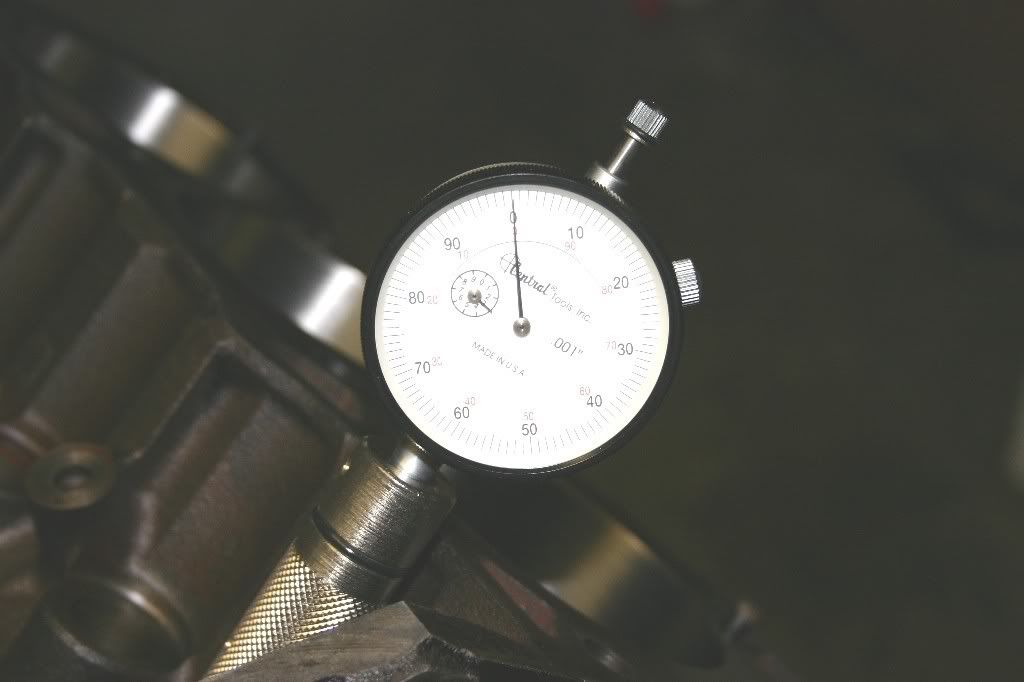
A dial gauge is in the lifter bore with its tip riding on the cam lobe. In the photo it's the #1 Exhaust lobe. Now, the tedious task of rotating the cam and recording the reading on the dial gauge. Again, because the degree wheel is on the cam, the markings on the degree wheel need to be doubled to represent the crank rotation...in other words, 10 degrees of cam rotation is equal to 20 degrees of crank rotation.

With that done, here's the plot of the cam's profile:

Image


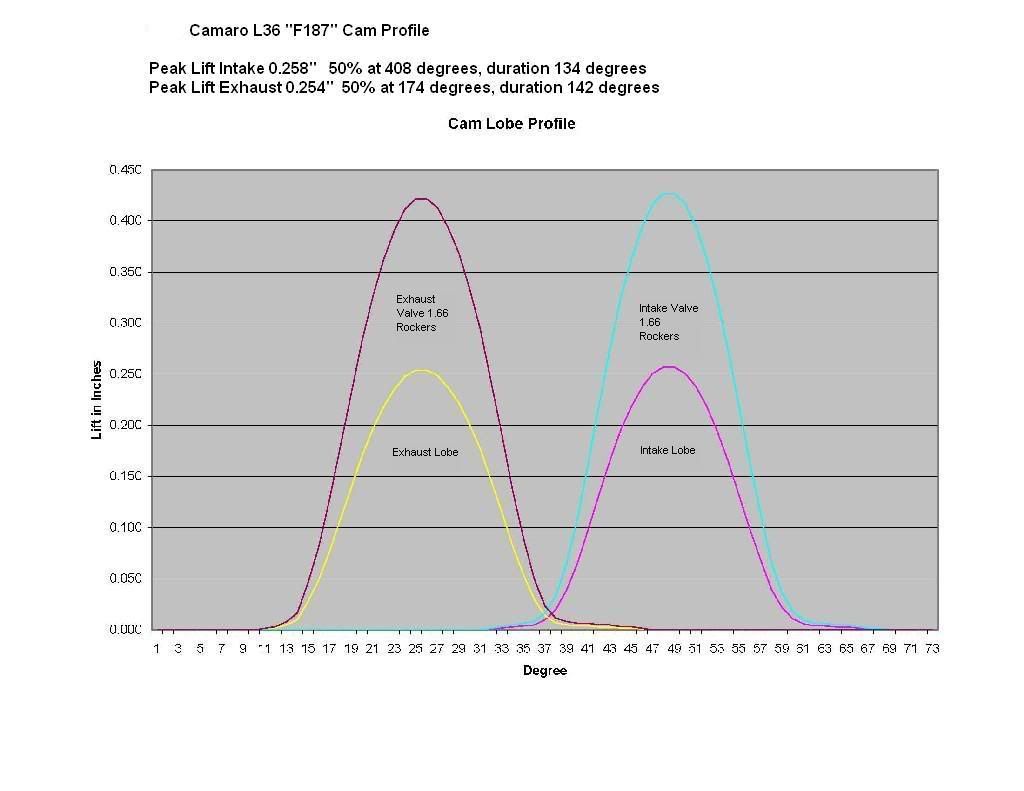
The valve lift numbers are computed with a 1.66 rocker arm ratio. (I need to mock one up to see if that is the actual ratio of the rockers.)

Next, I need to do the same thing to the stock L67 motor to see what its cam grind looks like.

I sat down with a calculator and figured out the "Grind Card" for the cam (for comparative purposes to other cams.)

Intake: opens 24 degrees ATDC, 191 degrees duration @ 0.050", lobe lift 0.258"
Exhaust: opens 6 degrees BBDC, 194 degrees duration @ 0.050", lobe lift 0.254"
Lobe separation angle 115 degrees.

The lobes are asymmetrical (dual pattern grind)

_________________
Bye Bye 1990 Bonneville LE... Now it belongs to my daughter
In the Garage: 2009 Subaru Outback, 1987 Camaro, 2006 SV650S, 1995 Regal 182 "ASANAGI", 1962 Ford Galaxie 500, 1995 Ford F150 XL 4WD, 1953 Farmall Cub


Top
 Profile  
 
PostPosted: Sat May 24, 2008 8:48 pm 
Offline
Retired Gearhead
Retired Gearhead
User avatar

Joined: Tue May 20, 2008 9:11 pm
Posts: 2156
Location: Fayette City,PA
Year and Trim: 1990 Bonneville LE
Originally Posted: Jan 31, 2007

With the cam back in, and while waiting for the crankshaft to be finished, I can assemble some of the top-end of the motor.

First to go back in are the lifters. They get pumped up with oil (stick them in a jar of oil and use a dowel rod to pump the pushrod seat a few times.) With oil inside the lifter, smear the outside of the rocker with assembly lube and insert into the lifter bores. This is #4 intake going in.

Image


Once all the lifters are in, smear assembly lube in the pockets of the lifter guides, install them over the lifters, and torque the bolts to 22ft-lbs.

Next item to go in is the balancer shaft. Pre-lube the roller bearings and smear assembly lube on the journal at the other end of the balancer. Here I'm using a 34mm deep socket to drive the roller bearing race into the block.

Image


Next item is the retainer plate. It's bolts also get torqued to 22 ft-lbs

Image


Next item to install is the balance shaft driven gear and the bolt. Bolt is 13/16ths and is torqued 16ft-lbs + 70 degrees of rotation.

Image


There's some tricks to installing the balancer shaft bolt. First, make sure the dimples in the gears line up with the gears fully seated. The gears are helical cut to run quiet. Now, there's no place to grab hold of the balance shaft to torque the bolt? What I did was slip a piece of soft metal into the right side of the gears where they mesh (sheet lead, brass, or copper are all acceptable materials) When the torque is applied, the gear teeth will try to feed the soft metal through and jam the gears in place. The lead/brass/or copper is much softer than the steel gear teeth, so no damage to the gears will occur. After it is torqued, turn the balance in its normal direction and remove the crushed metal from the gear teeth.

After the bolt is torqued, apply a bead of assembly lube to the gear teeth and spin the cam gear a few times. We're ready to move on to the next parts.

A few little tid-bits: The balancer shaft is made by Briggs & Stratton. You can see their logo cast into the balancer shaft, near the center. In operation, the gear drive spins the balancer at the same RPM as the crankshaft, but in the opposite direction. (Crank and Cam spins clockwise when viewed from the timing cover end, balancer spins counter-clockwise.)

More prep work... Here the cam timing magnet is being glued in place on the cam timing chain sprocket. While the metal tabs should hold the magnet in place, the occurrence of its plastic housing breaking and letting the magnet fall out is high enough that a little extra insurance is in order.

Keep the epoxy below the back surface of the sprocket...this surface will be in contact with the balancer drive gear when it is installed!

Image

_________________
Bye Bye 1990 Bonneville LE... Now it belongs to my daughter
In the Garage: 2009 Subaru Outback, 1987 Camaro, 2006 SV650S, 1995 Regal 182 "ASANAGI", 1962 Ford Galaxie 500, 1995 Ford F150 XL 4WD, 1953 Farmall Cub


Top
 Profile  
 
PostPosted: Sat May 24, 2008 8:53 pm 
Offline
Retired Gearhead
Retired Gearhead
User avatar

Joined: Tue May 20, 2008 9:11 pm
Posts: 2156
Location: Fayette City,PA
Year and Trim: 1990 Bonneville LE
Originally Posted: Jan 31, 2007

Quote:
sandrock wrote:
That engine is looking really good. It's amazing how similar an S2 is to an S1 though they are two different animals. Is this build going to end up with head studs or the normal TTY head bolts?


This one is going to use normal Torque to Yield bolts. I considered using head studs, but the gasket kit from Victor included all the head bolts (but no rocker arm bolts..go figure.)

The way I see it, this motor is never getting taken down again in it's life. With a 0.030" overbore already, it's not really a candidate for another overbore. If she blows, she's done...I'll strip it of usable parts and call it a day. Hence, I don't see much need for using re-usable studs.

_________________
Bye Bye 1990 Bonneville LE... Now it belongs to my daughter
In the Garage: 2009 Subaru Outback, 1987 Camaro, 2006 SV650S, 1995 Regal 182 "ASANAGI", 1962 Ford Galaxie 500, 1995 Ford F150 XL 4WD, 1953 Farmall Cub


Top
 Profile  
 
PostPosted: Sat May 24, 2008 8:56 pm 
Offline
Retired Gearhead
Retired Gearhead
User avatar

Joined: Tue May 20, 2008 9:11 pm
Posts: 2156
Location: Fayette City,PA
Year and Trim: 1990 Bonneville LE
Originally Posted: Jan 31, 2007

More stuff to clean and check out. This is the oil pump (as viewed from the timing cover side of the pump.)

Image

Rather a neat design. The oil pump is attached to the inside of the timing cover by five counter-sunk screws with T-30 Torx heads. The pump in driven directly off the crankshaft via the timing chain sprocket. The inner "rotor" for lack of a better word turns an offset outer rotor that spins in a pocket machined into the timing cover.

As the inner rotor is spun by the crank, oil enters the large gap between the rotors and is trapped by the teeth. as the cavity between the teeth gets smaller, the oil's pressure is raised and it exits towards the filter.

What we are looking for is any damage to the teeth of the rotors, as well as any metal impacted into the machined surfaces. Also, the clearance of the whole assembly needs to be checked. If it is too loose, then oil will escape around the rotors, lowering the oil pressure the pump can produce.

During reassembly, the cavity between the rotors is getting packed with grease to ensure is gets good suction and starts pumping oil out of the pan. Until that happens, the only lube protecting the parts will be the assembly lube.

The first oil filter and 4 quarts of oil get chucked after about 20 minutes of run time. All the assembly lube and grease is going to get melted once the engine comes up to temp and end up in the oil filter. There's no break-in period after this overhaul. Roller cams don't need it and there's no Molly coating on the lifters. The rings will wear in pretty quickly during normal driving, so, as soon as the motor lights off and warms up, it's ready to run. (Nice, easy "Pass or Fail" test... )

Quote:
sqela wrote:
at 30 over that block is relly pushing it


Well, any overbore is rolling the dice. The bigger the bore, the more the odds start stacking up against you. Pistons are available up to 0.060" overbore. But I would venture a guess that few blocks will take that. 0.030" over is usually safe unless the cores shifted a lot during the casting process. Beyond that, the wall thickness of the bores needs to be checked to ensure that it's thick enough...then there's a risk of hitting an inclusion or hidden crack. That's why we start with the block work, and then carry on with other tasks after it's done. If the block was junk, there's the very real chance of scrapping it and cutting my losses before too much was invested.

Also, the words "cheap" and "L67" don't go together. Everything for this motor has been far more expensive than I'm used to seeing. The price tag of this rebuild is going to hit about $1300 before I even get to kick the tires and light the fires. That's still cheaper than a remanufactured long block, but it's about twice what it costs to overhaul a typical 350 Chevy V8.

_________________
Bye Bye 1990 Bonneville LE... Now it belongs to my daughter
In the Garage: 2009 Subaru Outback, 1987 Camaro, 2006 SV650S, 1995 Regal 182 "ASANAGI", 1962 Ford Galaxie 500, 1995 Ford F150 XL 4WD, 1953 Farmall Cub


Top
 Profile  
 
PostPosted: Sat May 24, 2008 9:05 pm 
Offline
Retired Gearhead
Retired Gearhead
User avatar

Joined: Tue May 20, 2008 9:11 pm
Posts: 2156
Location: Fayette City,PA
Year and Trim: 1990 Bonneville LE
Originally Posted: Feb 03, 2007

Rotating assembly is back from the machine shop, time to start reinstalling it.

Here's the crankshaft with pipe cleaners inserted in some of the cross-drilled oil passages to show where they go.

Image

The way the crank is drilled, the holes in the main journals feed oil to the adjacent rod journals. #1 Main feeds #1 rod bearing, #2 Main feeds both #2 & #3 rods, #3 Main feeds #4 & #5 rods, and #4 main feeds #6 rod.

The bearings are new, Clevite 77 (kit PN: MS-2022P) and you need to follow the instructions to get the bearing shells in the right spot. Inside the kit are two different upper bearing part numbers and four different lower part numbers. Little card in the package tells you which ones go where. After checking clearance with plastigage and giving them a dollop of assembly lube, the crank can go in on them.

Image

Main caps go on next and the main cap bolts torqued.

With the main caps on and torqued (30ft-lbs+110 degrees for the mains, 11ft-lbs+45degrees for the side bolts) the timing chain and tensioner can be installed.

Image

The cam bolt is truly the bolt from H*** on this motor. Torque spec is 74 ft-lbs + 90 degrees. The final torque on the bolt has got to be well over 110 ft-lbs.

Tensioner is a little easier, it's an 8mm head and just needs some finger pressure to get it on the chain with the tang of the spring in the block hole. Tighten it to 16 ft-lbs.

Next up, time to check the fit of the piston rings. They are all pre-gapped, so there shouldn't be any problems, but checking them will make sure they are correct. To do this, I put them one at a time into the bore they will be installed in, use a piston to drive them partway down the cylinder bore, then measure the gap in the ring with feeler guages.

Image

With that done, I can assemble them onto a piston, and put a compressor on it. Here's one going into the block.

Image


Earlier on, during the disassembly, I mentioned that the 3800 is not a "zero deck" motor. Here's what I'm talking about. The gauge in the photo is set to measure the amount the piston protrudes above the block deck.

Image


When assembled, the piston sticks out 0.018" above the deck. This is OK and normal, since it is less than the thickness of the head gasket. If material was removed from the deck, then we might have the problem of the piston crowns hitting the cylinder head.

Image

With all the pistons in and the rod bolts torqued, it's time for the cylinder heads. Here I'll have to pause, since the head bolts that were shipped are the wrong kit.

_________________
Bye Bye 1990 Bonneville LE... Now it belongs to my daughter
In the Garage: 2009 Subaru Outback, 1987 Camaro, 2006 SV650S, 1995 Regal 182 "ASANAGI", 1962 Ford Galaxie 500, 1995 Ford F150 XL 4WD, 1953 Farmall Cub


Top
 Profile  
 
PostPosted: Sat May 24, 2008 9:14 pm 
Offline
Retired Gearhead
Retired Gearhead
User avatar

Joined: Tue May 20, 2008 9:11 pm
Posts: 2156
Location: Fayette City,PA
Year and Trim: 1990 Bonneville LE
Originally Posted: Feb 04, 2007

Well, while I didn't have enough head bolt to do both heads, I did have enough to do one, so I'll skip ahead a little and finish the 1-3-5 cylinder bank.

With the head on, I've installed the exhaust manifold and rocker arms. Nothing much exciting to it. Things are just going back together the way they came apart. Since I only have one head on, I've got to tighten the rocker arm bolts one pair at a time, rotating the crank the correct number of degrees per the firing order.

The exhaust manifold has been painted with a hi-temp exhaust paint and cured in an oven @ 500 degree for an hour. The exhaust manifold bolts are a mix of studs and bolts (bolts go in the lower flange holes on #3 and #5 cylinders so they don't interfere with the dipstick tube.

Image


With the manifold on and the torqued, time to finish out the cylinder head with the dipstick tube, valve cover, heat shield, plug wire loom, coil pack bracket and coil packs.

Image


It's starting to look like an engine again...

Next up, timing cover/oil pump/water pump/oil filter boss assembly.

_________________
Bye Bye 1990 Bonneville LE... Now it belongs to my daughter
In the Garage: 2009 Subaru Outback, 1987 Camaro, 2006 SV650S, 1995 Regal 182 "ASANAGI", 1962 Ford Galaxie 500, 1995 Ford F150 XL 4WD, 1953 Farmall Cub


Top
 Profile  
 
PostPosted: Sat May 24, 2008 9:18 pm 
Offline
Retired Gearhead
Retired Gearhead
User avatar

Joined: Tue May 20, 2008 9:11 pm
Posts: 2156
Location: Fayette City,PA
Year and Trim: 1990 Bonneville LE
Originally Posted: Feb 05, 2007

The timing cover was really nasty, so I spent an hour or so just scrubbing it down and removed the crank seal. Tried punching it out from the oil pump side but all the seal metal did was bend out. On the left side, front, there’s a flat cast into the cover that the seal lip peeks out of. Using a mallet and a flat blade screwdriver, I managed to raise the outside edge of the seal and could then drive the seal out.

Putting the new seal in was a piece of cake. Set it in place, then drive it into the pocket with a wood board and a mallet.

Here's the cover with the seal in place and the water pump back on.

Image


I've been trying to figure out a way to pre-oil the engine before starting it up. Normally on the engines I've worked on, you can drive the oil pump shaft with an electric drill to pump up the oil pressure and fill all the passages. Since the oil pump on the 3800 is driven directly from the crank, this isn't possible.

While cleaning up yesterday, I got a momentary flash of brilliance....here's what I came up with:

Image


What I've done to the filter boss is thread a compressor fitting into the spot where the oil pressure sensor/fuel pump switch normally goes. Now, when the engine is completely assembled I can pump the oil in using compressed air. What I will do is fill the compressor hose full of oil, plug it into the fitting, and run about 10psi of air pressure behind it to force the pint or so of oil in the hose into the engine. Filling the oil filter up with oil before screwing it on will fill the pump with oil and prime it.

_________________
Bye Bye 1990 Bonneville LE... Now it belongs to my daughter
In the Garage: 2009 Subaru Outback, 1987 Camaro, 2006 SV650S, 1995 Regal 182 "ASANAGI", 1962 Ford Galaxie 500, 1995 Ford F150 XL 4WD, 1953 Farmall Cub


Top
 Profile  
 
PostPosted: Sat May 24, 2008 9:22 pm 
Offline
Retired Gearhead
Retired Gearhead
User avatar

Joined: Tue May 20, 2008 9:11 pm
Posts: 2156
Location: Fayette City,PA
Year and Trim: 1990 Bonneville LE
Originally Posted: Feb 05, 2007

Quote:
fantastic88 wrote:
Isn't the L36 FWD different than the L36 desighned for RWD. If so, what are the differences.


No, they are the same basic short block regardless of FWD vs. RWD use. They both are based on the same block casting. Only differences are between the L67 rotating assembly and the L36 rotating assembly. I thought that the Camshaft grinds might be different, but every place I have looked up replacement cams lists the same Melling MC1292 roller cam as a replacement for both N/A FWD and RWD motors..as well as the S/C L67. If someone cares to look up GM part numbers and post them, that would be great.

In a Long Block state, the differences are:

Entire intake manifold - RWD motors have a manifold with the TB on the Accessory Drive end of the motor. FWD motors have the TB on the Bell housing end of the motor. All the FI related components are also different because of the manifolds.

Valve covers - Same design, but the RWD ones for the F-Bodies are die cast metal vs. Composite. Doesn't mean much, but is can be handy if you want to modify them.

Oil Pan - FWD motors have a rectangular pan with the drain plug on the left side of the motor (rear when it's in the car.) RWD motors have a pan with two large notches taken out of the bottom of the pan. One allows the motor to clear the cross member, the other allows the exhaust Y-Pipe to cross under the motor. The drain plug is also on the centerline of the motor at the bell housing end of the pan. In a RWD installation, the motor is angled slightly towards the rear, so the drain plug is positioned at the lowest part of the oil pan. FWD motors sit level in the mounts.

Harmonic Balancer - Three different flavors: Single serpentine belt for the RWD motors, Single with enough metal for a double row for L36 FWD, Double belt row for L67.

Oil Filter Boss - RWD motors need to clear the cross member, as well as the power steering rack. So the filter boss points straight towards the front of the car. The fitting for the oil pressure switch is also moved above it. (In an F-Body, the engine bay is ultra-tight fitting to the motor..hanging the oil pressure switch off the side would probably hit the fender well)

Here's the two side-by-side:

Image

_________________
Bye Bye 1990 Bonneville LE... Now it belongs to my daughter
In the Garage: 2009 Subaru Outback, 1987 Camaro, 2006 SV650S, 1995 Regal 182 "ASANAGI", 1962 Ford Galaxie 500, 1995 Ford F150 XL 4WD, 1953 Farmall Cub


Top
 Profile  
 
PostPosted: Sat May 24, 2008 9:46 pm 
Offline
Retired Gearhead
Retired Gearhead
User avatar

Joined: Tue May 20, 2008 9:11 pm
Posts: 2156
Location: Fayette City,PA
Year and Trim: 1990 Bonneville LE
Originally Posted: Feb 06, 2007

Quote:
95naSTA wrote:
I just wanted to add that the cams are the same. But, the timing cain gears for both are are slightly different and the L67 cam is retarted a few degrees compared to the L36's.


That's handy to know. The timing chain is a lot cheaper and easier to get to than the cam. If this stock cam (with stock L36 timing chain set) doesn't act right with a blower on it, I at least have the option of changing the timing gear without pulling the whole intake manifold to change the cam.

Well, hit another little snag in the assembly. A whole bunch of parts showed up today. Got the four needed head bolts to finish off the 2-4-6 cylinder bank. Also got the torque axis mount casting, spacers, and studs. That's where the snag comes in.

Since the motor that provided the brackets was a Grand Prix, the motor looks just like the photo from GM...with the torque mounts coming off the cylinder heads towards the radiator support. The belt routing on the front of the motor is different and precludes the use of the torque axis mount.

So now the search is on for a set of brackets from a 1997 Bonneville with the torque axis mounts to finish dressing up the front of the motor. I could still finish the motor and install it without the torque axis mount, but that means changing out the accessory belt setup later. (It would be a heck of a lot easier to get it done now, before the motor goes into the car)

Meanwhile a little Oil Pan Spotting....

Since we were talking about oil pans and the differences between series II FWD and RWD motors, here's some illustrations to help you out.

Here's the oil pan being used on this Series II L67 (FWD L36 is the identical pan)

Image

Image


Ok, Now this is what a Series II Rear Wheel Drive pan looks like


Image


And finally, while it is tempting to try to use an older Series I pan, here's some differences that will screw you up:

Image

Image


Hope that clarifies that a little

Now, on to Installing the Oil Pan:

First up is the oil pickup tube and screen. It installs with two 1/4"-20 tpi, 3/4" long bolts. There's a paper gasket between the pickup tube and the block (don't forget it) and torque to 11 ft-lbs

Image

Next up, the windage tray/oil pan gasket. On this one, I smeared a dab of RTV at the seam between the timing cover and the block. Then slipped in the gasket/windage tray.

Image

And finally, the oil pan. There are twenty 1/4"-20 tpi x 1" bolts. Put them all in loose, then go around and tighten them down. Oil pans are flexible, so you need all the bolts in first to line the pan up before you start tightening them down. That will pull the pan into shape. This pan was a little twisted. The bottom of it had been dented in. I hammered the dents out with a mallet and a block of wood before cleaning and repainting the pan.

Image

That leaves the drain plug (with new rubber washer) and a pipe plug to seal up the oil level sender bung (I don't have the wiring to support this feature, so I'll just plug the hole in the pan.)

_________________
Bye Bye 1990 Bonneville LE... Now it belongs to my daughter
In the Garage: 2009 Subaru Outback, 1987 Camaro, 2006 SV650S, 1995 Regal 182 "ASANAGI", 1962 Ford Galaxie 500, 1995 Ford F150 XL 4WD, 1953 Farmall Cub


Top
 Profile  
 
PostPosted: Sat May 24, 2008 9:57 pm 
Offline
Retired Gearhead
Retired Gearhead
User avatar

Joined: Tue May 20, 2008 9:11 pm
Posts: 2156
Location: Fayette City,PA
Year and Trim: 1990 Bonneville LE
Originally Posted: Feb 10, 2007

More stuff going on. Idler Pulley and the Torque Axis mounting. Note, apply sealant to bolts and studs, some of them extend into the water jackets.

Image


Front view of the motor with the Torque Axis mount in place. For the moment, it's just loosely installed. Once all the other accessories and belts are in place, I'll install it for real.

Image


Moving over to the left side of the engine, I can hang the exhaust header on.

Image


And finish it off with the lift ring and heat shield.

Image

If the heat shield looks a little funny, well, it is. I didn't know it till now, but the Bonneville and Grand Prix manifolds are slightly different with respect to the collector placement. Note the manifold in the photo has the collector right below the #4 cylinder exhaust port. On the Grand Prix that donated the heat shield, the collector is between the #4 and #6 exhaust ports. Surprise!

I cut the heat shield to get it to fit. I'll probably get a replacement heat shield before the motor gets installed.

Also, there's a modification to the header that is not standard. The EGR pipe on #6 and the extra header flange have been removed. The car will not be using EGR, so I had the tube lopped off and welded closed.

Quote:
95naSTA wrote:
That oil pickup looks different from the one on my 95 and the one in my spare parts bin.


That's the F-Body pickup in the photo. I didn't see any need to discard it as it fits the pan just fine.

Some more stuff going on. The intake manifold gasket surfaces are cleaned to a inch of their lives with acetone to remove any oil on the surfaces.

Image

Next, I applied beads of RTV on both ends of the valley and also around the coolant passages coming out the heads. ( This isn't the way you are supposed to do it, but with all the coolant failures that are happening, I'm going to deviate and try to take extra steps to seal the manifold up.)

Image

Next on, the intake gaskets and more RTV. On the manifold valley gaskets, there's is only one gasket type supplied in the kit. You must trim off one leg on each gasket to get them to fit properly to the block.

Image

Now the intake manifold goes on with the twelve 5/16" - 18 tpi x 1.25" bolts. When installing them with a lot of RTV, get all the bolts in loose, then start tighening them down in a criss-cross pattern (working from the middle four towards the ends.) Don't be in a big hurry, just keep repeating the pattern till they are all hand tight. Then torque to 11 ft-lbs in the same criss-cross pattern.

Image

Once the manifold is on, I need to install the locating dowel pins for the supercharger. They are pressed into the counter bores on two of the SC bolts. Here, I'm using a bolt and a stack of washers to press one of them into the manifold.

Image

And last, on goes the supercharger with it's gaskets and O-rings.

Image

Time to take a break and start fabricating a few items I'll need to finish this. (These are items that are caused by the motor going into a 1990 Bonneville.)

_________________
Bye Bye 1990 Bonneville LE... Now it belongs to my daughter
In the Garage: 2009 Subaru Outback, 1987 Camaro, 2006 SV650S, 1995 Regal 182 "ASANAGI", 1962 Ford Galaxie 500, 1995 Ford F150 XL 4WD, 1953 Farmall Cub


Top
 Profile  
 
PostPosted: Sat May 24, 2008 10:07 pm 
Offline
Retired Gearhead
Retired Gearhead
User avatar

Joined: Tue May 20, 2008 9:11 pm
Posts: 2156
Location: Fayette City,PA
Year and Trim: 1990 Bonneville LE
Originally Posted: Feb 11, 2007

Here are the custom bits and pieces...


First off, I want to use a two-piece A/C Compressor mount instead of the one piece mount that wraps around the edge of the block and attaches to the motor mount pads. To do this, I need to take an inch off the spacer for the torque axis mount (it uses the same block mounting hole as the A/C bracket.)

Here's the cut-off tool on the lathe cutting off the extra inch.

Image


And here's the spacer back in place with the A/C mount sandwiched between it and the block.

Image


Next, I need to do something with the fuel rails. My 1990 Bonneville does not have the quick disconnect fittings (they came to GM-Land a few years later) so I need a standard pipe fitting of some sort on the rail. I decided to go with AN pipe fittings (-6 for the feed line, -4 for the return to the tank.) These are pretty standard hot-rod stuff, but to fit them on the rails, I had to machine custom ones. For the feed line, I took a male AN-6 to male AN-6 fitting, bored one end out to 3/8", then machined the threads off on one side. The finished fitting was then silver soldered onto the injector rail pipe. The return is the same, only using a -4 fitting bored out with a 1/4" hole.

Image

And last, but not least, a custom plug for the EGR port on the intake manifold

Image


Quote:
dillcc wrote:
Is this why you didn't use the aluminum frame LIM gaskets?


No. The gaskets that need trimmed are the end of the block, not the intake-to-head gaskets.

Personally, I don't know if the latest and greatest aluminum frame gaskets work any better than the plastic framed ones. They are all putting a lot of faith in a thin little rubber bead around the head coolant passages.

Quote:
crzydmnd72 wrote:
It will be interesting to see how your RTV around the coolant ports holds up. Of course, only the long term will tell.


Yeah, Me too. It's a gamble of sorts, but I'm betting I know why they leak in the first place and the extra wide bead of RTV around the coolant passages should solve it.

After a long week on the job, and a few trips to the auto parts store. I can finally mock up the accessory drive belts.

The arrangement I came up with is a "bastard" drive system. The Supercharger belt is using the 1997 Bonneville arrangement with a Goodyear 4060725 belt, 3.5" tensioner pulley, and 3" idler. The Accessory drive is 2000 Grand Prix, using a Goodyear 4060915 belt and 3" tensioner pulley. As you can see, the belt arrangement works and I can use the late model alternator, with the 1997 Torque Axis motor mount.

Image

Another little factoid...I used the pressed steel pulleys whenever possible instead of the plastic ones. The reason is pretty simple...the bearings are usually what goes bad on an idler. Those bearings are sealed roller bearings with common sizes and are readily available. Here on the east coast of Florida there's an outfit called "Miller Bearings" that stocks most of the metric bearings and they are far cheaper than new idler & tensioner pulleys. With a steel pulley, use an appropriate socket that fits the outer race of the bearing and drive the bearing out of the center of pulley. Then plop that bearing down on the counter and you can get a replacement for about $2. (The inner, outer, and width dimensions in millimeters is stamped into the side of the bearing) Then drive the new bearing into the steel pulley, check that it's seated square, and you are good to go. Beats blowing $30 on a replacement pulley. This only works on the steel pulleys. The plastic ones are cast around the bearing, locking it in place.

Now, with any luck at all, the two plastic coolant elbows and water neck will be in tomorrow. With that I can finish the front of the motor for real and pressure test the coolant passages for leaks. I still need to take the motor off the engine stand tomorrow and install the rear cover and crank seal to finish up the assembly (just not enough room to do this on the engine stand). Everything else will wait until the motor is installed in the car.

Quote:
crzydmnd72 wrote:
RE: the pulleys. I have never had a long lasting aftermarket pulley. The aftermarkets I used for a few years were Factory Air brand. I could get about 10k miles outta them. Finally just started carrying a spare in the trunk in case I had to change one out roadside. (high usage service vehicle) A trip to the junkyard a few years ago netted me some used OEM ones that are still running.

Did you use the Factory Air brand or a better one?


The two 3" idlers are original GM with new Timken roller bearings. The 3.5" smooth idler is a Dayco replacement, and the ribbed idler on the SC belt is a GM replacement plastic (PN 125645509)

The bearing trick came to me via a motorcycle buddy. For years I bought bearings for the bikes at the Honda dealer, at a ridiculous markup. Then said buddy slapped me upside the head and explained the standard markings on the sides of the bearings. From that point on I've bought the bearings and seals from Miller.

Oh, I also picked up the thermostat today (Stant 13848, 44mm 180 degree) which I need to drill for relief holes and install tomorrow as well.

_________________
Bye Bye 1990 Bonneville LE... Now it belongs to my daughter
In the Garage: 2009 Subaru Outback, 1987 Camaro, 2006 SV650S, 1995 Regal 182 "ASANAGI", 1962 Ford Galaxie 500, 1995 Ford F150 XL 4WD, 1953 Farmall Cub


Top
 Profile  
 
PostPosted: Sat May 24, 2008 10:12 pm 
Offline
Retired Gearhead
Retired Gearhead
User avatar

Joined: Tue May 20, 2008 9:11 pm
Posts: 2156
Location: Fayette City,PA
Year and Trim: 1990 Bonneville LE
Originally Posted: Feb 18, 2007

[quote]1993 SLE wrote:
coming along Very nicely Curt [/quote


Thanks, another day, another little mini-project.

No dice on the coolant elbows and water-neck, so I figured I could test a few of the sub-systems to see that everything was working as it should prior to being installed in the car.

This little "Rube Goldberg" contraption is how I test the injector rails and the injectors themselves. In the photo, the gauges are regular R-12 A/C manifold gauges. Since I converted the rail to run with AN-4 fittings on the outlet side, no adaptors were needed to hook these up. The red hose (High Pressure gauge) is connected to the Schrader valve on the opposite side of the motor. The blue hose (Low Pressure gauge) is connected to the fuel return line. The black hose is from the air compressor in the garage and is connected via a coupling (quick disconnect barb to 3/8 NPT, then to a 3/8 NPT to AN-6 fitting) to the AN-6 fitting I installed on inlet side of the rail. The little hand pump is connected to the vac fitting on the fuel pressure regulator.

If your rails are regular GM quick disconnects, you can do the same thing but you will need to buy or make converters (using a junkyard pair of GM fuel lines and hose barbs)

Image


With the rail pressurized, I'm listening for any hissing air that would indicate a stuck injector or an O-ring failure. As you bring the air pressure up, you low side gauge will suddenly jump from 0 to the high side pressure. That's the point where the regulator is opening to dump the excess pressure overboard. Try it a couple of time with various amounts of vac and pressure on the regulator fitting and you can map out actual fuel rail pressure the regulator will set vs. the amount of boost or vac signal coming from the manifold. (Crack open the low side of the A/C Manifold gauges so the output of the regulator has some place to go...it can only dump the excess pressure to the return line, so you have to open the return line and allow the pressure drop to occur)

For reference sake, I plotted the rail pressure vs. the signal vac. With zero signal pressure, the regulator opens at 54 psi rail pressure. With 20 inches of vac on the regulator signal, the regulator opens at 50 psi rail pressure. The regulator is linear, with about a 1 psi drop in rail pressure for every 5 inches of vac. I ran out of pressure gauges, so I can't measure the rail pressure vs. positive boost pressure on the regulator, but I would venture a guess that it will also be linear.

With a battery, pushbutton, and an old chunk of injector wiring harness, I can go down the line and pulse each injector, listening for an audible hiss of air when the injector open.

Image


With this rig, you can also clean out the injectors off the car. Fill the rail and injectors up with carb cleaner. Let it sit for a little while to give the cleaner a chance to dissolve the varnish inside, then hook up the air pressure and start pulsing the injectors. If you do it on the work bench, you can stick the end of the injector in a can to catch the cleaner coming out when you pulse the injector. You can also see the spray pattern from the injector. Not really great for checking the actual flow rates, but good enough to know the injectors are going to work and you aren't going to be dumping fuel all over the place as soon as the pump kicks in.

_________________
Bye Bye 1990 Bonneville LE... Now it belongs to my daughter
In the Garage: 2009 Subaru Outback, 1987 Camaro, 2006 SV650S, 1995 Regal 182 "ASANAGI", 1962 Ford Galaxie 500, 1995 Ford F150 XL 4WD, 1953 Farmall Cub


Top
 Profile  
 
PostPosted: Sat May 24, 2008 10:16 pm 
Offline
Retired Gearhead
Retired Gearhead
User avatar

Joined: Tue May 20, 2008 9:11 pm
Posts: 2156
Location: Fayette City,PA
Year and Trim: 1990 Bonneville LE
Originally Posted: Feb 22, 2007

Home stretch on the rebuild...

Time to take the motor off the stand and get the rear cover on. Like the intake manifold, I'm not relying solely on the paper gasket. I've cleaned the gasket surface on the block with acetone and applied a small bead of RTV around the coolant openings in the rear of the block. And a little more around the cover seams down to the oil pan.

Image


Gasket and cover go on next, along with the rear seal installed in the cover. This was an assembly mistake. I drove the seal on from the front side of the cover, flush with the face of the cover. After install I realized the seal was too far out and needs to be flush on the inside of the cover in order to seal the crank properly. At this point, the only thing to do was to carefully drive it in a little further and as square as I can make it. (I might need to pull it later and make a proper press to put a new one in if this one leaks.)
Image

Flex plate back on and ready to go back on the engine stand. I need to get some flex plate bolts as they are also torque to yield. I may opt to get some regular flex plate bolts and torque them the old way. That will be Ok, I still have a few weeks left before the motor goes in the car.


Image


With that, the basic motor is complete. All that is left to do is mount the throttle body, starter, and wait for the injectors to come back from being cleaned. Then she'll be ready to install in the car.

_________________
Bye Bye 1990 Bonneville LE... Now it belongs to my daughter
In the Garage: 2009 Subaru Outback, 1987 Camaro, 2006 SV650S, 1995 Regal 182 "ASANAGI", 1962 Ford Galaxie 500, 1995 Ford F150 XL 4WD, 1953 Farmall Cub


Top
 Profile  
 
Display posts from previous:  Sort by  
Post new topic Reply to topic  [ 35 posts ]  Go to page Previous  1, 2

All times are UTC - 5 hours [ DST ]


Related topics
 Topics   Author   Replies   Views   Last post 
There are no new unread posts for this topic. Rebuilding my Supercharger

V8killer94

2

1658

Wed Jul 31, 2013 6:01 pm

redzmonte View the latest post

This topic is locked, you cannot edit posts or make further replies. New 97 Bonnie, need engine rebuilding advice?

ttocs84

14

3647

Mon Aug 23, 2010 9:56 pm

willwren View the latest post


Who is online

Users browsing this forum: No registered users and 9 guests


You cannot post new topics in this forum
You cannot reply to topics in this forum
You cannot edit your posts in this forum
You cannot delete your posts in this forum
You cannot post attachments in this forum

Search for:
Jump to:  
Powered by phpBB® Forum Software © phpBB Group


phpBB SEO