Page 1 of 1
SLE mods and such. L26 UIM project updates coming up.
Posted: Thu Jun 12, 2008 8:47 am
by radomirthegreat
It's been a while since this has been brought up. I took advantage of BC going away to stop posting about my SLE and focus more on the SSEi. However, I'm getting really anxious to finish it up. Especially now that I have another digital camera, I'm about to put it to its second day of use. What I'd really like to get to is the exhaust tips, but for now here's some spoiler fun:


Here's what it looked like:
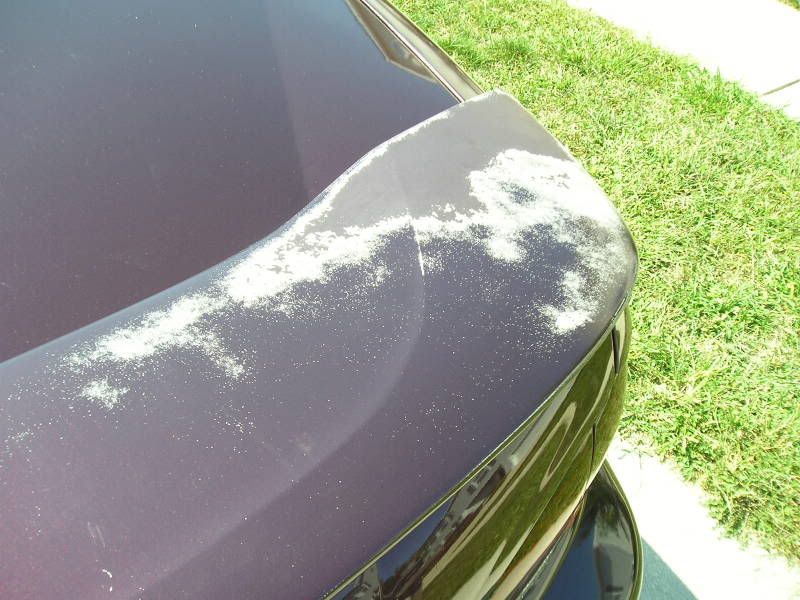
I took off the spoiler a few weeks ago to paint it. I bought from some auto parts stores three cans of Duplicolor (three random letters) 449. It's the stuff in the smaller can, not the bigger one. The paint went on well, but the rattle can clear coat just doesn't cut it. I have a paint gun, so I'm going to put on a few clear coats with that. I found a metallic flake clear coat. Has anyone here used it before? I'll probably soon take a picture of the SLE's spoiler's current condition. It looks good, but it's duller than the rest of the body paint.
So, on to the exhaust tips! I cross-drilled holes.

Then I put some rods through those holes.
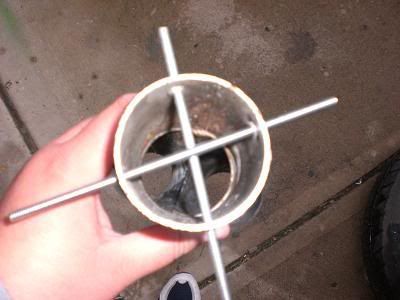
I used bolt cutters to shorten the rods.

Then, I chewed off the old exhaust tips. The saw was there as a backup.

That's where I stopped because of all the rain we had here recently. I'll soon finish up and take lots of pictures.
Re: SLE "mods" and such
Posted: Fri Jun 13, 2008 10:38 am
by JayGXP
maybe i missed something here but why did you put rods through the tips ?
Re: SLE "mods" and such
Posted: Fri Jun 13, 2008 2:34 pm
by TenGHz
They're his 'ghetto' welds.

Re: SLE "mods" and such
Posted: Fri Jun 13, 2008 3:27 pm
by radomirthegreat
TenGHz wrote:They're his 'ghetto' welds.
That is correct. You can't ghetto-weld better than not welding at all!
I'm working over the weekend, but I'll probably be able to finish up with the SLE on Monday or Tuesday and report my ghetto welding success with lots of pictures.
Re: SLE "mods" and such
Posted: Fri Jun 13, 2008 3:54 pm
by JayGXP

that is the funniest thing ever. but hey if it works roll with it

Re: SLE "mods" and such
Posted: Fri Jun 13, 2008 6:59 pm
by 00Beast
I was wondering the same thing, wow. Sounds like something my grandpa would've used on the farm back in the day
Re: SLE "mods" and such
Posted: Mon Jun 30, 2008 2:12 pm
by radomirthegreat
For all of you who know that everyone who lives at my house (and some others) are remodeling, the most important guy didn't show up today. Car work time!

I found at Auto Zone 5 qts of Valvoline Synthetic oil and 1 Bosch filter (rebranded Purolator) for $19.99. I bought 3 - one for the Alero (filter #3332) and two for my Bonnevilles (#3340 for the longer filter). My 94 has 2000 miles on its oil change, but that was done last October. The Mobil 1 synthetic oil still looks good as new, but should I change it?
Here's an oil change picture with the Alero and SLE.

Now, this is the fun part. I'm in the middle of it, so more pictures should come in later today. I've got the SLE lifted a bit.


Test sitting.

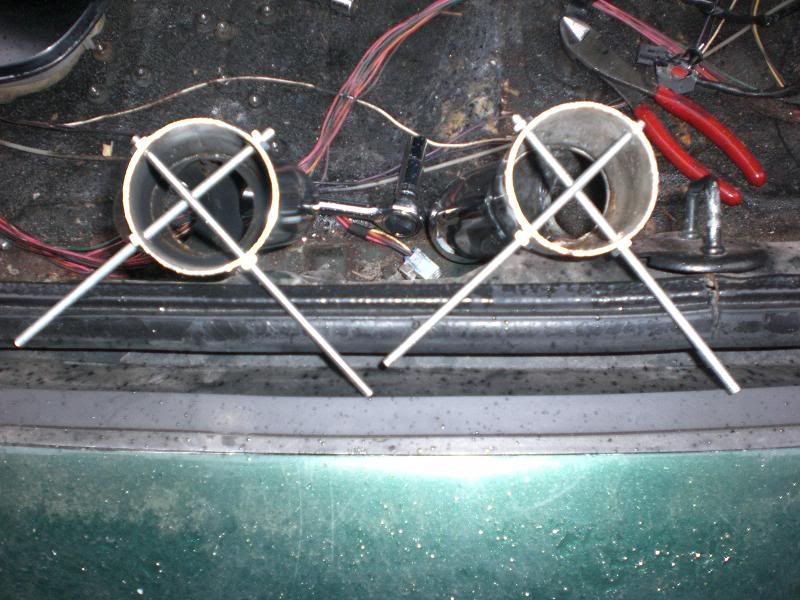
The awesome hand of Radomir sqeezes the exhaust tips into oval shapes!

One rod is mounted. I offset the holes a bit to make a really tight fit side-to-side. Then next holes will be offset the opposite way, and then it's all getting wrapped up. Even now, though, the exhaust tip is sitting cozily. I'd drive it like this if I didn't want hot exhaust pipes.


If I've counted correctly, I can add 9 more pictures to this page. That should be enough for the other exhaust tip, both of them, and then showing off the wrap. If this really does work, is anyone at all considering it over welding?

Re: SLE "mods" and such
Posted: Wed Jul 02, 2008 1:53 pm
by radomirthegreat
I've actually decided to give the tips a test run. I put on one with just one rod and two nuts, and it seems to sit really nicely. I'll probably keep it that way since it's just that much easier to remove than two rods. The two pictures in this post are from blademaster's driveway. I just put on these tips and then took off to his house.

The exhaust wrap should come on, but the functionality of this is so good that it's made me lazy. I thought I'd need the wrap as the last piece to hold it all in place, but the rods just by themselves are doing an awesome job. Still, I'll put it on either right now or later today.

Re: SLE "mods" and such
Posted: Sun Aug 24, 2008 1:13 am
by radomirthegreat

More stuff was done! I needed to take off the door panels of the 94 SSEi, and it just so happens I was using those to store some 6.5" Sony speakers. In the pictures below, you'll see sometimes I used the 94 SSEi as a work bench. Note the thin layer of sawdust.

Bugsi asked how one may manage to fit 6.5" speakers with no door panel modification. I at first used vacuum lines as standoffs. Here are 3 pictures that show how these sat in my 94's door panels, which are from a 98 SSE.
 This one shows the vacuum lines.
 http://i106.photobucket.com/albums/m242 ... CF1168.jpg
I decided to toss out the vacuum lines in favor of using 7/16" tall rubber/foam insulation from Lowe's. It's about $3.50 a pack. I used maybe 3.5 feet, if that. I figured slightly over 3.4' of insulation was needed using
pi and 6.5" as the diameter.
http://i106.photobucket.com/albums/m242 ... CF1169.jpg
http://i106.photobucket.com/albums/m242 ... CF1170.jpg
http://i106.photobucket.com/albums/m242 ... CF1171.jpg
The door panels from the SLE are original. I found a couple things broken. The plastic strip on top of the door panel, the hex head screw that holds the door handle cover, and one courtesy light has a broken tab were all on the driver's side and showed either wear or had no function left.
http://i106.photobucket.com/albums/m242 ... CF1173.jpg
Stock wiring was mostly kept. I cut out the tweeters. No need for those.


So, here are the tools I used for this:
• Wire cutters with what I suppose is a crimper. I used these to cut and strip wires and then to crimp on two speaker connectors.
• A file with a fine tip. I used this to pry out the lock tab.
• The flat head screwdriver was used to pull off the door panel accessories.
• One 10mm deep well socket. The 10mm bolts that go behind the courtesy light are much easier to put in with a deep socket than with a normal one because the normal type "skips" when it goes through the slot, and the resulting shake causes the bolt to fall out and into the door.
• Not pictured is a 1/8" tip that should have been a TORX, probably a T15 or so. I just didn't have the TORX bit. That was used to remove the screw which holds the interior door handle cover.
http://i106.photobucket.com/albums/m242 ... CF1179.jpg
Re: SLE "mods" and such
Posted: Tue Sep 02, 2008 1:30 am
by radomirthegreat
My neighbors across the street decided to celebrate Labor Day by launching fireworks all over the place. All our cars were covered in whatever is inside fireworks, and my next door neighbors had it worst with their entire yard covered in orange and gray stuff. I thought it would be best to work "indoors" and fix up the SLE's audio. I'll take a few tack cloths to the SSEi tomorrow and see if that helps clean up all the ashes. Rain has been taunting us for a while. We haven't had any, but today felt strange enough that I didn't want to risk fresh paint. SLE time!
First, here's a picture that shows off just how small my dog is.
http://i106.photobucket.com/albums/m242 ... CF1259.jpg
The amp I tried to fit under the dash is an Alpine MRP-F240. It provides 4×40W at 4Ω. That's much better than stock! I'm using line inputs so I can retain my stock head unit.
http://i106.photobucket.com/albums/m242 ... CF1185.jpg
I plugged an aftermarket head unit wiring harness to the OE wiring to see which wires go where. I basically cut the stock wiring so that speaker output wires from the head unit went into the amp and then left it to continue to the speakers. Not much effort there. However, the amp wouldn't fit under the dash because of the center console. I took it out and then put it back with the flaps actually surrounding the amp.
http://i106.photobucket.com/albums/m242 ... CF1262.jpg
http://i106.photobucket.com/albums/m242 ... CF1263.jpg
http://i106.photobucket.com/albums/m242 ... CF1264.jpg
http://i106.photobucket.com/albums/m242 ... CF1266.jpg
http://i106.photobucket.com/albums/m242 ... CF1267.jpg
http://i106.photobucket.com/albums/m242 ... CF1268.jpg
Something most unfortunate happened. My sister drives an Alero that's under my name but is in some technical way her car. She parked that right behind the SLE, and in between shifting to N and trying to hold the brake without the engine running and shifting back to P and back again, I happened to ease the SLE onto the Alero's bumper. The bumper is filthy, so you may not see the dent. I don't know. My sister says she can see it clearly.
http://i106.photobucket.com/albums/m242 ... CF1269.jpg
The SLE's bumper is just dandy.
http://i106.photobucket.com/albums/m242 ... CF1270.jpg
Almost done!
http://i106.photobucket.com/albums/m242 ... CF1272.jpg
I had not yet put in the cover that would complete the job because I had drilled into it two 5/16" holes...
http://i106.photobucket.com/albums/m242 ... CF1273.jpg
http://i106.photobucket.com/albums/m242 ... CF1274.jpg
http://i106.photobucket.com/albums/m242 ... CF1275.jpg
The inputs split and go to both the front and rear channels. I can plug in anything that has an audio output. It's awesome!
Re: SLE "mods" and such
Posted: Tue Sep 02, 2008 7:17 am
by tripscarcare95
Man you should become a paparazzi and follow around Britney Spears
You always got something on the go, good stuff
Re: SLE "mods" and such
Posted: Tue Sep 02, 2008 5:33 pm
by radomirthegreat
Re: SLE mods and such. L26 UIM project updates coming up.
Posted: Sun Sep 14, 2008 11:57 pm
by radomirthegreat
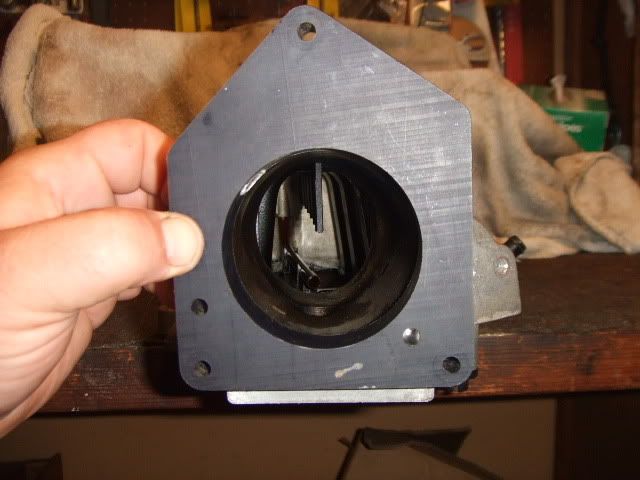
Here's my little update for some L26 testing fun. Agrazela is doing the work, and I'm just posting about it. Some of this is thoroughly plagiarized writing. If you were to do this on your own, you should plan to pick up the adapter plate in the following picture because it much more easily allows the L67 throttle body to mate to the L26 UIM, and it also allows for coolant to pass through and go to the TB. My project involves the use of a spacer. My L67 TB will not have coolant going through it.
http://i231.photobucket.com/albums/ee98 ... roj002.jpg
The L26 UIM hole is pretty much perfectly round. This calls for an L67 throttle body! An adapter is required. The one pictured here, which I will use, had a hole in it for water or alcohol injection. That hole has been filled. The second picture below shows that any mounting hole for the throttle body will go through the hole made for alcohol or water injection.
http://i231.photobucket.com/albums/ee98 ... rPlate.jpg
http://i231.photobucket.com/albums/ee98 ... domir2.jpg
This spacer doesn't have proper TB mounting holes, and drilling and tapping some new ones may not be a permanent solution. Illustrated in the following picture is the problem with the L67 throttle body mating to the L26 UIM. You can see that the red circles show holes where the L67 TB should mount, but the L26 UIM doesn't have screw/bolt room there.
http://i231.photobucket.com/albums/ee98 ... domir1.jpg
Here are four counter sunk holes to make the spacer into an adapter. These let the adapter first mount to the L26 UIM, and then bolts will hold the L67 TB flat against the surface.
http://momentoffame.com/photopost/data/ ... ad_001.jpg
Brass tubes help guide the TB and TB gasket, and they also help provide a backing for through-bolt spacers.
http://momentoffame.com/photopost/data/ ... ad_003.jpg
http://momentoffame.com/photopost/data/ ... ad_005.jpg
A dremel was taken to the UIM to make some room. The spacers for the bolts at the bottom are apparently necessary so that a wrench can get to the heads with ease.
http://momentoffame.com/photopost/data/ ... ad_009.jpg
http://momentoffame.com/photopost/data/ ... ad_010.jpg
Also, a notch was ground out so that a wrench can fit in easily.
http://momentoffame.com/photopost/data/ ... ad_011.jpg
Look at this monster of a TB on this UIM!
http://momentoffame.com/photopost/data/ ... ad_012.jpg
The UIM is finished! The brass hose barb needs a rubber vacuum attachment for my FPR and EVAP valve. The L67 throttle body has one already, but that one will be plugged.
http://i231.photobucket.com/albums/ee98 ... Fin001.jpg
http://i231.photobucket.com/albums/ee98 ... Fin002.jpg
Here's where the MAP sensor goes:
http://i231.photobucket.com/albums/ee98 ... Fin003.jpg
The plastic brake booster nipple on the 99 SLE have a small, 1/4" "side" nipple for the HVAC system; I will swap in my current plastic nipple:
http://i231.photobucket.com/albums/ee98 ... Fin004.jpg
So, that's the progress so far. What do you guys think of it?
Re: SLE mods and such. L26 UIM project updates coming up.
Posted: Tue Sep 23, 2008 11:05 pm
by bruce
thats a sick amount of work dude!!! I see you already incorporated that little alpine into your system. I miss that amp it was small but so stout for only 40 watts a channel. Whats the big boy infinity going into??
Re: SLE mods and such. L26 UIM project updates coming up.
Posted: Wed Sep 24, 2008 1:23 pm
by radomirthegreat
The Infinity is going into my 94 SSEi. The Alpine sounds awesome in the SLE! It's really crisp and clear. All the speakers really sprung into higher levels of performance with it installed.