Page 3 of 6
Re: It's raining outside...and a little inside too!
Posted: Sun Apr 11, 2010 2:41 pm
by GXPete
You're right. Getting the back seat out and disconnecting the battery was child's play. Getting the front seats out are proving more challenging. I thought I had plenty of Torx drivers, but alas, my largest is a T40. Off to fetch the 47. :sad5:
Hey, what's the trick to getting the black covers off the front of the seat rails to get at those bolts?
Re: It's raining outside...and a little inside too!
Posted: Sun Apr 11, 2010 2:51 pm
by lewis26
Just pull! They snap out eventually.

Re: It's raining outside...and a little inside too!
Posted: Sun Apr 11, 2010 4:41 pm
by GXPete
Ok, got the seats out; phew. They were heavier than I expected. You guys must be a lot beefier than I. Let me paint the picture...I'm 6' 2", 150 lbs. (Can you say beanpole?) Anyway, tried to get carpeting out but it appears to be held by the center console. So now what, are you going to tell me that has to come out too? If so, it may have to wait until next weekend - before I run out of light I need time to get the seats back in so I can drive it to work tomorrow. Let's make it easy - what all has to come out to get the carpets out?

Re: It's raining outside...and a little inside too!
Posted: Sun Apr 11, 2010 4:46 pm
by myfirstbonnie
Iknow you don't want to hear it, but the console. 4 bolts to the dash, the clip for the shifter knob, a connector and the shift cables.
Re: It's raining outside...and a little inside too!
Posted: Sun Apr 11, 2010 5:11 pm
by GXPete
That's why these are built on a line...thanks for letting me know. Guess this will have to wait until next week. For now, back to reassembly.

Re: It's raining outside...and a little inside too!
Posted: Sun Apr 11, 2010 5:12 pm
by lewis26
Think of it as a learning experience. Getting to the point you were at will be much faster next week.
Re: It's raining outside...and a little inside too!
Posted: Sun Apr 11, 2010 5:51 pm
by harofreak00
Mike's right. I have done this so many times I could honestly do it with my eyes shut in 30 minutes.
The console is easy, much easier than the seats. Keep at it...
Re: It's raining outside...and a little inside too!
Posted: Sun Apr 11, 2010 10:49 pm
by GXPete
Ok, so let's get further into the details of removing the center console. While I had the seats out, I removed the two bolts holding the back end of the console down and was able to wiggle it and lift it some, but it became obvious there was a lot more to it. So here are the questions:
- 1. Where are the other bolts?
- 2. Where is the shifter knob clip?
- 3. Do I have to take all the trim around the cluster, radio, A/C and shifter off?
- 4. Anything else I need to be aware of?
- 5. I set the seat back to its full upright position (feel like I'm flying) and pulled the seats out whole. Is that the best/only way?
- 6. Why in heck aren't I taking this to a dealer and letting them take care of it?

Thanks.
Re: It's raining outside...and a little inside too!
Posted: Sun Apr 11, 2010 10:59 pm
by harofreak00
1. There are 6 bolts on your 05, the 00-01 used 8 bolts. The 4 other bolts are behind the dash bezel.
2. Set the parking brake, put the shifter in 1st, pull the leather shift boot down from the handle, the clip is on the front of the shifter knob. Pull straight out. Once you have the knob off, you’ll need to remove the shifter bezel. To do this, you’ll have to have the dash bezel off first, read below.
3. The dash bezel needs to come off. Here is how:
hawkjet wrote:There are two plastic rivets going up into the fascia above the instrument cluster. Press the center of the rivets upward (pics 1 & 2) and then carefully pry the rivets out (pic 3).

Pry the trim ring off the ignition switch (pic 4) notice I put electrical tape around the screwdriver blade to avoid marring the trim. Then pull out the 'cubby hole' on the left of the wheel (pic 5). Tilt the wheel all the way down and pull the panel off the dash (pic 6).

Reach behind the right side and disconnect the connector(pic7). Carefully tweek the panel to get it around the wheel and out of the way.
Once the dash bezel is off, you’ll need to remove the cubby hole/heated seat button pod. Just 2 clips hold it in. After that you’ll need to take off the shifter bezel. Pull straight up. Knob has to be off first.
4. Once the console is loose, you’ll need to disconnect the shifter cables from the shifter. One is large and black, just pry it off. The other one is directly under the shifter, and has a yellow or green “cap” over it. Pull the cap off, and then remove the cable.
5. It doesn’t really matter as long as you got it out.
6. Because you are saving lots of money, learning about your car, and you are able to clean, clean clean.
Re: It's raining outside...and a little inside too!
Posted: Mon Apr 12, 2010 10:17 pm
by GXPete
Thanks Andrew. You're so right about the cleaning part too. Everything needs a good cleaning, carpet, seats and all trim. I just always need to make sure I can get at least enough back together to drive it to work on Monday. If I can get the carpet out, I'll put the console and seats back in and leave the dash bezel off if possible until the next phase. I assume I can't have the shifter on without the console? I don't have a cubby on the left side, the HUD controls are there, but I'm sure there's a connector for that as well. Thanks again.
Re: It's raining outside...and a little inside too!
Posted: Mon Apr 12, 2010 10:24 pm
by harofreak00
You can remove the shifter from the console, or you can just control the trans by pulling on the cables

Re: It's raining outside...and a little inside too!
Posted: Mon Apr 12, 2010 10:31 pm
by 00Beast
Yes, there is one connector for the HUD controls, there is enough slack to pull the bezel out and then unplug the connector. That's what I do, anyways.
Re: It's raining outside...and a little inside too!
Posted: Sun Apr 25, 2010 9:36 pm
by GXPete
This weekend's progress...
Didn't get a chance to pull the seats to get the carpet out, but I did get the dash bezel & ashtray/shifter bezel removed. I also took the driver's knee pad cover off and unbolted the four console bolts from the dash. I noticed during this process that the upper right bakelite tab that was holding the console to the dash was shattered. It must have taken a hit or was a pressure break. There is also a small pea-sized tear on the front edge of the vinyl console cover right next to it, so a hit is more likely; future repair.
Boxed up the radio and heated seat switches to ship to Andrew so he can fix some spent bulbs/LEDs. In between some other stuff I pulled the passenger door panel off so I could remove the outside mirror. Previous owner must have gotten hit or hit something as the outside edge of the mirror is scraped pretty badly and two of the three bolt posts holding it on got snapped. I had tried super glue but that didn't hold them, so after removing the mirror today I got some plastic weld epoxy and put them back on. It's curing but already appears to be a more solid hold than the CA. Just not sure about the stress of the bolts since they don't look like the are all perfectly on plane with each other. Will have to wait and see. Duct tape now seals the area where the mirror was. Gotta love duct tape.

When I took the door panel off I noticed a couple areas where the plastic door seal sealant had pulled away but it could have happened while I was taking off the door panel. At any rate, it was all still very gooey, so I just made sure it was all sealed up again so I would not have any leaks. I have a leak on the driver's side (reason for pulling the carpet in the first place) and I already know I have at least one clip on the driver's door panel that's let go so I'm hoping when I pull that one off that I'll find the leak there and not have to go hunting under the dash for it.
Every Monday I seem to be heading to work with less of my car! :sad5: Can't wait to get it all back together again. Hopefully I'll still remember how to reassemble it (now what was this for??).

Re: It's raining outside...and a little inside too!
Posted: Sun Apr 25, 2010 10:11 pm
by harofreak00
You know that the door panel doesnt have to come off to take the mirror off, right? Just the tweeter pod is all.
Re: It's raining outside...and a little inside too!
Posted: Mon Apr 26, 2010 8:39 pm
by GXPete
Yeah, but I wanted to take the mirror completely off the car to work on it and I knew it would need time to cure. Now, getting the cable connector through the foam rubber padding was a challenge. I ended up just pulling the wire pins out of the connector and pulling them through without the connector. Worked like a charm. Those don't have to go back in the connector in any particular order, right?

While I have the mirror out of the housing, I may have it painted. I need to pick up one of the screws that held the mirror in the housing cuz one of them snapped when I was removing it.
Re: It's raining outside...and a little inside too!
Posted: Mon Apr 26, 2010 10:21 pm
by harofreak00
You didn't really need to remove the foam padding completely, you could have just moved it to the end of the connector, plenty of room to epoxy the pins back in place.
Re: It's raining outside...and a little inside too!
Posted: Thu Apr 29, 2010 9:54 pm
by GXPete
I understand. But you started me down this road of learning how to take my car apart and put it back together. Now I want to take everything apart!
Re: It's raining outside...and a little inside too!
Posted: Thu Apr 29, 2010 10:05 pm
by harofreak00
Fair enough! I like your style.
Re: It's raining outside...and a little inside too!
Posted: Thu Apr 29, 2010 10:15 pm
by GXPete
Funny thing...I recently got my monthly diagnostic report from OnStar and there was a big red alert to call them immediately because there 'could be a communication problem' with the OnStar system. You think? I've had the headliner out of my car for about a month now.
Re: It's raining outside...and a little inside too!
Posted: Sat May 01, 2010 2:30 pm
by GXPete
Finally got some good weather on a weekend, so I managed to get the seats, console and carpeting out this morning...
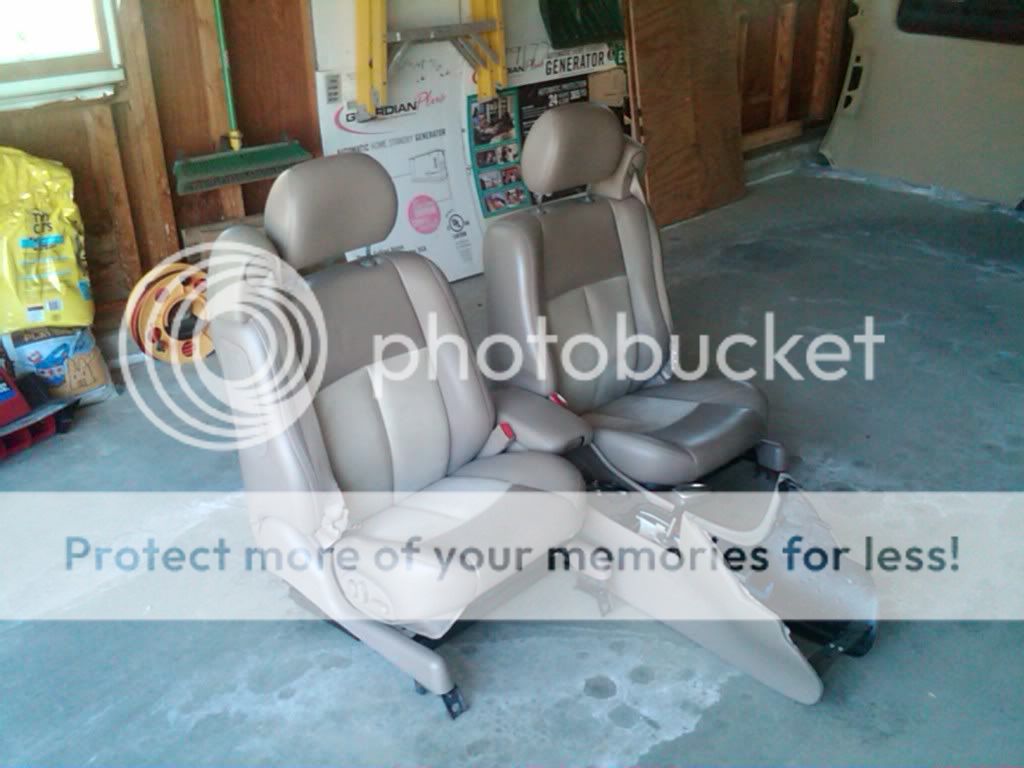
What do you guys use to clean your carpets. I wonder how our Haan Steam Cleaner would work on it?

The 'sponges' on the underside of the carpeting on the driver's side were soaked.
I stood on them to drain most of the water, then turned them over to let the sun do the rest.

No rust under the driver's carpet, but a little on the rear floor.
Do I need to be concerned as long as I fix the leak?
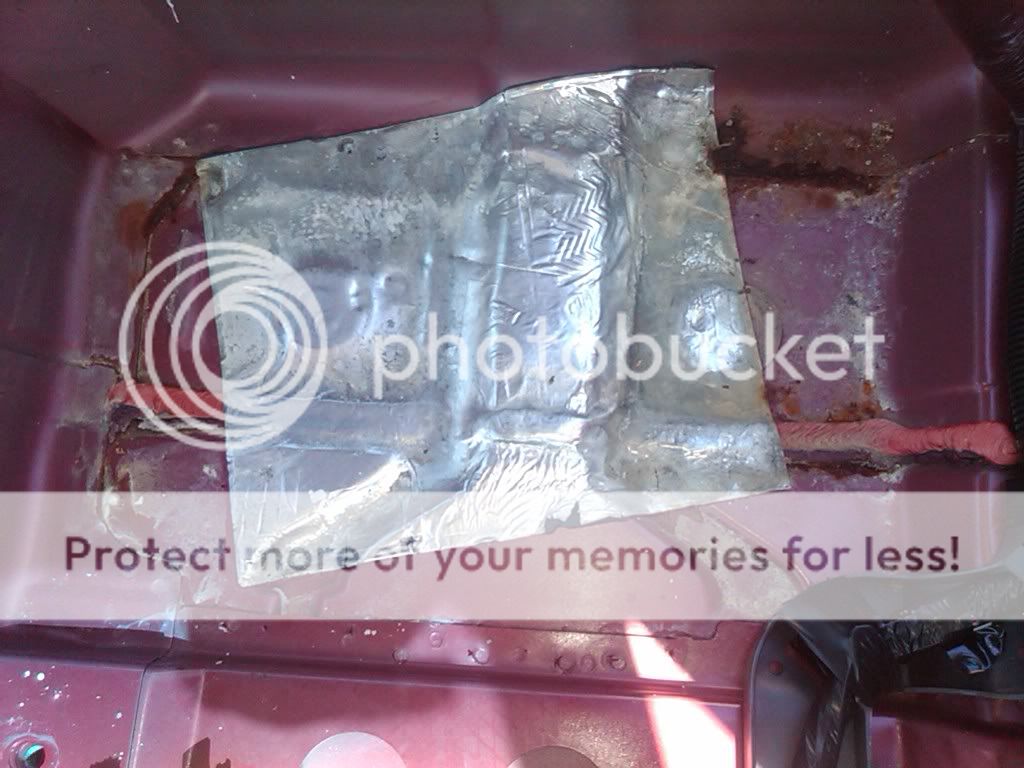
Under the carpeting I found build manifests for about 8 consecutive VINs after mine.
Interesting that they'd leave all that paper under the carpeting.
