Page 6 of 7
Re: How to: 2000+ radio light fix tutorial (45pics)
Posted: Sun Feb 09, 2014 9:29 am
by crash93ssei
Does the radio work otherwise / does it still play sound?
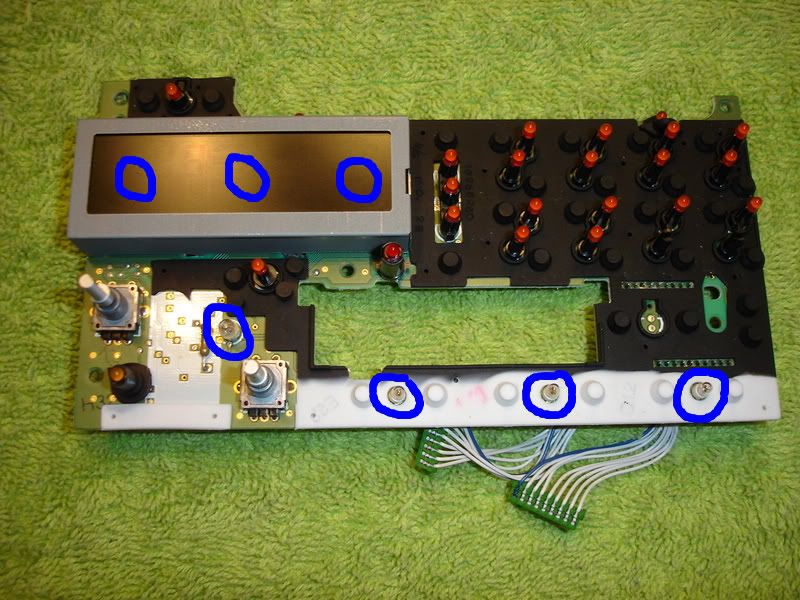
There are two ribbon type wires that go from the main circuit board to the faceplate, make sure they are both connected and seated properly as well as the wires not broken or cut.
Re: How to: 2000+ radio light fix tutorial (45pics)
Posted: Sun Feb 09, 2014 9:31 am
by Bmiller269
Yes radio works and buttons do as well. Just total dead display
Re: How to: 2000+ radio light fix tutorial (45pics)
Posted: Tue Apr 22, 2014 5:42 pm
by JaxGXP
harofreak00 wrote:Yes, a 12 power source.
The bulbs are 5x11mm.
Like I said in the original post, 2174 bulbs are the closest I found, but I'm not sure if they are the right brightness level.
I know this thread is old but here is an update on a source for the display lamps.
I did a radio repair today on my 2005 GXP using Radio Shack 272-1154 ($2.49 each) lamps which came up on a search for 2174 bulbs. They are smaller than the original Delco lamps and have shorter and thicker leads. However they will fit the PCB if you get all the old solder out of the holes. Because of the shorter leads you can bend them upward only about 45 degrees instead of parallel to the PCB like the old lamps. There is still plenty of room for them to clear the display. They worked just fine providing adequate illumination through the display. I changed all three so I could not determine if the brightness level is the same as the old 2174s. By changing all three since the radio is already dismantled you will insure the brightness level is consistent across the display.
Re: How to: 2000+ radio light fix tutorial (45pics)
Posted: Mon Jul 21, 2014 10:35 pm
by TurnItUp
I just want to say thanks to everyone who contributed information to this thread. I recently purchased a 2002 Pontiac Montana with burnt out radio bulbs, and with the help of this thread I successfully replaced them. I did it a little differently and wanted to share my experiences with others looking to do this.
I had a continous roll of LED's I bought off of amazon a while ago just to have around for various projects. These LED strips can be cut at certain intervals and run on 12vdc, so I decided to give them a try. I cut a strip down to 3 LED's, soldered on a pair of wires from a cat5 cable, and then hot glued it to the display. This worked quite well, although you can see where the LED's are as it is brighter where they shine. If I were to do it over, I would try two strips of LED's and stagger them to get a more even light.
The only odd thing I noticed is that there must be a small voltage to these lights all of the time. The glow very faintly even when the car is turned off. Nothing that will kill the battery, so it doesnt really bother me, but is something to keep in mind if you are going to use LED's. I have had these in for almost a month now. It is so nice to be able to see the display again!


Re: How to: 2000+ radio light fix tutorial (45pics)
Posted: Mon Oct 06, 2014 12:15 pm
by Oldman
This may sound stupid, but I'm not exactly sure what I need to replace. I can't read my clock during the day, but at night I can. Seems the backlighting is not working very well. I've replaced what I think are the back lights (clear ones) with some bulbs from Radio Shack, but they just don't seem bright enough.
I'm not opposed to soldering in some bulbs, but I need to know if you can tell me what bulbs to use.
Thanks for your help, and sorry if I have asked a question that has already been asked and answered multiple times.
Re: How to: 2000+ radio light fix tutorial (45pics)
Posted: Mon Oct 06, 2014 12:16 pm
by Oldman
This may sound stupid, but I'm not exactly sure what I need to replace. I can't read my clock during the day, but at night I can. Seems the backlighting is not working very well. I've replaced what I think are the back lights (clear ones) with some bulbs from Radio Shack, but they just don't seem bright enough.
I'm not opposed to soldering in some bulbs, but I need to know if you can tell me what bulbs to use.
Thanks for your help, and sorry if I have asked a question that has already been asked and answered multiple times.
Re: How to: 2000+ radio light fix tutorial (45pics)
Posted: Mon Oct 06, 2014 12:23 pm
by harofreak00
I've been using 2174 bulbs.
Re: How to: 2000+ radio light fix tutorial (45pics)
Posted: Sun Dec 21, 2014 11:18 am
by Bizywk
Wow what a great forum, and I see some spot on guidance here. I wish I knew about this years ago. The replacement bulb tutorial is exceptionally accurate and well illustrated. Perhaps someone here has encountered my problem and has a solution.
Long time Bonnie owner. This one is a 2002 SSEI and I love it. I've replaced these lights before and things went well. This time, it went horribly wrong. The lights work just fine after the repair, but the display is unintelligible. I've checked the alignment of the LCD against the PCB lands and see no problems. No debris of any kind on the mating surfaces either. The window appears to align correctly as well upon re-assembly. Any ideas?
Thinking of trying to replace the LCD to see if that solves the issue, but cant find a source of supply. I live just 45min from the factory where these radios were made. You'd think I could find them a bit more easily.
Re: How to: 2000+ radio light fix tutorial (45pics)
Posted: Sun Dec 21, 2014 6:03 pm
by harofreak00
I have LCD's if you need one.
Re: How to: 2000+ radio light fix tutorial (45pics)
Posted: Wed Dec 24, 2014 1:52 pm
by jtcahill
Hello. I read your post and steps to fix the Bonneville Radio. I have a 2000 Bonneville SE that I love and won't sell it. I've had if since new. It has 180K miles and still provides me with 30+ MPH and the total comfort of a 5 seat, full size car. Are you still offering repair services of the Bonneville Radio lights? If yes, I sure would love to ship my unit to you for your services. Please let me know.
One other question, once the car is removed from the car, does it need to be reprogrammed?
My E-Mail is
jtcahill@nycap.rr.com
Re: How to: 2000+ radio light fix tutorial (45pics)
Posted: Sun Dec 28, 2014 6:12 pm
by harofreak00
Email reply sent, thanks!
Re: How to: 2000+ radio light fix tutorial (45pics)
Posted: Mon Jan 26, 2015 1:12 pm
by bradb76
bluewingjb wrote:I found the bulbs at this site for just 29 cents each. You can get 10 shipped to your door for under $10, thats better than having to go to Radio Shack and these bulbs are the same specs as the RS 272-1092 bulbs..
http://www.replacementlightbulbs.com/lamp7219.html
Wes
Did you install these bulbs and did they work?????
Re: How to: 2000+ radio light fix tutorial (45pics)
Posted: Thu Jan 29, 2015 8:26 pm
by bradb76
how did you remove the old solder out of the holes?
Re: How to: 2000+ radio light fix tutorial (45pics)
Posted: Thu Feb 09, 2017 2:10 pm
by scooberu
First of all, this tutorial is the bee's knees. Thank you Harofreak, for writing and posting this. I might have shipped the radio to you, but I had just completed the job when you posted the price for that.
bradb76: I did install the 29 cent lights, and they are plenty bright. They are rated for 10,000 hours, so it is conceivable that they would go out in a few years, but they may not. I believe 6 of 7 were out on my car.
To get the solder out of the holes, I pressed a sewing pin against the hole while heating the pin with the soldering iron. When it slipped through, I took the heat off, let it cool, and pulled the pin back. That was the hardest part of the project. I did not have a "12 volt source" to test with, but I did have an old mostly dead 14.4v drill battery. Mostly dead is still a little bit alive, so I connected it with some jumpers to test the connections. It worked perfectly. I did use flux on the new light bulb posts. I had solder available, but the existing solder on the board was enough to make the connections and I speculated that any flux in that solder would have been burned up.
Re: How to: 2000+ radio light fix tutorial (45pics)
Posted: Tue Apr 04, 2017 10:17 am
by Wolter
I see Radio Shack part# 272-1092 and the 272-1154 bulbs. Can you tell me which ones go where?
Re: How to: 2000+ radio light fix tutorial (45pics)
Posted: Tue Apr 04, 2017 10:24 am
by Wolter
I am confused on how many types of bulbs. When I open the radio I see a lot of tiny red LEDs and the bigger clear bulbs. Are the big bulbs the Delco bulbs? I am assuming the tiny red LED must be the Micro Lamps part# 272-1092? If so why are they not red?
Re: How to: 2000+ radio light fix tutorial (45pics)
Posted: Tue Apr 04, 2017 10:47 am
by harofreak00
Did you actually read the entire original post and look at all the pictures? It clearly explains everything.
Re: How to: 2000+ radio light fix tutorial (45pics)
Posted: Sat Jul 08, 2017 11:06 am
by salsadude
can you please repost the photos for replacing the Display lights? your account for the photos is hung up so they will not display any longer. Thanks. Salsadude
Re: How to: 2000+ radio light fix tutorial (45pics)
Posted: Mon Jul 10, 2017 9:28 am
by harofreak00
As of late, Photobucket decided they weren't going to allow 3rd party hosting unless you pay $400/year. The photos still work on their site, you just need to go to each picture directly. A HUGE pain I know...but it is also a huge pain to reupload and relink all the pics like I just did for this post. I did it because I know this is a very popular post with over 35,000 views. If you find any other photos that aren't displaying, try copying the image and pasting into your browser like this:

Re: How to: 2000+ radio light fix tutorial (45pics)
Posted: Mon Jul 10, 2017 9:48 am
by 96 SSEi
nice writ-up...thanks
you CAN remove the solder with a braided piece of wire or anything the solder will stick to. there is a small vacuum that is made to suck it off the pcb. you can heat, remove bulb, put new bulb in while still melted and then you should be good after another heat and cool.