Need help Replacing an alternator on a 1997 Bonneville SE
-
patriottuba

- SLE Member

- Posts: 56
- Joined: Fri Jul 23, 2010 11:02 pm
- Year and Trim: 1999 Dark Green SLE
- Location: Huntington, WV
Need help Replacing an alternator on a 1997 Bonneville SE
Just need a walk-through on replacing an alternator on my 97 SE. Any help will be greatly appreciated. 
-
94SilverSSEi
- Certified Bonneville Nut

- Posts: 3351
- Joined: Thu May 22, 2008 11:14 pm
- Year and Trim: 97.2 40th SLE
68 w/400
94 SSEi - Location: Racine, Wisconsin
Re: Need help Replacing an alternator on a 1997 Bonneville S
There should be one bolt on each side of the alternator holding it to its bracket. And then there will be a plug on one side that just pops out and on the other side there should be a little nut with another cable. Remove that nut and the alternator should come right off.
Very simple procedure.
Very simple procedure.
Clay
1997.2 40th SLE-138k
1968 Bonneville 400ci w/TH-400-40k
1999 GMC Suburban SLT-191k
2005 Escalade 253k-GINA
1997.2 40th SLE-138k
1968 Bonneville 400ci w/TH-400-40k
1999 GMC Suburban SLT-191k
2005 Escalade 253k-GINA
nos4blood70 wrote:Literally, cars are drugs.
-
patriottuba
- SLE Member
- Posts: 56
- Joined: Fri Jul 23, 2010 11:02 pm
- Year and Trim: 1999 Dark Green SLE
- Location: Huntington, WV
Re: Need help Replacing an alternator on a 1997 Bonneville S
Thank you so much, going to try to remove the squeaky thing tomorrow.
-
94SilverSSEi
- Certified Bonneville Nut
- Posts: 3351
- Joined: Thu May 22, 2008 11:14 pm
- Year and Trim: 97.2 40th SLE
68 w/400
94 SSEi - Location: Racine, Wisconsin
Re: Need help Replacing an alternator on a 1997 Bonneville S
No problem. Shouldn't take you more than 10 mins to swap it out
Clay
1997.2 40th SLE-138k
1968 Bonneville 400ci w/TH-400-40k
1999 GMC Suburban SLT-191k
2005 Escalade 253k-GINA
1997.2 40th SLE-138k
1968 Bonneville 400ci w/TH-400-40k
1999 GMC Suburban SLT-191k
2005 Escalade 253k-GINA
nos4blood70 wrote:Literally, cars are drugs.
-
Archon

- Resident Gearhead

- Posts: 8781
- Joined: Mon May 19, 2008 10:30 pm
- Year and Trim: 2014 Cadillac XTS Vsport.
- Location: Grand Rapids, Michigan
Re: Need help Replacing an alternator on a 1997 Bonneville S
Just to be sure....disconnect the battery before working on the alternator. At the very least, do not let the wire removed from under the nut to touch any metal. You'll have sparks flying everywhere. A backup wrench will help when removing the nut.
*Gone, but not forgotten* - Black 2000 SSEi, HIR Headlights, Angel Eyes fogs, 3rd brake light overlay, hi-flo cat, 180 degree thermostat, HS 1.9 rockers, LSx yellow springs, Intense FWI, PCM, shift kit, push rods, and 3.4 Pulley. ZZP Power Log.
-
bill buttermore

- Retired Gearhead

- Posts: 3989
- Joined: Mon May 19, 2008 12:35 pm
- Year and Trim: 98 Caravan is the daily driver 215K
- Location: Ames, Iowa
Re: Need help Replacing an alternator on a 1997 Bonneville S
Copied the following from the Techinfo article on replacing LIM gaskets and UIM. Removal of the alternator is part of that job. This was written for a '97 L-36, so should be pretty accurate.
As Dick advised, disconnect the battery by removing either cable, then...
Remove belt from alternator Check to make sure you have a belt routing diagram. If you do not, look at the accessory belt and draw one up for reference. With a 15mm socket and a long handle, turn the bolt on the tensioner assembly idler pulley counter-clockwise to loosen the accessory belt. Using only your hands, pull the belt off of the alternator pulley. It is not necessary to remove the belt from the lower pulleys.
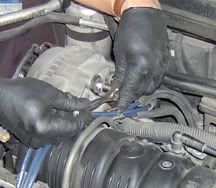
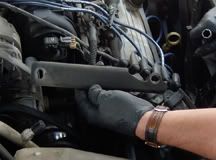
Remove alternator Squeeze and wiggle the round plastic cover on the rear of the alternator. Lift it off to expose the output connection. Undo the 13mm nut and remove the output wire. Replace the nut on the bolt and replace the cover over the nut. Undo the 10mm bolt holding the top brace to the rear of the alternator (closest to the UIM). Undo the 10mm bolt holding the other end of the top brace. Note that the top brace is installed on top of the wiring harness. Now break loose (but do not remove) the two 10mm bolts holding the lower brace for the rear of the alternator to the alternator support bracket. You may have to wiggle the 10mm socket down between the wiring harness and the vacuum hose to the power brake booster. In the front of the alternator, remove the 13mm nuts securing the ends of the bracket between the alternator and under the coil packs (ICM). Remove the bracket. Now remove the two 13mm bolts and one 13mm stud securing the front of the alternator. Remove the two bolts previously loosened to remove the lower rear brace for the alternator. The alternator can now be lifted up and tilted to expose the electrical connector on the back for the voltage regulator. Undo the electrical connector for the voltage regulator and remove the alternator.

As Dick advised, disconnect the battery by removing either cable, then...
Remove belt from alternator Check to make sure you have a belt routing diagram. If you do not, look at the accessory belt and draw one up for reference. With a 15mm socket and a long handle, turn the bolt on the tensioner assembly idler pulley counter-clockwise to loosen the accessory belt. Using only your hands, pull the belt off of the alternator pulley. It is not necessary to remove the belt from the lower pulleys.
Remove alternator Squeeze and wiggle the round plastic cover on the rear of the alternator. Lift it off to expose the output connection. Undo the 13mm nut and remove the output wire. Replace the nut on the bolt and replace the cover over the nut. Undo the 10mm bolt holding the top brace to the rear of the alternator (closest to the UIM). Undo the 10mm bolt holding the other end of the top brace. Note that the top brace is installed on top of the wiring harness. Now break loose (but do not remove) the two 10mm bolts holding the lower brace for the rear of the alternator to the alternator support bracket. You may have to wiggle the 10mm socket down between the wiring harness and the vacuum hose to the power brake booster. In the front of the alternator, remove the 13mm nuts securing the ends of the bracket between the alternator and under the coil packs (ICM). Remove the bracket. Now remove the two 13mm bolts and one 13mm stud securing the front of the alternator. Remove the two bolts previously loosened to remove the lower rear brace for the alternator. The alternator can now be lifted up and tilted to expose the electrical connector on the back for the voltage regulator. Undo the electrical connector for the voltage regulator and remove the alternator.

1998 3.8 Dodge Caravan 214K
2000 3.3 Dodge Caravan 175K
1949 Plymouth Special Deluxe 4-dr sedan 25K (needs some work!)
-
lunchboxx
- Posts like an LN3

- Posts: 473
- Joined: Wed May 28, 2008 8:28 am
- Year and Trim: 2000 SSEi w/ 99K
- Location: Central Florida SEBF 2008 & 2010 survivor!
Re: Need help Replacing an alternator on a 1997 Bonneville S