


I will be replacing my front rotors this week.
I do not have a shop manual so wondering if anyone can provide any helpful insight, also torque specs etc.. would probably be helpful.
Thanks in advance.
'00 SSEi - front rotors
-
Archon

- Resident Gearhead

- Posts: 8781
- Joined: Mon May 19, 2008 10:30 pm
- Year and Trim: 2014 Cadillac XTS Vsport.
- Location: Grand Rapids, Michigan
Re: '00 SSEi - front rotors
I'm putting the finishing touches on a techinfo article for replacing front and rear pads and rotors. It's still a work in progress, but this should help you.
This procedure is how to replace pads and rotors on a 2000 Pontiac Bonneville. Previous years used rear drum brakes not disc, so that section will not apply. The front brakes are similar through the years, so that section can be used for all years.
This is not a particularly difficult job. Even a novice wrencher should be able to replace these parts.
You’ll need:
Jack and jack stands
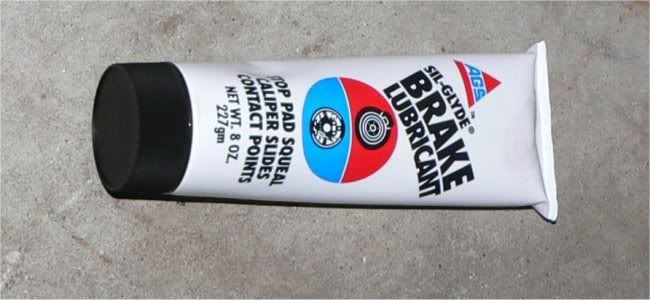
High temperature brake lube
A method to spin in the rear caliper piston
12 and 15 mm sockets
Torque wrench
The rear brake procedure is more detailed, and the rotors are somewhat prone to warping, so this procedure will start there.
Raise and properly support the rear of the vehicle.
Remove the wheels.
Spray penetrating oil, like PB Blaster on the bolt that holds the cables to control arm.

Disconnect the wheel speed sensor.
Remove the lower bolt from the caliper.

Remove the bolt from the lower control arm that had been sprayed with penetrating oil. This bolt often corrodes in the control arm, so it may break, or strip.
Using a large C-clamp, compress the pads slightly – no more than 1 mm. As soon as resistance is felt, stop compressing. Going farther could damage the parking brake mechanism.

Using a screwdriver between the caliper bracket and caliper, pry up on the caliper until it swings and clears the pads.

Wiggle the caliper up and down, while also pushing toward the center of the car, until it comes off the caliper pin.

Remove the pads.

Support the caliper by hanging it. This prevents too much pressure from being put on the brake flex hose.

(If you are not replacing the rotor, the caliper bracket and rotor do not have to be removed, so those steps can be skipped.)
Remove the bolts from the caliper bracket, then remove the bracket.


If the rotors are original, they may be held on by some clips. These can be cut off, or spun off using some needle nosed pliers. Whether you decide to reinstall them, is up to you.
Remove the rotor. If it is rusted on, spray some penetrating oil around the middle of rotor, then strike the rotor between the studs with a hammer until the rotor comes off. Use care not to hit the studs, or you’ll damage the threads.

Clean the face of the hub well with a wire brush.
Clean the grease off the caliper slide bolts, and wire brush the mating surface of the caliper bracket, and the caliper clips, if the pads did not come with new ones.
The piston for the rear brakes has to be spun in, instead of just compressing it with a C clamp. Sears is one place that sells a tool that helps you do that. If you use care, some pliers, vise grips, or needle nosed pliers could be used instead.

Spin the piston in until it does not go in any farther. If it does not spin in, the caliper will need to be replaced. There are two “v”-shaped grooves in the piston. When done, one V should face to the top of the caliper, the other to the bottom.


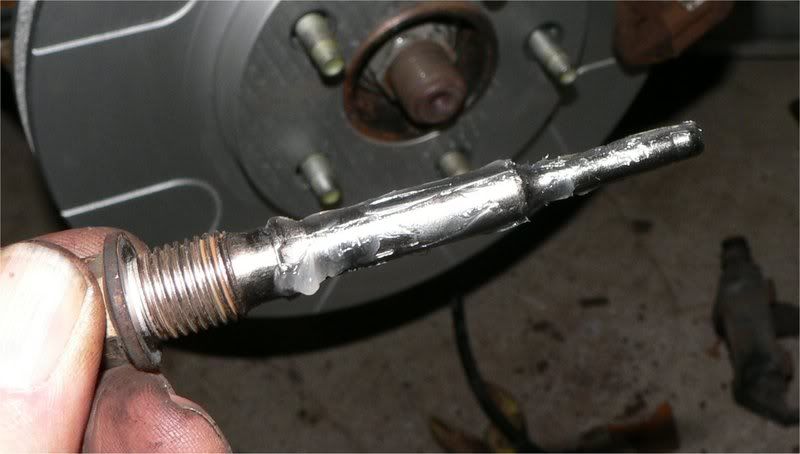
Using care to not tear it, remove the boot from the slide on one side of the caliper, pushing the slide to that side. Lube the slide with some high temperature brake grease, and put some grease in the boot on the other side.

Clean the new rotors with some brake cleaner, and be careful not to get any grease on them. If you do, clean it off with brake cleaner. Install the new rotor on the hub; put just a tiny bit of brake grease on the clips for the brake pads at the contact points, and install the caliper bracket. (GM recommends using blue thread lock on the bracket bolts.) Tighten the bracket bolts to 94 ft. lbs. Clean and lube the caliper slide pin.

Install the pads in the caliper bracket.

Slide the caliper back on the slide pin, and swing the caliper down over the pads. If you have trouble, check the pads to make sure they are firmly against the rotor. If it still won’t swing down, you may have to spin the piston in farther. Install the caliper bolt, and tighten to 20 ft. lbs.
Reinstall the bracket and bolt for the emergency brake cable, and reconnect the wheel speed sensor.
Front Brakes
Raise, and properly support the vehicle.
Remove the wheels.
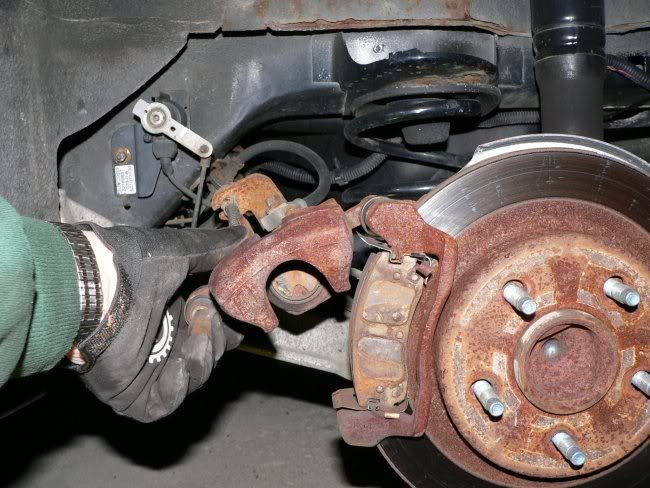
Using a large C-clamp, compress the pads enough to relieve the pressure of the pads against the rotor.

Remove the two caliper bolts.

Using a screw driver, pry between the caliper bracket and the caliper until it slides off. Support the caliper so that it does not hang from the flex brake hose.

Remove the caliper bracket, and the pads from the bracket.

(If just replacing pads, the bracket and rotor do not need to be removed so those steps can be skipped.)
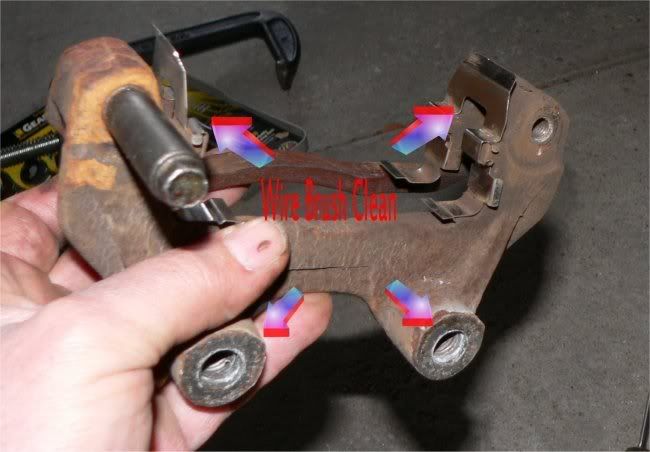
Clean the mating surface on the caliper bracket, and the steering knuckle where it bolts on. If the new pads did not come with new caliper clips, clean any dirt and grease off them.
If the rotors are original, they may be held on by some clips. These can be cut off, or spun off using some needle nosed pliers. Whether you decide to install them, is up to you.
Remove the rotor. If it is rusted on, spray some penetrating oil around the middle of rotor, then strike the rotor between the studs, with a hammer until the rotor comes off. Use care not to hit the studs, or you’ll damage the threads.
Clean any loose rust from the surface of the hub, with a wire brush.

Put the new rotor back on the hub, lightly grease the caliper clips, then bolt the caliper bracket on to the steering knuckle. Tighten to 137 ft. lbs. (GM recommends using blue thread lock on the bracket bolts.)

Install the brake pads.

Take one of the old pads, and place it on the caliper next to the piston. Using the C-clamp, compress the piston in. Some suggest loosening the bleeder screw while doing this to keep any dirt and old fluid being pushed back into the master cylinder.

Clean the caliper slide pins, and lube with high temperature brake grease.
Install the caliper over the pads. While installing the caliper, push the boots in that are attached to the caliper bracket so that the holes in the boots line up with the holes in the caliper. Install the slide pins, and torque to 63 ft. lbs.
This would also be a good time to bleed the brakes, and flush out the old fluid.
This procedure is how to replace pads and rotors on a 2000 Pontiac Bonneville. Previous years used rear drum brakes not disc, so that section will not apply. The front brakes are similar through the years, so that section can be used for all years.
This is not a particularly difficult job. Even a novice wrencher should be able to replace these parts.
You’ll need:
Jack and jack stands
High temperature brake lube
A method to spin in the rear caliper piston
12 and 15 mm sockets
Torque wrench
The rear brake procedure is more detailed, and the rotors are somewhat prone to warping, so this procedure will start there.
Raise and properly support the rear of the vehicle.
Remove the wheels.
Spray penetrating oil, like PB Blaster on the bolt that holds the cables to control arm.
Disconnect the wheel speed sensor.
Remove the lower bolt from the caliper.
Remove the bolt from the lower control arm that had been sprayed with penetrating oil. This bolt often corrodes in the control arm, so it may break, or strip.
Using a large C-clamp, compress the pads slightly – no more than 1 mm. As soon as resistance is felt, stop compressing. Going farther could damage the parking brake mechanism.
Using a screwdriver between the caliper bracket and caliper, pry up on the caliper until it swings and clears the pads.
Wiggle the caliper up and down, while also pushing toward the center of the car, until it comes off the caliper pin.
Remove the pads.
Support the caliper by hanging it. This prevents too much pressure from being put on the brake flex hose.
(If you are not replacing the rotor, the caliper bracket and rotor do not have to be removed, so those steps can be skipped.)
Remove the bolts from the caliper bracket, then remove the bracket.
If the rotors are original, they may be held on by some clips. These can be cut off, or spun off using some needle nosed pliers. Whether you decide to reinstall them, is up to you.
Remove the rotor. If it is rusted on, spray some penetrating oil around the middle of rotor, then strike the rotor between the studs with a hammer until the rotor comes off. Use care not to hit the studs, or you’ll damage the threads.
Clean the face of the hub well with a wire brush.
Clean the grease off the caliper slide bolts, and wire brush the mating surface of the caliper bracket, and the caliper clips, if the pads did not come with new ones.
The piston for the rear brakes has to be spun in, instead of just compressing it with a C clamp. Sears is one place that sells a tool that helps you do that. If you use care, some pliers, vise grips, or needle nosed pliers could be used instead.
Spin the piston in until it does not go in any farther. If it does not spin in, the caliper will need to be replaced. There are two “v”-shaped grooves in the piston. When done, one V should face to the top of the caliper, the other to the bottom.
Using care to not tear it, remove the boot from the slide on one side of the caliper, pushing the slide to that side. Lube the slide with some high temperature brake grease, and put some grease in the boot on the other side.
Clean the new rotors with some brake cleaner, and be careful not to get any grease on them. If you do, clean it off with brake cleaner. Install the new rotor on the hub; put just a tiny bit of brake grease on the clips for the brake pads at the contact points, and install the caliper bracket. (GM recommends using blue thread lock on the bracket bolts.) Tighten the bracket bolts to 94 ft. lbs. Clean and lube the caliper slide pin.
Install the pads in the caliper bracket.
Slide the caliper back on the slide pin, and swing the caliper down over the pads. If you have trouble, check the pads to make sure they are firmly against the rotor. If it still won’t swing down, you may have to spin the piston in farther. Install the caliper bolt, and tighten to 20 ft. lbs.
Reinstall the bracket and bolt for the emergency brake cable, and reconnect the wheel speed sensor.
Front Brakes
Raise, and properly support the vehicle.
Remove the wheels.
Using a large C-clamp, compress the pads enough to relieve the pressure of the pads against the rotor.
Remove the two caliper bolts.
Using a screw driver, pry between the caliper bracket and the caliper until it slides off. Support the caliper so that it does not hang from the flex brake hose.
Remove the caliper bracket, and the pads from the bracket.
(If just replacing pads, the bracket and rotor do not need to be removed so those steps can be skipped.)
Clean the mating surface on the caliper bracket, and the steering knuckle where it bolts on. If the new pads did not come with new caliper clips, clean any dirt and grease off them.
If the rotors are original, they may be held on by some clips. These can be cut off, or spun off using some needle nosed pliers. Whether you decide to install them, is up to you.
Remove the rotor. If it is rusted on, spray some penetrating oil around the middle of rotor, then strike the rotor between the studs, with a hammer until the rotor comes off. Use care not to hit the studs, or you’ll damage the threads.
Clean any loose rust from the surface of the hub, with a wire brush.
Put the new rotor back on the hub, lightly grease the caliper clips, then bolt the caliper bracket on to the steering knuckle. Tighten to 137 ft. lbs. (GM recommends using blue thread lock on the bracket bolts.)
Install the brake pads.
Take one of the old pads, and place it on the caliper next to the piston. Using the C-clamp, compress the piston in. Some suggest loosening the bleeder screw while doing this to keep any dirt and old fluid being pushed back into the master cylinder.
Clean the caliper slide pins, and lube with high temperature brake grease.
Install the caliper over the pads. While installing the caliper, push the boots in that are attached to the caliper bracket so that the holes in the boots line up with the holes in the caliper. Install the slide pins, and torque to 63 ft. lbs.
This would also be a good time to bleed the brakes, and flush out the old fluid.
*Gone, but not forgotten* - Black 2000 SSEi, HIR Headlights, Angel Eyes fogs, 3rd brake light overlay, hi-flo cat, 180 degree thermostat, HS 1.9 rockers, LSx yellow springs, Intense FWI, PCM, shift kit, push rods, and 3.4 Pulley. ZZP Power Log.