Joined: Mon May 19, 2008 6:04 pm
Posts: 25894
Location: Browerville, MN
Year and Trim: 2004 GXP - plus a handful of other Bonnevilles
|
I've spent many hours working on this update, but I know its not perfect. Feel free to post any questions, comments, additions, etc to further help the community. ExteriorHood bubbling
Problem: Also known as hood herpes, paint bubbles on lip of hood due to an incompatible primer on the aluminum hood of the 2000-2005 Bonnevilles. Not a matter of if this problem will happen, but when. Usually the underside of the hood by the latch is the starting point.
Solution: Strip and redo: Unfold the front seam, mechanically remove all material down to bare metal, re-prime, and paint.
Estimated Cost: $200-500 at a body shop. Road rash
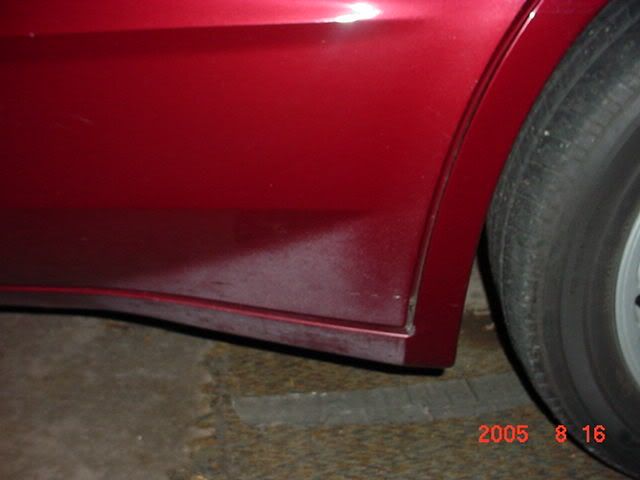
Problem: This is the sandblasting of the paint on the rear rocker moldings of the SLE/SSEi body style, due to the fact that they are angled in a way that puts them in direct contact of the road debris from the front tires. Problem shown here: http://i9.photobucket.com/albums/a71/si ... adrash.jpg
Solution: Depending on the level of damage, and whether the damage is through the clearcoat, this might be a simple fix with just some rubbing compound, or require a full repaint of the rocker moldings. To help prevent this problem, install some mudflaps to keep the road debris off the side of the car.
Estimated Cost: $100-300 at a body shop. Fogged headlights
Problem: This can be a combination of two problems; the first being a rough surface on the lens of the headlight, caused by road debris. It can also be tiny cracks in the plastic lens, caused by heat damage from the sun or the bulbs.
Solution: If the surface is rough, the lens can be fixed. If the lens is smooth, but full of tiny cracks, it is not fixable. To fix the rough surface, you need to sand down the headlights, starting with 400 grit, and then work yourself up with 800, 1000, 1500, 2000 grit sandpaper. Then go over it with some polishing compound and it should be clear as glass. Detailed photos here: viewtopic.php?f=9&t=14938&p=158135&hilit=sandpaper#p158135
Estimated Cost: FREE - $30 + labor, depending on if you have the materials on hand. Filthy wheels
Problem: The surface of the rim is covered in brake dust, rust or tar.
Solution: Wash the wheels the best that you can with soap and water, and then use some Mother’s Mag and Aluminum polish on a rag. You can either work it with your finger, or with a Powerball Mini. http://www.mothers.com/02_products/05100-05101.html
Estimated Cost: $5-10 + labor Sunroof doesn’t work/doesn’t sit correctly
Problem: The sunroof assembly doesn’t work. Sometimes it might vent but not move back, other times it might move back, but not vent. Other times, it doesn’t sit flush with roof and causes leaks. Or, it doesn’t work at all.
Solution: First you need to determine the cause of the problem. If it doesn’t go to a certain position, examine the plastic levers that control the movement. You can get a much better view of the workings if you remove the glass. Simply remove the 4 torx bolts that hold the glass in, and remove it and set it aside. Try to operate the sunroof now and watch the mechanism. You will be able to tell immediately if a part is broken or not functioning correctly. If a part is broken, it is not really a serviceable unit, and the entire assembly must be replaced.
If the glass doesn’t sit flush with the roof, you need a calibration done. This is a pretty involved fix as you have to drop the headliner to access the motor. Without getting into the details, basically you use the vent position on the switch to adjust the angle of the glass to be how you want it when it is closed. Next, remove the motor from the assembly, and move the switch through all the positions, and then back to the closed position. Insert the motor back into the assembly and reassemble. This should resync the motor with the glass.
Estimated Cost: $100+ for a used sunroof assembly + labor. Intermittent windshield wipers
Problem: Windshield wipers have a mind of their own. They might go on by themselves, they might not work when you need them, or they are jerky in their movements.
Solution: Water gets inside the box and causes massive amounts of corrosion on the circuit board. viewtopic.php?f=21&t=15390&hilit=wipers&p=161391#p161391
Estimated Cost: $30-50 for a used wiper assembly + labor. Faded window trim
Problem: Plastic trim on the doors next to the windows fades from the sun, and eventually cracks and rusts.
Solution: Apply a black vinyl over the faded trim. viewtopic.php?f=14&t=235
Estimated Cost: $20 for the vinyl + labor. Door cladding coming off
Problem: The door trim on the SLE/SSEi body style is coming off.
Solution: Remove as much of the old adhesive as you can with a heat gun. Pick up some 3M Molding Tape, and apply it to the areas. Press on firmly. http://i675.photobucket.com/albums/vv11 ... G_5294.jpg
Estimated Cost: $10-40 depending on how much 3M tape you need. Rust under fuel door
Problem: The paint is starting to bubble under the fuel door. This is caused by an adhesive used to glue body panels together. It holds water and allows rust to form. viewtopic.php?f=18&t=21288
Solution: Once it has started to rust, there is no stopping it. The infected area must be cut out and a new section must be welded in, and painted. If the area has NOT rusted yet, you can help prevent it by drilling a small drain hole inside the filler area at the lowest point so the water has a place to escape. Another option would be to pump in some RTV or silicone into the corners so the water drains out the fuel door area. Basically, you don't want to give water a chance to sit.
Estimated Cost: $500-1500+ Interior Water leaks
Problem: You find standing water on the floor, under the rear seat, or in the trunk.
Solution: Depending on where the water is, you either have a leak from the sunroof drain lines, the door seals or water shields, or center taillight.
Sunroof drains: viewtopic.php?f=43&t=1688
Door water leaks: viewtopic.php?f=43&t=11470
Center taillight/trunk lid: viewtopic.php?f=18&t=20281
Estimated Cost: Minimal cost of supplies, mostly labor. You could spend hours looking for the leak. Radio lights/Dash lights not working
Problem: You have one or more bulbs burnt out in your radio display, or other dash components.
Solution: Replace the bulbs yourself: viewtopic.php?f=18&t=7188
Pay someone to do it for you: viewtopic.php?f=18&t=7449
Estimated Cost: $20-$50 depending on who does the labor. Fuel gauge has a mind of its own
Problem: The fuel gauge doesn’t work correctly. You are sick of using the trip meter to judge your distance left.
Solution: You need to replace the fuel level sensor on the fuel pump assembly. Buying this part from GM will cost over $400. Thanks to Hans, we have a simple $40-50 fix. The fix involves buying a part from a GM dealer that is made for a recall on Tahoe’s. What happens that makes the sensors not read correctly, is the little fingers on the sensor wear out, causing false readings.
Bad sensor: http://i33.photobucket.com/albums/d61/b ... G_7569.jpg
Good sensor: http://i33.photobucket.com/albums/d61/b ... G_7572.jpg
Luckily GM made it easy to get the fuel pump out by making an access panel in the trunk. You simply remove the pump from the fuel tank, and swap the sensor arms, and reinstall. For a more detailed explaination with a video tutorial, see here: viewtopic.php?f=9&t=3463
Pics here: viewtopic.php?f=18&t=456
Part number needed: 15824379 ($43.30 as of 5/8/11)
Estimated Cost: $40-50 for the part from GM, $20-30 on ebay Window regulator broken
Problem: Your window falls down into the door and won’t roll back up. You can hear the motor working, but nothing happens.
Solution: The cable that lifts the window pulled out of the plastic retainer. You can repair it yourself: viewtopic.php?f=43&t=212
Or buy a replacement regulator: http://shop.ebay.com/?_from=R40&_trksid ... Categories
Estimated Cost: $5 to fix it yourself, around $50 for an aftermarket regulator. Passenger front and both rear door windows & locks don’t work
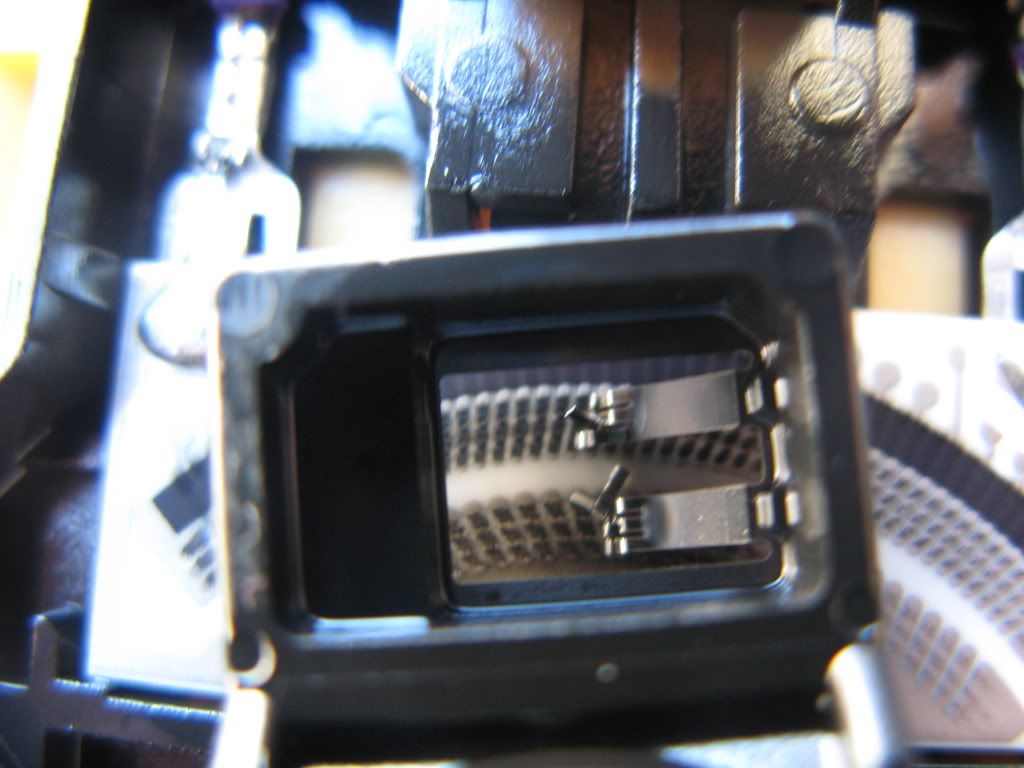
Problem: You notice that the passenger front window, and both rear windows don’t work, along with the door locks.
Solution: Whether you know it now or not, you have some water leaks, allowing water to get under your carpet, and its corroding the wiring. Thankfully, this is a rather simple fix if you have any electronic/soldering knowledge.
The windows and door locks data runs on a serial bus line that goes from each door module to each other. There is a splice pack under the driver seat that connects these wires. It gets wet and corrodes.
- Picture step-by-step tutorial - http://imgur.com/a/ex8w6
1. Remove the driver seat bolts with a T47 Torx bit. You’ll need to remove those plastic covers. Two bolts in front, two in the back. Disconnect the wiring and remove from the car.
2. Lift up the carpet and notice standing water, or signs of previous water.
3. There is some wiring that runs directly under the driver seat. Remove the wire loom from that 1ft section. Carefully cut away the wire wrap from the wires to expose the wires.
4. You’ll see 4 tan wires that look like they have black duct tape wrapped around them, cut away this wrap as well. You should find a splice pack that looks like this (complete with corrosion): http://i675.photobucket.com/albums/vv11 ... G_7787.jpg
5. Cut out the splice pack and save it to show your friends.
6. Cut back the 4 tan wires until it is fresh and clean. Black wiring is not good, cut back as much as necessary, it could be wicked up into that wire a few inches, or a few feet, depending on how long the problem has existed.
7. Solder a new wire in its place. It doesn’t have to be fancy. Any gauge wire will work as long as it’s somewhat similar to the existing wire. All you are doing is reconnecting the 4 door modules so they can communicate again. Be sure to use heat shrink tubing to keep the water out. http://i675.photobucket.com/albums/vv11 ... G_7788.jpg
8. Rewrap the area with wire wrap (electrical tape), and put the wire loom back on
9. Reinstall the seat.
10. FIX YOUR LEAKS! Check the links in the “Water leaks” section of this document. Estimated Cost: FREE, just some simple supplies and time Heated seat doesn’t work
Problem: When the switch is depressed, the light comes on for a second or two, and then shuts off.
Solution: You have a burnt out heating element in the seat. You can repair it yourself: viewtopic.php?f=49&t=25179
Estimated Cost: A few dollars in soldering supplies, plus labor. Cups don’t fit in cupholder
Problem: 00-01 style center console doesn’t allow two cups to co-mingle in the cupholder.
Solution: Upgrade to a 02-05 console for a redesigned console that performs much better.
Estimated Cost: $50-100 for a used console. Center console lid is cracked/ripped/worn
Problem: Excessive elbow pressure causes wear on the vinyl console lid.
Solution: Replace with another lid.
Estimated Cost: $20-30 Saggy sun visors / sunshade / headliner
Problem: The fabric on the visors, sunroof shade or headliner has began to deteriorate and sag. Another problem with the visors is the lighted mirror cover. The little plastic tabs under the springs break allowing the cover to flop.
Solution: The visors aren’t serviceable as they are glued together, and must be replaced. The sunshade and headliner can be recovered: viewtopic.php?f=43&t=9351
Estimated Cost: $50 in materials, plus labor. Chassis/Steering/Suspension Clunk in steering at low speeds
Problem: Noticeable clunk in the steering wheel when turning either way at low speeds.
Solution: This is because of a poor design in the intermediate steering shaft between the steering column and the steering rack. You can either lube the existing shaft, or replace it with an updated design. (GM PART # 26068295)
All info here: viewtopic.php?f=55&t=217
Estimated Cost: Minimal cost of grease, mostly labor. $100-$160 for new replacement. Service Stability System – TRAC OFF, ABS & BRAKE lights are on
Problem: You get the annoying “ding, ding, ding” on the DIC with the message, “Service Stability System”. You might also have the TRAC OFF, ABS & BRAKE lights lit up on the instrument cluster.
Solution: You have a problem with some part of the Stability System. The only true way to diagnose this is with a scanner that can read ABS codes. The dealer can scan it with the Tech2, but there are cheaper scanners that can do it. 90% of the time, the issue stems from a bad WSS (wheel speed sensor), which is located inside the wheel bearing. The entire hub must be replaced. The next most common failure is from the SWPS (steering wheel position sensor). Other problems can be the EBCM (electronic brake control module) or Yaw sensor.
How to replace wheel bearing: viewtopic.php?f=54&t=12947
How to replace SWPS: viewtopic.php?f=55&t=18539
Estimated Cost: $100-160 for a new wheel bearing, Timkin is recommend. Power steering leak
Problem: You notice power steering fluid on the ground. You notice whining coming from the power steering pump while turning.
Solution: You have a leak in the high pressure power steering line. Replacement is necessary.
Estimated Cost: Replacement line $15-30, plus 1-2 hours labor. Rear shocks bounce/rattle
Problem: Your car handles poorly, the rear of the car feels unstable. You have a clunking/rattle noise coming from the trunk area.
Solution: You either have bad rear shocks, or bad rear shock mounts. If the ride is unstable or bouncy, you need new shocks. If the car is clunking/rattling over bumps, you need new shock mounts. It is suggested to replace both the shocks and mounts while you are in there. Replacement is pretty simple. Jack car up, remove 2 – 10mm nuts from bottom of shock, disconnect airline, open trunk, remove side carpets and shock mount covers, remove 2 – 13mm nuts to release shock mount. Insert new shocks/mounts and install in reverse.
Monroe MA822 Max-Air Air Shocks are recommended.
Estimated Cost: $60-75 for a pair of shocks, $50-60 for a pair of mounts, 1-2 hours labor. 60-70mph Vibration
Problem: You get a slight vibration between 60-70mph, basically any highway speed.
Solution: There is no real single solution for this problem. Roughly 50% of 2000+ Bonneville owners have experienced this issue one time or another, and it can be a mix of different problems. The most common fix is rebalancing the tires. Some have experienced better luck with Road Force Balancing. Other fixes have included ball joints, control arm bushings, tie rod ends, etc...
Estimated Cost: Depends on the solution, $50+ Engine UIM/LIM gaskets leaking coolant
Problem: You are experience a loss of coolant, overheating engine, or coolant in your oil.
Solution: 3800 Series II Vin K Upper Intake Information: viewtopic.php?f=53&t=1061
How to change Upper Intake Manifold & Lower Intake Manifold gaskets: viewtopic.php?f=53&t=3591
Estimated Cost: $100-300 depending on if you are SC/NA and where you source your parts. Experienced mechanic: 3-4 hours/First-time DIYer: all day/weekend Leaking/Cracked Coolant Elbows
Problem: You are noticing a loss of coolant. You determine its coming from the passenger side of the engine where the plastic coolant elbow goes from the LIM to the tensioner bracket. The elbow is either cracked, or is leaking past the o-rings.
Solution: The elbows need to be replaced. You need to remove the alternator, and the tensioner assembly to get to them. Apply some silicone RTV to the ends of the elbows before installing them.
Part number: Dorman HELP! 47065: http://www.dormanproducts.com/p-19917-47065.aspx
More info: viewtopic.php?f=18&t=23252
Where to put the RTV: viewtopic.php?f=19&t=25473&p=259394
Estimated Cost: $5 for the elbows, plus $5 for some silicone RTV Oil pressure sensor is pegged
Problem: Your oil pressure gauge is reading 120 psi at all times.
Solution: You have a bad sensor. Replacement necessary. Read all about it: viewtopic.php?f=53&t=17496
Estimated Cost: $40-45 for new sensor, adds just a few more minutes to your oil change. Idler pulley is squeaky or exploded or is missing
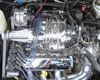
Problem: If supercharged, you noticed a loss in power, you popped the hood and noticed your belt was off. You tried to put it back on, only to find that one of your pulleys was missing. The OEM pulleys are plastic, and when the bearings go out in them, they heat up, melting the plastic, causing it to explode.
Solution: You need to replace the pulley. 3800 Pulley's image: http://i675.photobucket.com/albums/vv11 ... ulleys.jpg
Estimated Cost: $20-25 for new pulley, $40-45 for a new belt (if the original was destroyed), should only take a few minutes to change it. Supercharger rattles only at idle
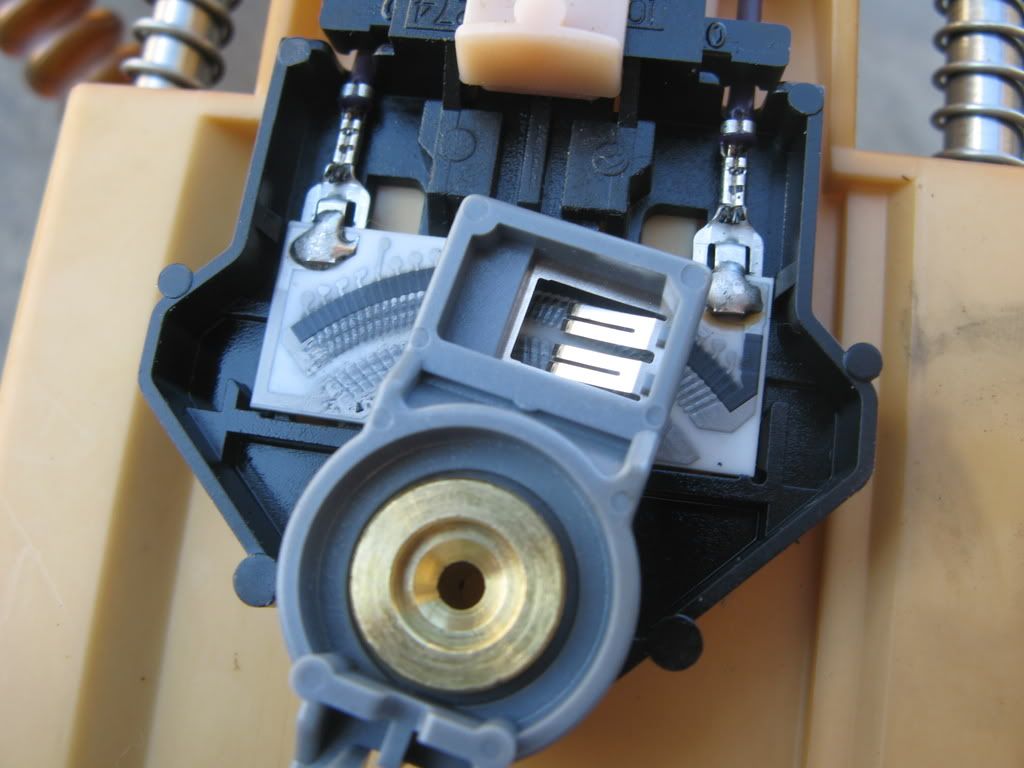
Surging at 47+ mph while going up hills
Problem: You have a noticeable surge at 47+ mph while going up hills when the tranny is in OD.
Solution: While this problem feels like a transmission issue, 99% of the time, it is an ignition issue. There are 4 basic components in the ignition system: spark plugs, spark plug wires, ignition coils and the ICM (ignition control module) mounted under the coils. If you don’t know how old the plugs/wires are, replace them. Coils next, followed by the ICM.
Estimated Cost: NAPA Belden Premium Wires, $30-40
Spark Plugs (NGK TR55 or Autolite 605) (Never Bosch), $12-48
Ignition coils, used $10-15 each, new $30-70 each
ICM, used $30, new $130+ Loss of power in higher RPM’s
Problem: The car has a loss of power at higher RPM’s, stalls and chokes out when giving throttle.
Solution: The catalytic converter is plugged, not allowing the exhaust gases to release from the engine. Replacement cat is required.
Estimated Cost: $50-70 for aftermarket cat (OEM cats cost hundreds), $20-50 for installation labor. UIM exploded (L36 only)
Problem: When going to start the car, the UIM (Upper Intake Manifold) explodes.
Solution: This is caused by a faulty FPR (Fuel Pressure Regulator) that allows fuel to leak into the intake manifold. When the car starts, it backfires and causes the intake to explode. Example here: viewtopic.php?f=19&t=9646
This is a completely PREVENTABLE problem. There is a recall on the bad FPR, get it checked out at the dealer.
Estimated Cost: FREE before the explosion, $200+ after the explosion, depending on the amount of damaged caused. Transmission (4t65e, 4t65e-HD, 4t80e) Transmission slams into gear
Problem: The transmission slams or bangs into gear when shifting to reverse or drive.
Solution: The front transmission mount is bad. Replacement necessary, you have two options: Stock or the “hockey puck mount", now known as the "boat roller mount".
More information: post425869.html#p425869
Estimated Cost: $60-70 for stock mount, under $20 for solid front mount. 1-2 hours labor Transmission shift harsh/firm when warm
Problem: The transmission shifts harsh after driving for a while when tranny is warm.
Solution: The PCS (pressure control solenoid) is acting up. You might have the code P1811. While the sensor is cheap, it is located inside the transmission and the side cover must be removed to access it. To remove the side cover, the subframe must be lowered to clear the frame rail. It is a very labor intensive fix.
It has also been said that an aftermarket shift kit can help cure this problem.
More info: https://tripleedgeperformance.com/harsh ... -dtc-p1811
Estimated Cost: $40 for the new solenoid, but $400-1000 in labor. Loss of overdrive
Problem: The transmission doesn’t have overdrive, engine revs at 2500rpm at 60mph instead of 1600 rpm.
Solution: The 4th clutch hub splines have worn off, causing the loss of overdrive. The hub is located deep within the tranny, and the side cover must be removed. The repair can be done with the tranny still in the car, but the subframe must be lowered to access it. A replacement hub with hardened splines. Most all 2003 and newer vehicles came from the factory with the heat treated version.
More info: http://tripleedgeperformance.com/No_4th_Gear.html
Project pics: viewtopic.php?f=9&t=5832&start=60
Estimated Cost: $40-80 for new hardened hub, but $400-1000 labor. _________________ Andrew - owner/operator of Bonnevilles Unlimited

2004 Bonneville GXP | 60k | White Gold Tricoat | custom built supercharged 3800 hot rod | garage queen
1997 Corvette | 55k | Silver Metallic | Z06 wheels | Date-night Hauler/Parts runner
2014 Town & Country Limited | Cashmere Pearl | 95k | Family Hauler
2002 Ram 1500 Quad Cab Sport | Black| 260k | Official Bonneville Hauler
Last edited by harofreak00 on Sun May 15, 2011 3:44 pm, edited 6 times in total.
|
|


 ... I see 2 of my current problems here, and 1 more in the "to be added" list. Lets see if I can find time to fix my problems before more end up on the list.


