PontiacBonnevilleClub.com
http://www.pontiacbonnevilleclub.com/forum/

Leather restoration
http://www.pontiacbonnevilleclub.com/forum/detailing-appearance/topic45396.html
Page 1 of 1

Author:  Hotwheels [ Mon Feb 09, 2015 11:09 pm ]
Post subject:  Leather restoration

This isn't on a Bonneville, but I figured this may be of use to some of you - it sure revived the nasty interior of my project Suburban.

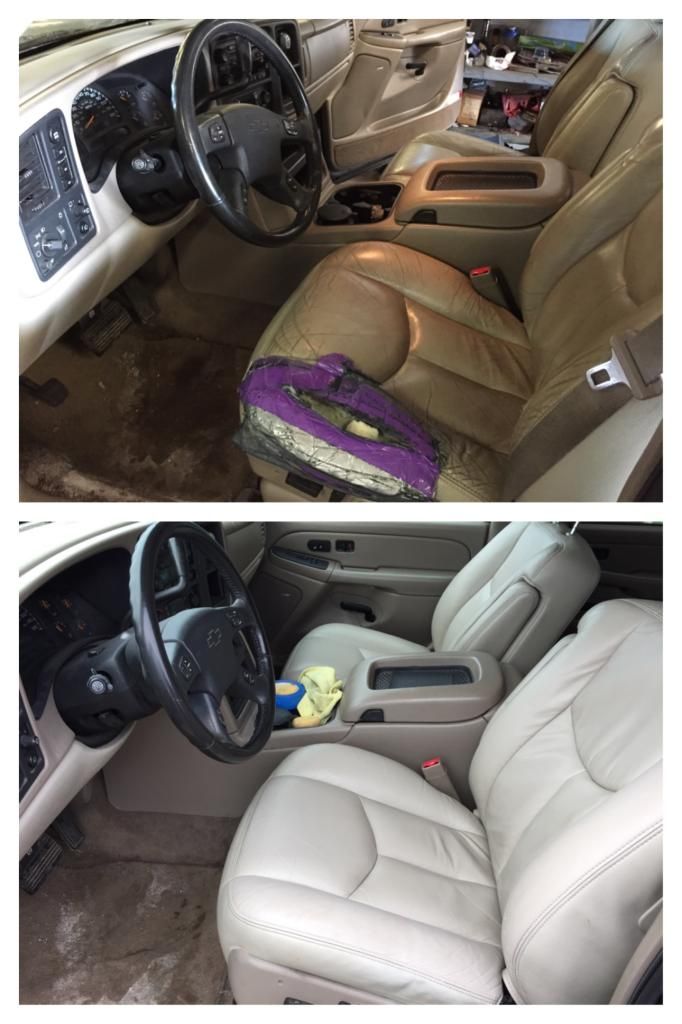
Backstory, I picked up this '04 Suburban Z71 for dirt cheap as it needed bodywork, interior work, and a couple non-op accessories fixed. Currently has 151k, had belonged to a family of 7 since 30k if that gives you any indication of the interior condition...

Anyhoo, after a fair amount of research online, I decided to use the Magic Mender leather repair kit (leatherrepairkits.com), which provides color charts with exact match dyes to your interior. I used 1 leather repair kit plus 1 additional bottle of dye ("Color Flex") to do the first 2 rows of seats.

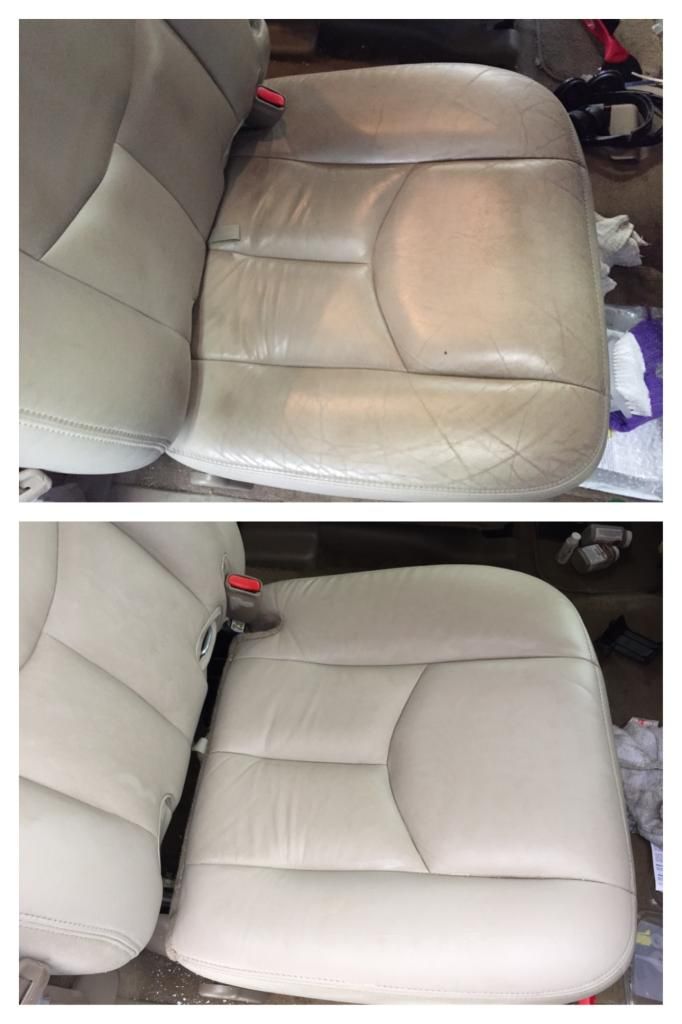
First I had to cut through the grunge with a cleaning. I tried something new I learned from a leather repair shop online - Scrubbing Bubbles + scrub brush. These seats were GROSS. Then condition the seats before proceeding.

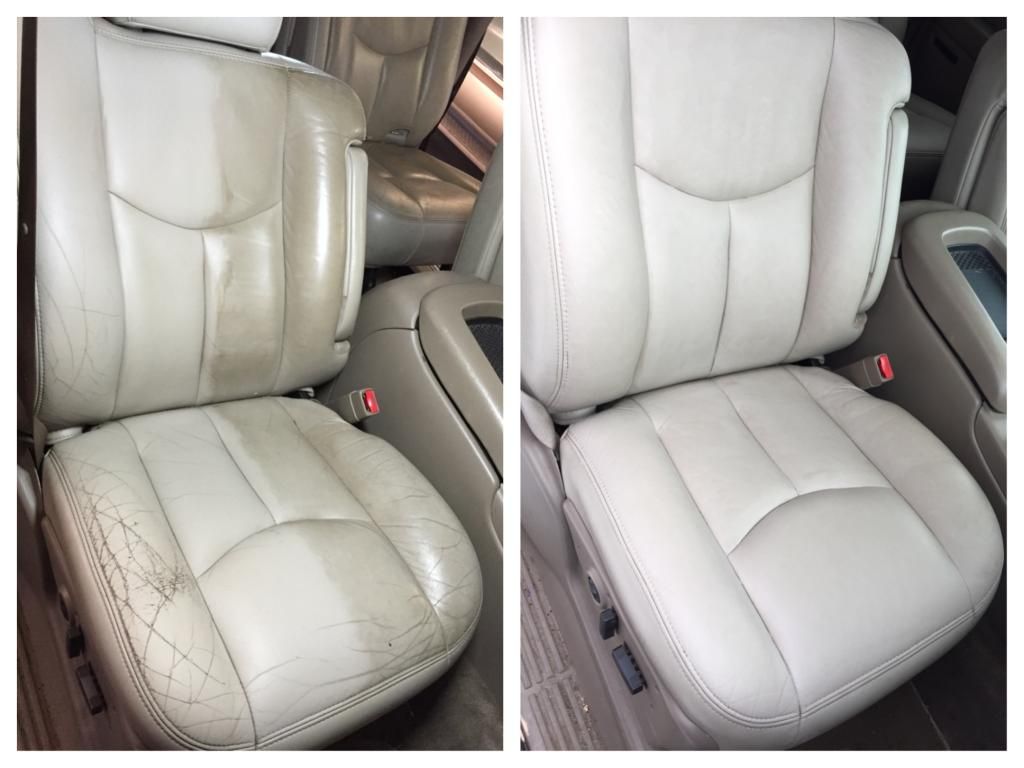
Original vs cleaned vs refinished:
Image

Then, sand lightly with 320 grit to get rid of any rough edges, apply filler if needed (and dry for 20 min), if so, then sand smooth afterward. Use the provided alcohol cleaner to get rid of any dust. Then shake the Color Flex (dye/paint) VERY thoroughly for a couple minutes. What you'll realize is that the original dye is really a paint/coating on top of the leather itself, so "repainting" the leather via this method isn't anything new. This was news to me.

Pour a fair amount of Color Flex into the provided paint tray, and smear the first coat on thinly with the provided sponge - wet it lightly before using. Allow 10-15 min to dry, then apply the second coat by dabbing - just like sponge painting. Just go light on each coat - not too thick or else risk cracking in the future. Allow drying time in between coats, and do more coats until you see the result you like. I did 2-3 coats. You'll need more over any areas that required filler.

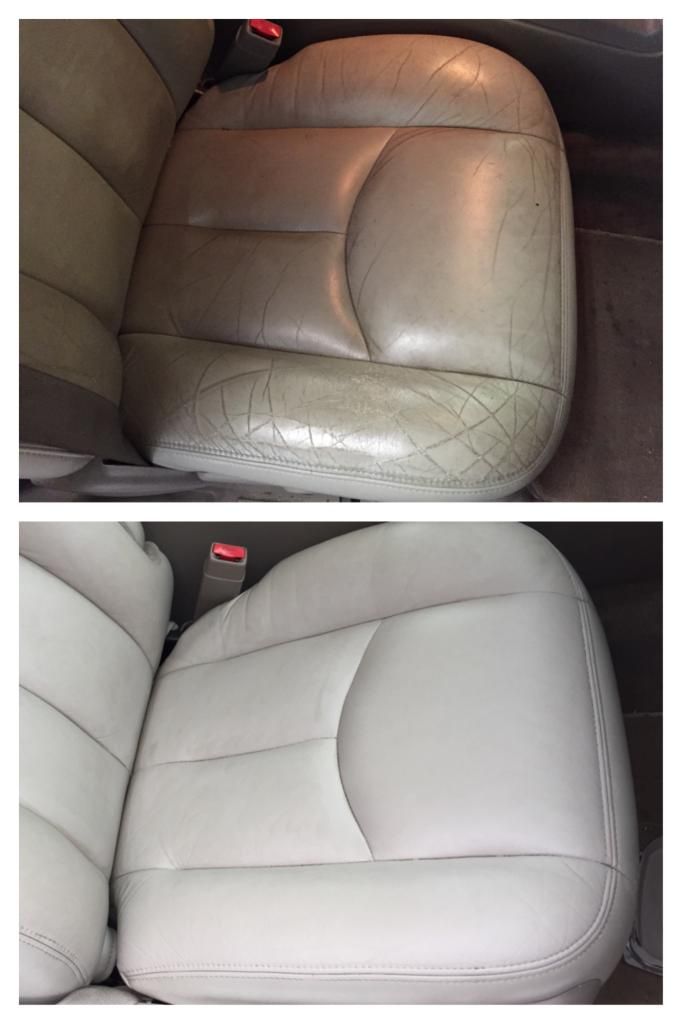
I let it dry in a heated shop overnight, and voila!

The driver's seat covers and foam were replaced with used covers from a donor seat, along with replacing the heated seat pads. On the driver's seat I experimented further by only dyeing the outside (door side) bolsters and you can see how well the color matches (Light Shale). Results are amazing! It's recommended to recondition the seats again after this.

Now onto detailing the rest of this mess...


Image

Image

Image

Author:  dadofone2011 [ Mon Feb 09, 2015 11:21 pm ]
Post subject:  Re: Leather restoration

This looks amazing. Great job.

Author:  00Beast [ Mon Feb 09, 2015 11:41 pm ]
Post subject:  Re: Leather restoration

Wow! Dramatic improvement!

Author:  1oldman [ Mon Feb 09, 2015 11:41 pm ]
Post subject:  Re: Leather restoration

AMAZING! Do you think that the seats could be made two-tone, as in inserts one color and the bolsters another? I really appreciate you sharing this with the FORUM. Looks like you did a great job! - BC

EDIT: Two tone as in the First Gen CTS - BC

Author:  Hotwheels [ Tue Feb 10, 2015 12:11 am ]
Post subject:  Re: Leather restoration

Hmm....that is a good point. I'm sure it could be done. The paint/dye is suspiciously similar to indoor latex house paint, perhaps a slightly thinner feel, requiring a few coats of coverage to create a strong color. I'm not sure how a dark to light transition would be without trying it first. But light to dark would be no problem. Just have to do a good job of masking for crisp lines (I did some masking, particularly on the driver's seat, where I only redid a section of the seat). I have a junk seat cover to practice on....I'll have to try it!

Author:  DCJREDLINE [ Tue Feb 10, 2015 2:09 am ]
Post subject:  Re: Leather restoration

WOW, impressive for sure!!

Author:  1oldman [ Tue Feb 10, 2015 6:13 am ]
Post subject:  Re: Leather restoration

Hotwheels wrote:
Hmm....that is a good point. I'm sure it could be done. The paint/dye is suspiciously similar to indoor latex house paint, perhaps a slightly thinner feel, requiring a few coats of coverage to create a strong color. I'm not sure how a dark to light transition would be without trying it first. But light to dark would be no problem. Just have to do a good job of masking for crisp lines (I did some masking, particularly on the driver's seat, where I only redid a section of the seat). I have a junk seat cover to practice on....I'll have to try it!

Just from my perspective, I'd go dark to darker. I would think it would be problematic to try and go from dark to light, but then, I could be wrong. - BC

Author:  nos4blood70 [ Tue Feb 10, 2015 2:49 pm ]
Post subject:  Re: Leather restoration

Stunning! I might wanna try this on my parents' Lexus. The driver seat is in sad shape.

Author:  crash93ssei [ Tue Feb 10, 2015 3:12 pm ]
Post subject:  Re: Leather restoration

Looks like a great option for trashed seats. My only issue is dye transfer or the dye coming off at a later date during cleaning. The factory leather has the color layer then a layer of clear coat to protect it, if these kits had the clear coat with them it would be even better. Either way though it is a massive improvement and should last for a long time!

Author:  1oldman [ Sun May 10, 2015 11:24 pm ]
Post subject:  Re: Leather restoration

Could we have an update on how the leather repair(s) are holding up? Thank you! - BC

Author:  95naSTA [ Sun May 10, 2015 11:54 pm ]
Post subject:  Re: Leather restoration

I didn't see this the first go around and I'm glad I'm seeing it now.

This is 100% unreal. Killer work!

Author:  Hotwheels [ Sat May 30, 2015 11:20 pm ]
Post subject:  Re: Leather restoration

Sorry about the delay in getting back to you guys, the leather repair has actually held up decent for the heavy use its been getting. It is showing some tiny cracking though as I did not get a chance to put any clear coat on it. Need to do this repair with a clear coat on my Avalanche and see how it fares. I think with that added, it should be very durable.

Page 1 of 1 All times are UTC - 5 hours [ DST ]
Powered by phpBB® Forum Software © phpBB Group
http://www.phpbb.com/