It is currently Tue Apr 16, 2024 4:34 am

All times are UTC - 5 hours [ DST ]


Post new topic Reply to topic  [ 5 posts ] 
Author Message
PostPosted: Wed May 21, 2008 9:49 pm 
Offline
Administrator
Administrator
User avatar

Joined: Mon May 19, 2008 6:04 pm
Posts: 25877
Location: Browerville, MN
Year and Trim: 2004 GXP - plus a handful of other Bonnevilles
Trim Panel Replacement - Side Front Door

Tools Required
J 36796 Clip Zip Tool
J 38778 Door Trim Pad Clip Remover

Removal Procedure
Remove the inside door handle bezel. The front inside door handle bezel has electrical connectors, the rear does not.

Image
Insert a flat bladed tool behind the forward upper edge of the door handle bezel.
Gently pry the upper portion of the bezel away from the door trim panel.

Image
Pull the bezel forward over the inside door handle.
Disconnect the electrical connector.

Image
Remove the upper door trim panel.
Use the J 38778 in order to release the retainer at the top of the upper door trim panel.
Lift the upper door trim panel upwards in order to remove.
Disconnect the wire harness to the tweeter.

Image
Use the J 36796 in order to release the retainers around the outside edges of the door trim panel. Start at the bottom and work around.

Image
Starting at the bottom rear of the door trim panel pull inwards, while lifting upwards in order to remove.
Disconnect the door trim panel wiring harness.

Image
Remove the armrest pull cup retainers from the inside of the door trim panel.
Use needle nose pliers to compress the 360 clip.
Pull the 360 clip out of the nylon nut on the door trim panel.


Installation Procedure

Image
Install the 360 clip retainers into the nylon nuts on the inner door panel.
Connect the door wire harness to the door trim panel wire harness.

Image
Starting at the bottom, secure the door trim panel around the outside edges with the retainers (2).
Align the door trim panel to the 360 clip retainers (1).
Snap the retainers in to secure the center of the door trim panel to the inner door panel.
Pull on the armrest to assure proper fit.
Push outwards near the top of the door trim panel in order to snap the top door trim panel retainer into the channel in the window inner belt seal strip.
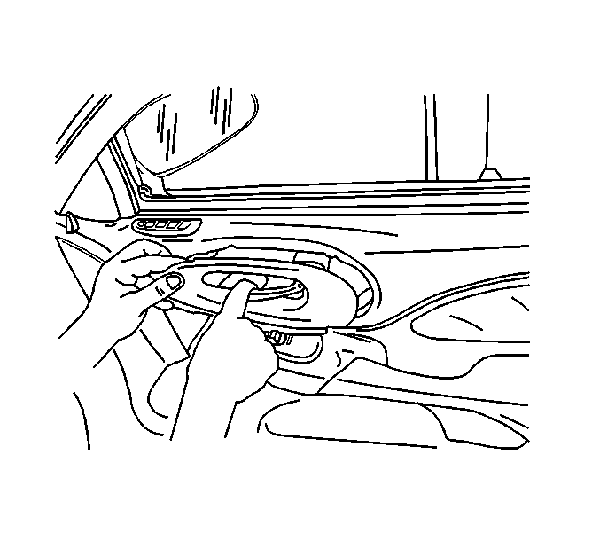
Install the inside door handle bezel.
Image
Connect the electrical connectors, if any, to the inside door handle bezel.
Guide the inside door handle through the opening in the door handle bezel.
Snap the door handle bezel into place.
Work the rubber around and behind both the manual lock knob and the inside door handle.

Image
Install the upper door trim panel (1).
Connect the wire harness to the tweeter.
Insert the tabs into the slots on the door trim panel.
Insert the retainer into the hole in the door frame.


Trim Panel Replacement - Side Rear Door

Tools Required
J 36796 Clip Zip Tool

Removal Procedure

Remove the inside door handle bezel. The front inside door handle bezel has electrical connectors, the rear does not.

Image
Insert a flat bladed tool behind the forward upper edge of the door handle bezel.
Gently pry the upper portion of the bezel away from the door trim panel.

Image
Pull the bezel forward over the inside door handle.
Disconnect the electrical connector.
Image
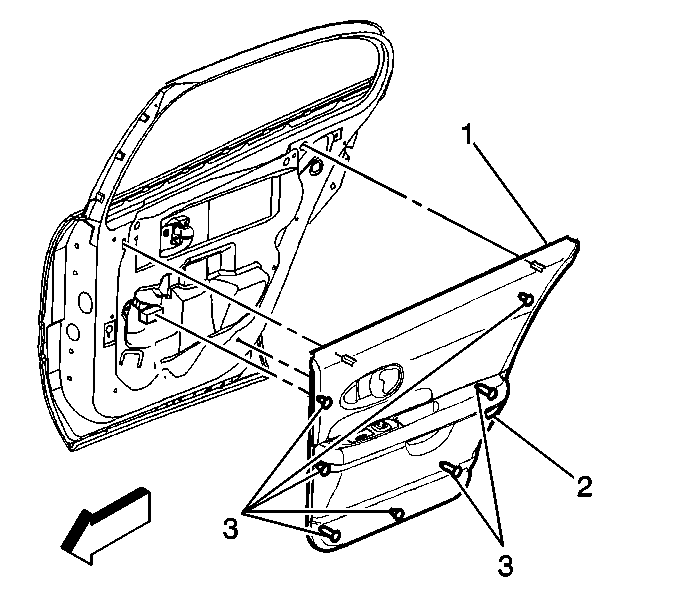
Use the J 36796 in order to release the retainers around the outside edges of the door trim panel.

Image
Rock the door trim panel (1) upwards, starting at the rear, while lifting upwards to remove.
Disconnect the door trim panel wiring harness.


Remove the armrest pull cup retainers from the inside of the door trim panel.
Use needle nose pliers to compress the 360 clip.
Pull the 360 clip out of the nylon nut on the door trim panel.

Installation Procedure

Image
Install the 360 clip to the nylon nuts on the inner door panel by sliding the 360 clip down into the grooves in the nylon nuts.
Connect the trim panel electrical connector to the door wiring harness connector.

Image
Starting at the bottom, secure the door trim panel around the outside edges with the retainers (2).
Align the door trim panel to the armrest pull cup retainers (1).
Snap the retainers in to secure the center of the door trim panel to the inner door panel.
Pull on the armrest to assure proper fit.
Push outwards near the top of the door trim panel in order to snap the top door trim panel retainer into the channel in the window inner belt seal strip.
Install the inside door handle bezel.

Image
Connect the electrical connectors, if any, to the inside door handle bezel.
Guide the inside door handle through the opening in the door handle bezel.
Snap the door handle bezel into place.
Work the rubber around and behind both the manual lock knob and the inside door handle.

Image
Install the upper door trim panel (1).
Connect the wire harness to the tweeter.
Insert the tabs into the slots on the door trim panel.
Insert the retainer into the hole in the door frame.

_________________
Andrew - owner/operator of Bonnevilles Unlimited
Image
2004 Bonneville GXP | 60k | White Gold Tricoat | custom built supercharged 3800 hot rod | garage queen
1997 Corvette | 55k | Silver Metallic | Z06 wheels | Date-night Hauler/Parts runner
2014 Town & Country Limited | Cashmere Pearl | 95k | Family Hauler
2002 Ram 1500 Quad Cab Sport | Black| 260k | Official Bonneville Hauler


Top
 Profile  
 
PostPosted: Wed Jul 30, 2008 8:44 pm 
Offline
SLE Member
SLE Member

Joined: Wed Jul 23, 2008 9:19 am
Posts: 51
Year and Trim: 2002 Pontiac Bonneville SSEI
Thanks for the great explanation on the door trim removal. It was exactly what I was looking for.

I am trying to fix up some leaks in my 2003 SSEI. I fixed the sunroof drains, which were the principal culprits.

During my research, there was frequent mention that the doors can leak because a plastic liner adhered to the door inner metal may release, allowing water to enter at the bottom of the trim pad rather than exiting out the door drains. However the Pontiac service advisor at my dealership has never heard of that problem.

I am finding water pooling on the top edge of the lower door seal, at the kick plate. This appears to be residual from what may have run past the trim panel during the rainstorm. I would like to diagnose this a little further before tearing off the door trims. My thought is to just run hose water on the exterior of the open door, and see if there is any moisture on the inner door below the trim.

Any thoughts on this plan?

_________________
2002 Bonneville SSEi Black on Black
Mods:Black window Tint all around, Infinity Kappa speakers,Custom Headliner and Visors
Underway: cleared corners, smoked tail lenses, 10 disc cd player


Top
 Profile  
 
PostPosted: Tue Jan 06, 2009 7:17 pm 
Offline
LE Member

Joined: Mon Jan 05, 2009 7:30 pm
Posts: 4
Year and Trim: 2001 SE
Thanks, Panel removal will help plenty when I replace bad window relay/motors on both rear doors. many thanks..


Top
 Profile  
 
PostPosted: Tue Jan 06, 2009 11:48 pm 
Offline
Retired Site Developer
User avatar

Joined: Tue May 27, 2008 10:30 pm
Posts: 20960
Location: MN/IA
Year and Trim: '17 Silverado 1500
kts0347 wrote:
Thanks for the great explanation on the door trim removal. It was exactly what I was looking for.

I am trying to fix up some leaks in my 2003 SSEI. I fixed the sunroof drains, which were the principal culprits.

During my research, there was frequent mention that the doors can leak because a plastic liner adhered to the door inner metal may release, allowing water to enter at the bottom of the trim pad rather than exiting out the door drains. However the Pontiac service advisor at my dealership has never heard of that problem.

I am finding water pooling on the top edge of the lower door seal, at the kick plate. This appears to be residual from what may have run past the trim panel during the rainstorm. I would like to diagnose this a little further before tearing off the door trims. My thought is to just run hose water on the exterior of the open door, and see if there is any moisture on the inner door below the trim.

Any thoughts on this plan?

Yes, it's called the watershield. Water that gets in past the window is supposed to run down it and out the drains at the bottom of the door, if the seal on it is not good, it can escape past it and get into the car. Follow this procedure, and make sure that seal/goop is good.

_________________
Bye Bye:
Image
RIP sandrock
Sirius wrote:
Think about it. You’re tooling down the road in your Prius, knowing full-well that this thing being green is as big a sham as federally mandated ethanol-enriched gas, Russia pulling out of Ukraine, and Obamacare.


Top
 Profile  
 
PostPosted: Tue Jan 06, 2009 11:49 pm 
Offline
Resident Gearhead
Resident Gearhead
User avatar

Joined: Mon May 19, 2008 10:30 pm
Posts: 8781
Location: Grand Rapids, Michigan
Year and Trim: 2014 Cadillac XTS Vsport.
KTS, you'll find your information here.
http://www.pontiacbonnevilleclub.com/forum/viewtopic.php?f=18&t=4244

Fixing - this may help you.
http://www.pontiacbonnevilleclub.com/forum/viewtopic.php?f=43&t=212

_________________
*Gone, but not forgotten* - Black 2000 SSEi, HIR Headlights, Angel Eyes fogs, 3rd brake light overlay, hi-flo cat, 180 degree thermostat, HS 1.9 rockers, LSx yellow springs, Intense FWI, PCM, shift kit, push rods, and 3.4 Pulley. ZZP Power Log.


Top
 Profile  
 
Display posts from previous:  Sort by  
Post new topic Reply to topic  [ 5 posts ] 

All times are UTC - 5 hours [ DST ]


Related topics
 Topics   Author   Replies   Views   Last post 
There are no new unread posts for this topic. PDad: Rear Door Panel Removal?

TrueWildMan

5

4646

Wed Jun 11, 2008 4:26 pm

TrueWildMan View the latest post

There are no new unread posts for this topic. Door Panel

robjr69

8

5368

Mon Feb 07, 2011 12:46 pm

harofreak00 View the latest post

There are no new unread posts for this topic. Looking for a lighted door panel how-to

1tinindian

9

1708

Mon Apr 29, 2013 3:13 pm

2003 SSEi View the latest post

There are no new unread posts for this topic. Door panel re-install...

Mac077

6

2129

Tue Aug 12, 2008 10:37 am

Mac077 View the latest post

There are no new unread posts for this topic. What is the trick to remove door panel arm rest clips?

Ramcharger310

3

2137

Tue Mar 10, 2015 9:48 pm

nos4blood70 View the latest post


Who is online

Users browsing this forum: No registered users and 1 guest


You cannot post new topics in this forum
You cannot reply to topics in this forum
You cannot edit your posts in this forum
You cannot delete your posts in this forum
You cannot post attachments in this forum

Search for:
Jump to:  
Powered by phpBB® Forum Software © phpBB Group


phpBB SEO