It is currently Thu Apr 25, 2024 3:38 pm

All times are UTC - 5 hours [ DST ]


Post new topic Reply to topic  [ 21 posts ]  Go to page 1, 2  Next
Author Message
PostPosted: Tue Jun 24, 2008 10:07 am 
Offline
Retired Gearhead
Retired Gearhead
User avatar

Joined: Mon May 19, 2008 12:35 pm
Posts: 3989
Location: Ames, Iowa
Year and Trim: 98 Caravan is the daily driver 215K
Change Accessory Belt L36
(Applies to 95-99 L36; 96-99 L67 similar)

Note: This procedure has been revised based on suggestions received in this topic and further testing. The revised version is posted in Techinfo: viewtopic.php?f=53&t=2652

If your accessory belt looks like this or worse:

Image

You will need to remove the old belt and install a new one. On most cars, this is a simple job, but on the Series II 3800, there is a spacer that must be removed from the lower bolt on the front motor mount to allow the belt to be removed or installed. Figure on about an hour to get the belt changed if you have never done it before. Probably thirty minutes the second time around.

Tools you need to do the job include:

a jack
a jackstand
a piece of 2x4 for oil pan
15mm socket for tensioner
18mm socket for motor mount
19mm (3/4") socket for lug nuts and covers
socket handle
pliers
a 12mm socket with a very long extension or
an appropriately sized piece of pipe
2-4lb hammer
torque wrench for lug nuts

If your wheel and rotor are corroded, you will also need:
a wire brush
a sturdy scraper


Image

The first thing you want to do is make sure you have a belt routing diagram. If you don't have a sticker in your engine compartment, just draw one up by looking at the belt on the engine and store it in a convenient place where you will not be likely to lose it. :wink:

Image

Loosen the old belt by placing a 15mm wrench on the tensioner bolt (big arrow) It helps to have a nice long handle to provide some leverage. Note the position of the tension indicator (little arrow).

Image

Turn the wrench counter-clockwise to remove tension on the belt...

Image

then just slip the belt off the alternator pulley.

Image

Now, remove the lug nut covers if your wheels have 'em. I need a 3/4" wrench for mine.

Image

Then loosen the lug nuts.

Image

Now jack up the car...

Image

and support it safely. Then remove the wheel.

Image

Use pliers or side cutters carefully to pull out the center button on the 3 plastic retainers for the engine shield.

Image

Don't miss this retainer up under the front of the fender.

Image

Swing the engine shield out of the way. This will expose the stud that must be removed to slip out the spacer allowing you to remove and install the belt.

Image

On my car, the stud is secured by an 18mm nut rusted tightly to the stud. If your nut comes off leaving the stud in the block, you will need the external torx socket to remove the stud. However, don't remove the stud until....

Image

you have supported the engine with a jack. Use a piece of 2x4 on the jack pad so you don't dent the oil pan. Just bring the jack up snug. Then remove the stud. This will free the spacer. Wiggle the spacer up as far as it will go, then jerk it out lifting the outer end. With the spacer out, you can pull out the old belt.

Image

Here is another photo of the spacer with the engine on a stand.

Image

Lay the new belt beside the old one, then pick them both up with your index fingers and pull them tight to make sure the new one is approximately the same size.

Image

Slip the new belt down through the opening where you pulled the spacer and removed the old belt. Route the belt around all but the alternator pulley. Put the 15mm socket and handle on the tensioner pulley bolt and turn counter-clockwise to give room to slip the belt back over the alternator pulley. Release the tensioner. Check the mark on the belt tensioner to make sure it is between the upper three scribed lines indicating maximum tension (top mark) average tension (middle mark) and minimum tension (bottom mark).

Image

Before you try to put the spacer back in place, check the alignment of the hole in the mount with the hole in the block. Adjust the jack to keep the holes aligned. Here is where it can get tricky. The spacer may not want to go back in between the mount and the block without a little persuasion. Some guys grind a chamfer on an edge of the spacer to help get started. I could almost get the front bottom edge of the spacer over the top of the motor mount, but not quite. I grabbed a long 1/2" drive extension and slipped on a 12mm impact socket. The idea was to find something that would hold against the upper edge of the spacer allowing it to be tapped into place. An appropriately sized piece of pipe would have worked as well. I just fitted the spacer in place above the holes keeping it as close to perpendicular to the block as possible, then gave the "special tool" a whack with a 2-lb hammer. That was enough to pop the end of the spacer past the top edge of the mount. I suppose I could have loosened all the bolts on the mount to achieve the same result, but I was willing to give this a try first, and it worked OK. The picture shows the spacer in place and the approximate position of the "special tool" where I whacked it. The stud can now be replaced and tightened back up, and the jack removed from under the engine. Start the engine and make sure the belt runs OK.

Image

There was rust and corrosion from the wheel stuck to the rotor. If left in place, this can cause your rotors to warp....really! So, the rotor got brushed...

Image

and the wheel got scraped with a heavy duty scraper...

Image

then wire brushed so the mounting surfaces would both be true.

Image

Lug nuts were snugged up. Car was taken off the stand and put back on the wheel. Lug nuts were final torqued to 100 ft-lbs in a star pattern. Replace the lug nut covers. All done.

Image

_________________
Image


1998 3.8 Dodge Caravan 214K
2000 3.3 Dodge Caravan 175K
1949 Plymouth Special Deluxe 4-dr sedan 25K (needs some work!)


Last edited by bill buttermore on Sun Jul 06, 2008 7:35 am, edited 2 times in total.

Top
 Profile  
 
PostPosted: Tue Jun 24, 2008 11:19 am 
Offline
Retired Gearhead
Retired Gearhead
User avatar

Joined: Tue May 20, 2008 6:50 am
Posts: 5115
Location: Deltona, FL
Year and Trim: 1997 SE
Great write-up and pics, Bill! I did grind my spacer just a bit and filed it smooth on one side to make it somewhat easier to pound in without changing it's overall length.

IMO, replacing the spacer is probably the toughest part of the whole task.

Again, nice one! This will be a good addition to the TECHINFO articles for us lowly L36 guys.

_________________
White Horse. 230K miles, It just keeps on kickin'
Image


Top
 Profile  
 
PostPosted: Tue Jun 24, 2008 11:21 am 
Offline
Retired Admin/Techinfo Admin

Joined: Mon May 19, 2008 2:08 pm
Posts: 26009
Location: Space Coast, or at least it used to be
Year and Trim: 03 SLE, 95 SE, 95 TS SE
I agree... Great Job and a great write up..


Top
 Profile  
 
PostPosted: Wed Jun 25, 2008 1:40 pm 
Offline
SLE Member
SLE Member

Joined: Thu May 22, 2008 12:29 am
Posts: 77
Year and Trim: 95 88 Royale X2
96 Bonneville SE
06 GXP Grand Prix
Great writeup and pictures Bill!

I sure wish I'd had your instructions the first time I did it. I would've lost less blood and had fewer grey hairs!

_________________
'96 L36 Bonneville SE, 95k miles (leather) 17" SLE rims
'95 L36 Olds 88 (leather) (x2) (both sold)
'91 Olds 442 w-41 (1 of 204): '79 Olds Holiday 88 coupe. Factory buckets, console
1958 Impala Coupe 348 75k miles
1958 Impala convertible 283, 51k miles


Top
 Profile  
 
PostPosted: Wed Jun 25, 2008 2:51 pm 
Offline
SLE Member
SLE Member

Joined: Wed May 28, 2008 6:51 am
Posts: 76
Year and Trim: 1995 Oldsmobile 88 Royale. Rescued from the auction.
Nice write up and great visuals. :beerchug: For those running a Olds, I was able to pull the motor mount bolt and spacer without having to remove the wheel or jack up the motor, 'bout a 20 minute job. I wouldn't think a '95 Bonnie would be that much different in engine mounting than a "95 Olds, but after looking at your pictures, it looks like I had more room to work.


Top
 Profile  
 
PostPosted: Wed Jun 25, 2008 2:52 pm 
Offline
Posts like an L36
Posts like an L36
User avatar

Joined: Mon May 26, 2008 4:36 pm
Posts: 925
Location: Houston,TX
Year and Trim: 2007 Grand Prix GT
That is one very fine write up Bill, The NA guys thank you very very very much. :banana:

_________________
Image
2007 Grand Prix GT L32
Poly endlinks, swaybar bushings and dogbone bushings. Drop in high flow air filter. Its a start!

2009 Mitsubishi Eclipse GS (project BlackSheep) Bone stock for now, 5 spd and fun as hell! (Gf's Ride)
1996 Pontiac Bonneville SE Gone but not forgotten
1997 Dodge Ram Sport 4x4 5.9L The Beast!


Top
 Profile  
 
PostPosted: Wed Jun 25, 2008 3:13 pm 
Offline
Retired Gearhead
Retired Gearhead
User avatar

Joined: Tue May 20, 2008 6:50 am
Posts: 5115
Location: Deltona, FL
Year and Trim: 1997 SE
57lxi wrote:
Nice write up and great visuals. :beerchug: For those running a Olds, I was able to pull the motor mount bolt and spacer without having to remove the wheel or jack up the motor, 'bout a 20 minute job. I wouldn't think a '95 Bonnie would be that much different in engine mounting than a "95 Olds, but after looking at your pictures, it looks like I had more room to work.

While it's true that you don't have to remove the wheel to do this on the Bonneville (I didn't), it makes for less awkward positions and somewhat less knuckle busting if you do. I still had to support the engine with a jack though.

_________________
White Horse. 230K miles, It just keeps on kickin'
Image


Top
 Profile  
 
PostPosted: Wed Jun 25, 2008 5:58 pm 
Offline
SSE Member
SSE Member

Joined: Wed Jun 11, 2008 8:16 pm
Posts: 124
Year and Trim: 1997 SSE
Good write up, but you honestly don't need to do about half the work you outlined, the engine is perfectly stable in the engine bay for the time you have the spacer out. Last time I did it took me about 15 minutes, with no wheel removal or engine supporting.

_________________
-Chris
Image
1992 Chevrolet Lumina Z34 3.4L TDC v6, Hydramatic 4T60E
1990 Pontiac Turbo Grand Prix 3.1L v6 Hydramatic 4T60
1997 Pontiac Bonneville SSE 3.8L v6, Hydramatic 4T60E
1987 Chevrolet Camaro 5.0L v8, Hydramatic 700R4


Top
 Profile  
 
PostPosted: Wed Jun 25, 2008 10:38 pm 
Offline
Retired Gearhead
Retired Gearhead
User avatar

Joined: Mon May 19, 2008 12:35 pm
Posts: 3989
Location: Ames, Iowa
Year and Trim: 98 Caravan is the daily driver 215K
White93Z34 wrote:
Good write up, but you honestly don't need to do about half the work you outlined, the engine is perfectly stable in the engine bay for the time you have the spacer out. Last time I did it took me about 15 minutes, with no wheel removal or engine supporting.
Funny you should mention this. In fact, I had not supported the engine initially, but I noticed that the engine dropped a little when I pulled the stud. (It is hard to figure how that happens when the mount is still attached with two other bolts, but....) At that point, supporting the engine seemed to be the prudent approach.

_________________
Image


1998 3.8 Dodge Caravan 214K
2000 3.3 Dodge Caravan 175K
1949 Plymouth Special Deluxe 4-dr sedan 25K (needs some work!)


Top
 Profile  
 
PostPosted: Wed Jun 25, 2008 11:34 pm 
Offline
Posts like an L27
Posts like an L27

Joined: Thu May 22, 2008 1:29 pm
Posts: 658
Location: Burnsville, MN
Year and Trim: 1999 SSE
Nice job Bill. The engineers at GM never cease to amaze me. All that just to change a belt! :bs:

_________________
1999 SSE. 112k, Cleared Corners, Mobile 1, Energy Suspension endlinks. Ported and Polished LIM, NGK TR-55 Sparkplugs, 180 drilled Intense stat, Flow matched injectors, Intense FWI, Intense PCM, MagnaFlow Cat.


Top
 Profile  
 
PostPosted: Thu Jun 26, 2008 1:52 am 
Offline
SLE Member
SLE Member

Joined: Thu May 22, 2008 1:36 pm
Posts: 45
Location: Pleasant Bend, Ohio
Year and Trim: 95 SSE
I did my '95 with no jack in about 20 minutes...No bloodshed at all...:)
Try it without the jack first...You can always jack it later...so to speak... 8-[
Great explanation and pics of the spacer!!

_________________
95 Bonneville SSE, Black w/Graphite Leather, 180 drilled Thermostat, All Superwhite bulbs, Gatorback belt, ADTR Air Intake, Belkamp Upper Intake Manifold from NAPA, 17" Aztek Wheels, 235/55-17 tires, 206k miles, Debadged, 38% Tint, GTS Headlight covers, 12" MTX Blue Thunder subs , JVC CD, MB Quartz 5.25's, MA 6x9's NAPA Fuel Pump, 3rd Water Pump, 2nd starter, New Airmix acutator!!!
79 Camaro Z28
96 Impala SS
87 Bonneville LE


Top
 Profile  
 
PostPosted: Thu Jun 26, 2008 9:38 am 
Offline
Posts like an L27
Posts like an L27

Joined: Thu May 22, 2008 1:29 pm
Posts: 658
Location: Burnsville, MN
Year and Trim: 1999 SSE
For you guys that did this in 15 and 20 minutes without the jack, did you just work at it from under the front of the car by reaching in, or did you work from the top, under the hood, reaching down? Maybe jacking the car up puts some torque/stress on that area that makes the spacer harder to get in or out.

_________________
1999 SSE. 112k, Cleared Corners, Mobile 1, Energy Suspension endlinks. Ported and Polished LIM, NGK TR-55 Sparkplugs, 180 drilled Intense stat, Flow matched injectors, Intense FWI, Intense PCM, MagnaFlow Cat.


Top
 Profile  
 
PostPosted: Thu Jun 26, 2008 10:38 am 
Offline
Retired Gearhead
Retired Gearhead
User avatar

Joined: Mon May 19, 2008 12:35 pm
Posts: 3989
Location: Ames, Iowa
Year and Trim: 98 Caravan is the daily driver 215K
Barry wrote:
... Maybe jacking the car up puts some torque/stress on that area that makes the spacer harder to get in or out.
I believe that is right, Barry. When I pulled my lower bolt, the engine dropped relative to the mount. That may have caused the space between the bottom mount and the engine to open up a bit. The thing is, I don't know if I could have gotten the bolt back in without raising the engine. What I did was to only raise the engine enough to align the holes for the lower bolt. At that point, there is play on either end of the spacer once you manage to get the spacer where it needs to go. Perhaps if you lift with too much force, that space closes and makes it more difficult to replace the spacer. Maybe the amount the engine drops has to do in part with the condition of the front mount, and possibly even the other mounts. That may explain why some need to jack the motor while others do not.

One thing I can say for sure. It is easier to undo the lower bolt from the side with the wheel off. There is even room for an impact wrench done from that position.

_________________
Image


1998 3.8 Dodge Caravan 214K
2000 3.3 Dodge Caravan 175K
1949 Plymouth Special Deluxe 4-dr sedan 25K (needs some work!)


Top
 Profile  
 
PostPosted: Thu Jun 26, 2008 12:03 pm 
Offline
SLE Member
SLE Member

Joined: Thu May 22, 2008 1:36 pm
Posts: 45
Location: Pleasant Bend, Ohio
Year and Trim: 95 SSE
Barry wrote:
For you guys that did this in 15 and 20 minutes without the jack, did you just work at it from under the front of the car by reaching in, or did you work from the top, under the hood, reaching down? Maybe jacking the car up puts some torque/stress on that area that makes the spacer harder to get in or out.

I did mine completely from the top...I really did not have any problem getting to the bolt/stud.

_________________
95 Bonneville SSE, Black w/Graphite Leather, 180 drilled Thermostat, All Superwhite bulbs, Gatorback belt, ADTR Air Intake, Belkamp Upper Intake Manifold from NAPA, 17" Aztek Wheels, 235/55-17 tires, 206k miles, Debadged, 38% Tint, GTS Headlight covers, 12" MTX Blue Thunder subs , JVC CD, MB Quartz 5.25's, MA 6x9's NAPA Fuel Pump, 3rd Water Pump, 2nd starter, New Airmix acutator!!!
79 Camaro Z28
96 Impala SS
87 Bonneville LE


Top
 Profile  
 
PostPosted: Thu Jun 26, 2008 4:55 pm 
Offline
Posts like an L27
Posts like an L27

Joined: Thu May 22, 2008 1:29 pm
Posts: 658
Location: Burnsville, MN
Year and Trim: 1999 SSE
Great topic for most everbody. Don't the SC cars have the same issue?

_________________
1999 SSE. 112k, Cleared Corners, Mobile 1, Energy Suspension endlinks. Ported and Polished LIM, NGK TR-55 Sparkplugs, 180 drilled Intense stat, Flow matched injectors, Intense FWI, Intense PCM, MagnaFlow Cat.


Top
 Profile  
 
PostPosted: Thu Jun 26, 2008 9:53 pm 
Offline
Retired Gearhead
Retired Gearhead
User avatar

Joined: Mon May 19, 2008 12:35 pm
Posts: 3989
Location: Ames, Iowa
Year and Trim: 98 Caravan is the daily driver 215K
Barry wrote:
Great topic for most everbody. Don't the SC cars have the same issue?
Yeah, supercharged cars from 96-99 and NA from 95-99 have the same design on the main accessory belt. Supercharged cars add a separate system (outside this one, iirc) for the blower.

_________________
Image


1998 3.8 Dodge Caravan 214K
2000 3.3 Dodge Caravan 175K
1949 Plymouth Special Deluxe 4-dr sedan 25K (needs some work!)


Top
 Profile  
 
PostPosted: Fri Jun 27, 2008 1:12 am 
Offline
Posts like an L36
Posts like an L36
User avatar

Joined: Wed May 21, 2008 8:37 pm
Posts: 893
Location: Chambersburg, PA
Year and Trim: 1997 Pontiac Bonneville SE (H4U)
I use simple green and a wire brush to scrape the rust off the rotor/wheel mating surface. It works VERY well. Then just spray it down with a bit of water, and I typically just rub a very thin layer of bearing grease on that mating surface. Works very well, no more rust and the wheel never sticks.

_________________
- Josh

Image
1994 Bonneville SSEi - 136k mi - FWI, 180* T-stat, Fresh upper gaskets
1997 Bonneville SE - 110k mi - H4U, 3.06:1, Tinted Tails, Bridgestone Potenza G009 225/60/16s
Performance: INTENSE PCM, INTENSE 180* T-stat, Gutted air box, K&N air filter, Ported LIM, Borg Warner Wires, NGK TR-55 Plugs, Adjustable Trans Modulator.
Bells and Whistles: Flowmaster 80 crossflow muffler w/ quad tips, 2x Kicker CVR12 Subs in vented box, 1000W RMS 1-ohm American Bass Amp, Alpine MRP-F200 4-channel amp (temporary), Infinity 60.7CS 6.5" Component System (front), Blaupunkt 3-way 6x9s (rear), Pioneer DEH-P6900UB Head Unit, Hardwired Whistler Pro 58 Radar Detector, Hardwired Navigon 2100 GPS


Top
 Profile  
 
PostPosted: Sun Jul 06, 2008 6:54 am 
Offline
Retired Gearhead
Retired Gearhead
User avatar

Joined: Mon May 19, 2008 12:35 pm
Posts: 3989
Location: Ames, Iowa
Year and Trim: 98 Caravan is the daily driver 215K
I changed the belt on a 97 SE yesterday, and tried out a couple of the suggestions offered by our members. Trying to remove the lower stud and spacer from the top of the car seemed pretty awkward, so I went after it from below as before. But, this time, I did not support the engine with a jack. I did not have a problem replacing the spacer and aligning the bolts at all. Got the belt changed in less than 15 minutes.

I have edited the article in Techinfo accordingly.

_________________
Image


1998 3.8 Dodge Caravan 214K
2000 3.3 Dodge Caravan 175K
1949 Plymouth Special Deluxe 4-dr sedan 25K (needs some work!)


Top
 Profile  
 
PostPosted: Sun Jul 06, 2008 10:46 am 
Offline
Posts like an L27
Posts like an L27

Joined: Thu May 22, 2008 1:29 pm
Posts: 658
Location: Burnsville, MN
Year and Trim: 1999 SSE
That' encouraging. Did you have to jack the car up, or could you just reach in?

_________________
1999 SSE. 112k, Cleared Corners, Mobile 1, Energy Suspension endlinks. Ported and Polished LIM, NGK TR-55 Sparkplugs, 180 drilled Intense stat, Flow matched injectors, Intense FWI, Intense PCM, MagnaFlow Cat.


Top
 Profile  
 
PostPosted: Sun Jul 06, 2008 11:16 am 
Offline
SSE Member
SSE Member
User avatar

Joined: Sat Jul 05, 2008 7:10 pm
Posts: 105
Location: Valley Forge, PA
Year and Trim: (Still have 3) 1995 SE - 1996 SSE - 1998 SSEI
Great write up. Almost childproof.

The drive belt should be part of the best practices initial tune-up (like the plugs,wires, O2 sensor, T-stat, gutted airbox etc). I cured 2 noisy steering pumps with new gator belts and one tensioner replacement. When you are just starting out, the drive belt replacement is a little spooky without explicit instructions, like these.

I'll still support the engine. Call it superstitious behavior. I would want to know if the straddling mounts are weak. But this way might not be the best way to find out. :wink:

Great article. Thanks for the write-up.

charlie

_________________
Image


Top
 Profile  
 
Display posts from previous:  Sort by  
Post new topic Reply to topic  [ 21 posts ]  Go to page 1, 2  Next

All times are UTC - 5 hours [ DST ]


Related topics
 Topics   Author   Replies   Views   Last post 
There are no new unread posts for this topic. 
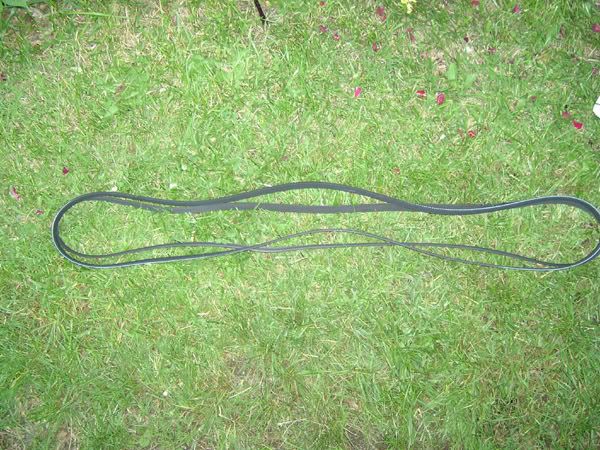
Change accessory serpentine belt on Supercharged engine L67

blye

1

2293

Thu Mar 28, 2013 11:14 pm

Focke-Wulf190 View the latest post

There are no new unread posts for this topic. Serpentine belt

wpbrink

4

1484

Sun Feb 28, 2016 8:29 pm

MKMike View the latest post

There are no new unread posts for this topic. Serpentine belt without A/C

Krenzy

1

1536

Sat May 26, 2012 7:16 pm

00Beast View the latest post

There are no new unread posts for this topic. Replacing Serpentine Belt...

Strongbad

5

1562

Sun Jun 20, 2010 9:16 pm

94SilverSSEi View the latest post

There are no new unread posts for this topic. questions about serpentine belt

nickdalzell1

12

2366

Tue Sep 10, 2013 11:37 pm

nickdalzell1 View the latest post


Who is online

Users browsing this forum: No registered users and 10 guests


You cannot post new topics in this forum
You cannot reply to topics in this forum
You cannot edit your posts in this forum
You cannot delete your posts in this forum
You cannot post attachments in this forum
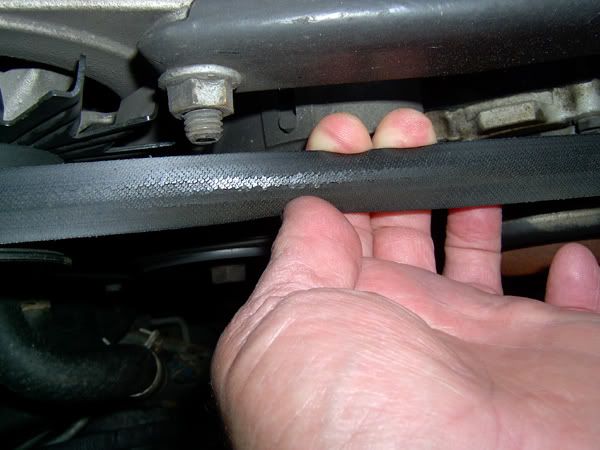
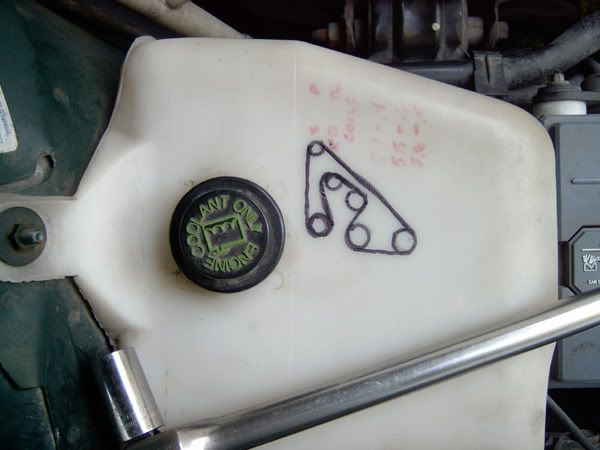
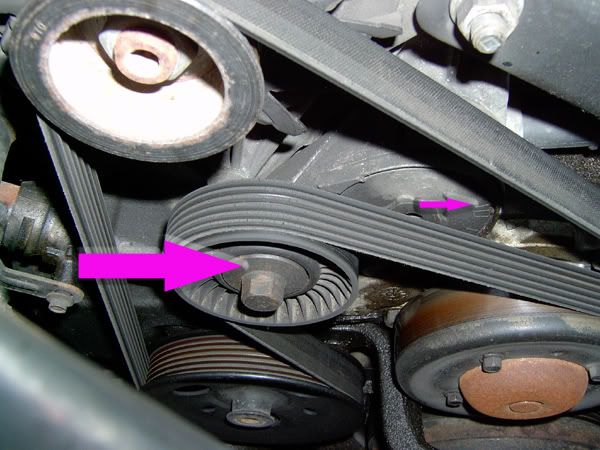
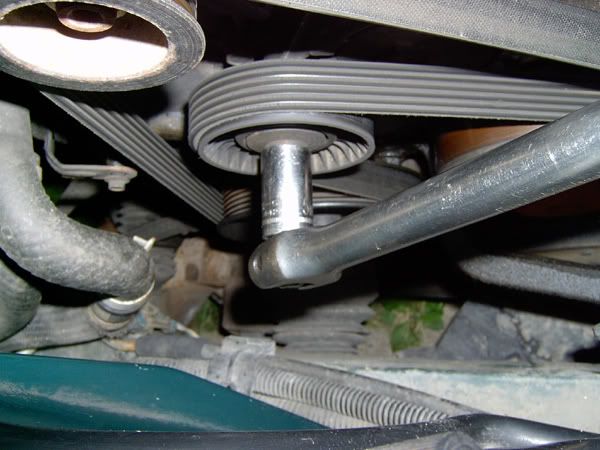
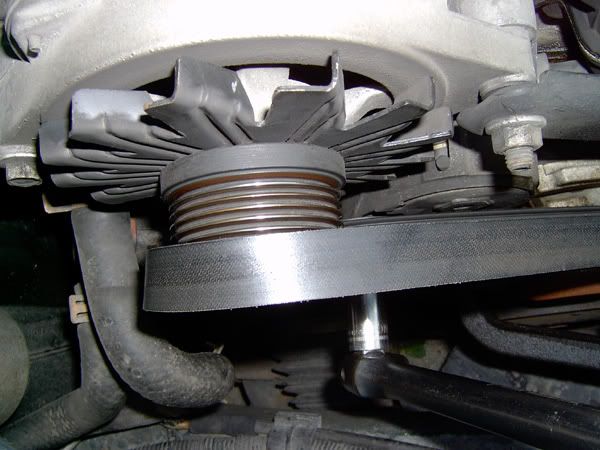
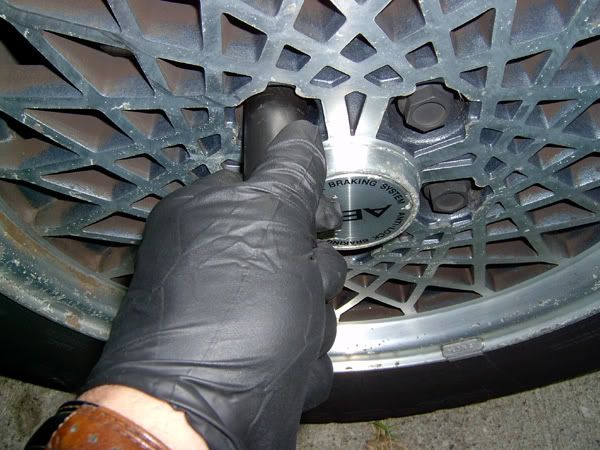
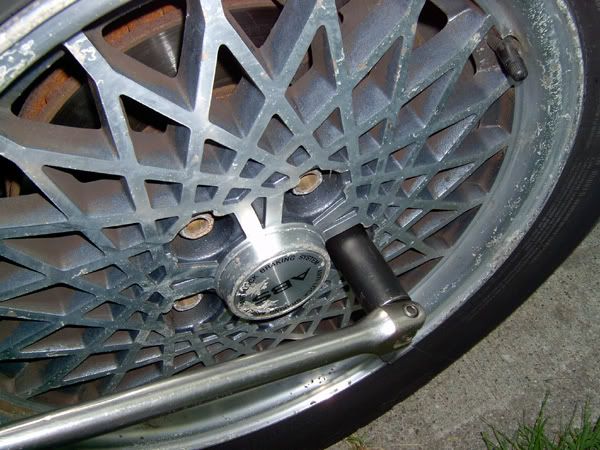
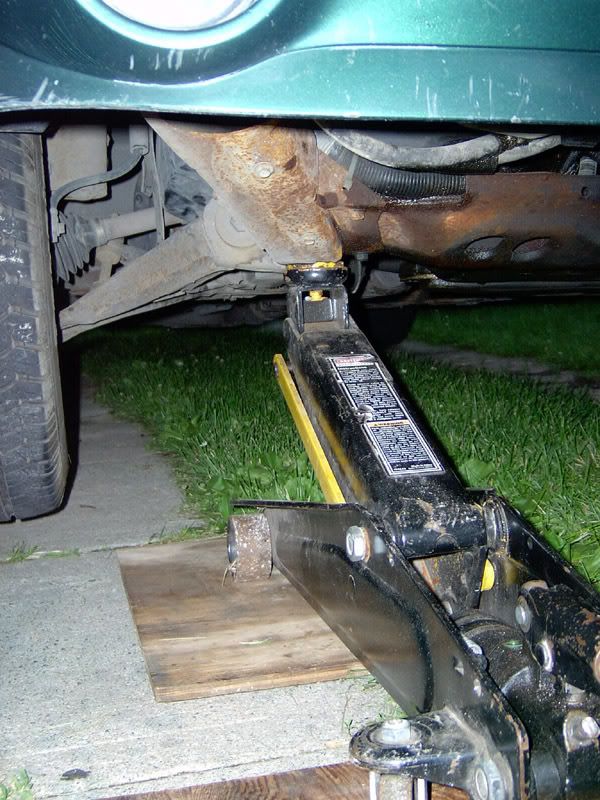
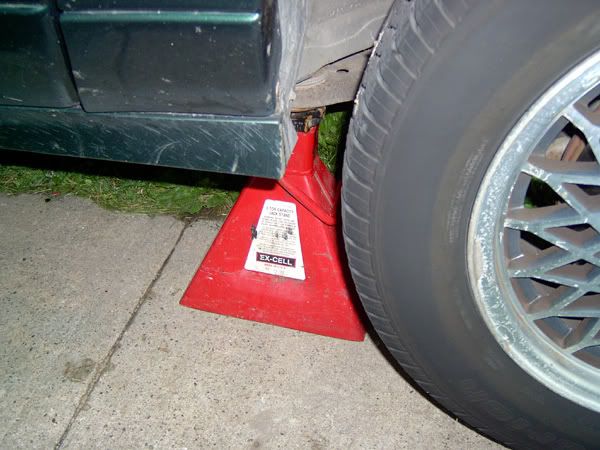
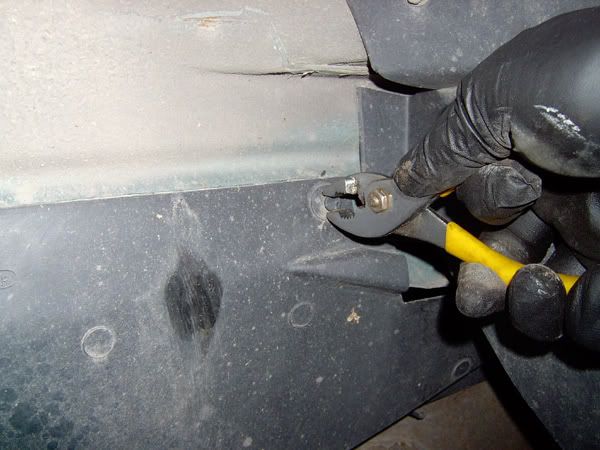
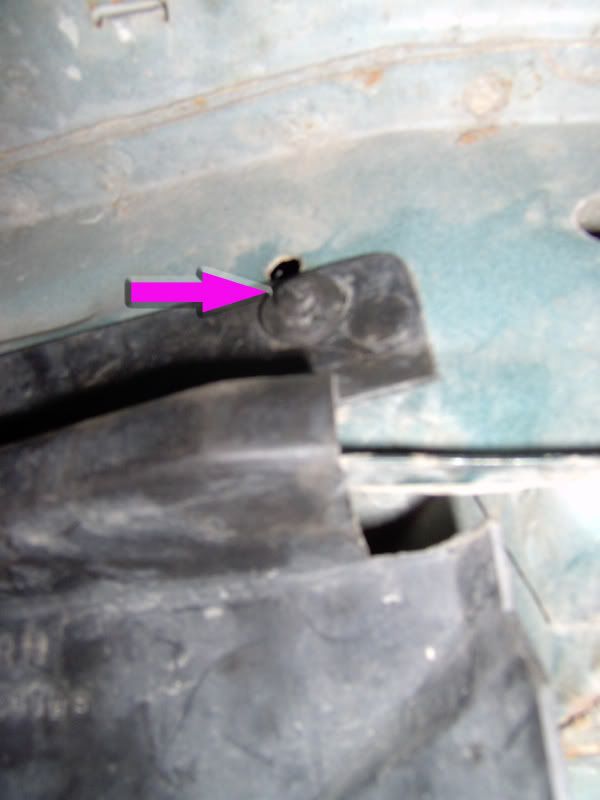
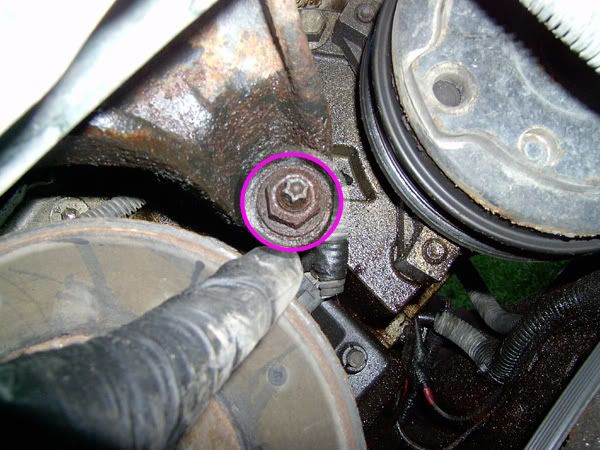
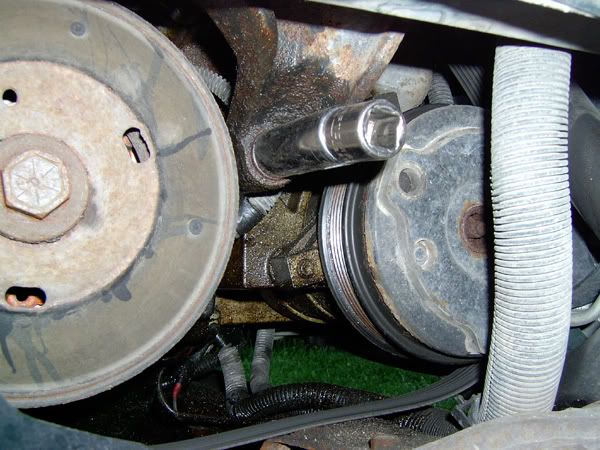
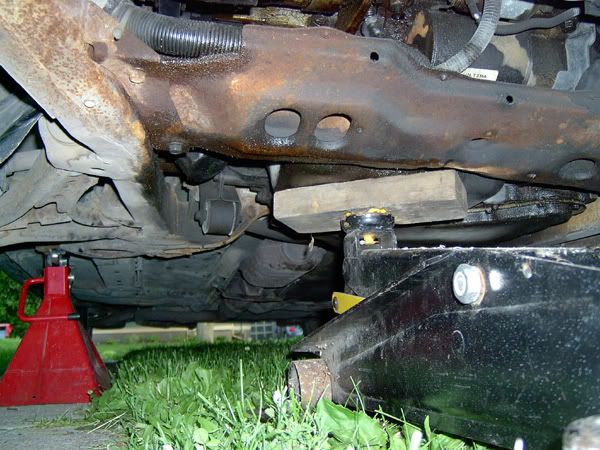
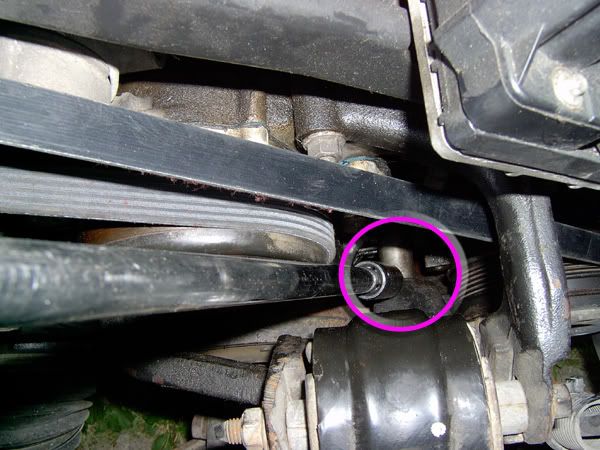
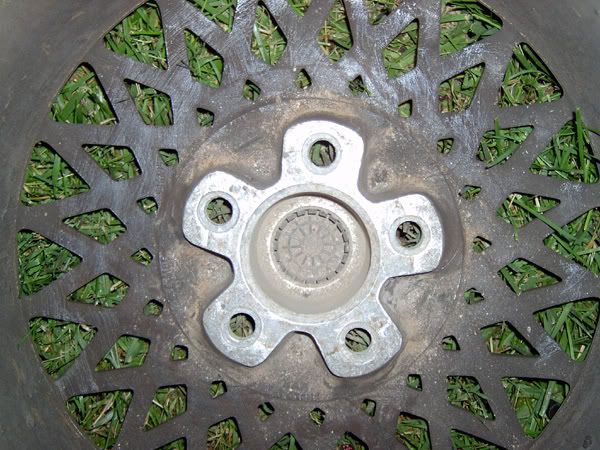
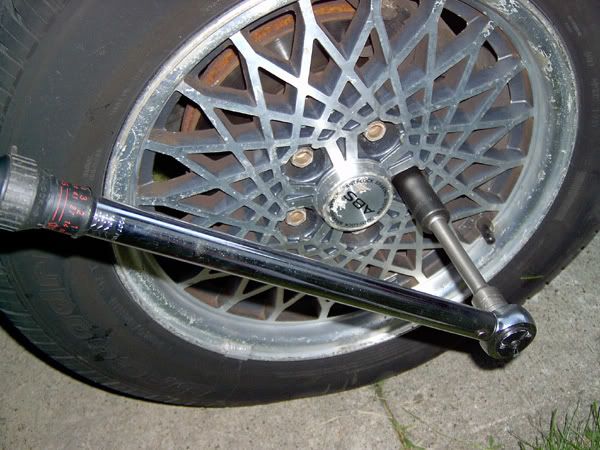
Search for:
Jump to:  
Powered by phpBB® Forum Software © phpBB Group


phpBB SEO